Project Explorer
Introduction
Section titled “Introduction”What is the Project Explorer?
Section titled “What is the Project Explorer?”The Project Explorer is the screen at the route /explorer. It is where you look inside your test project. On the left it shows a file tree — a collapsible, indented list of every folder and file Testver scanned in your project. On the right it shows a file viewer that opens whatever file you click and displays it in the most useful way for that file’s type.
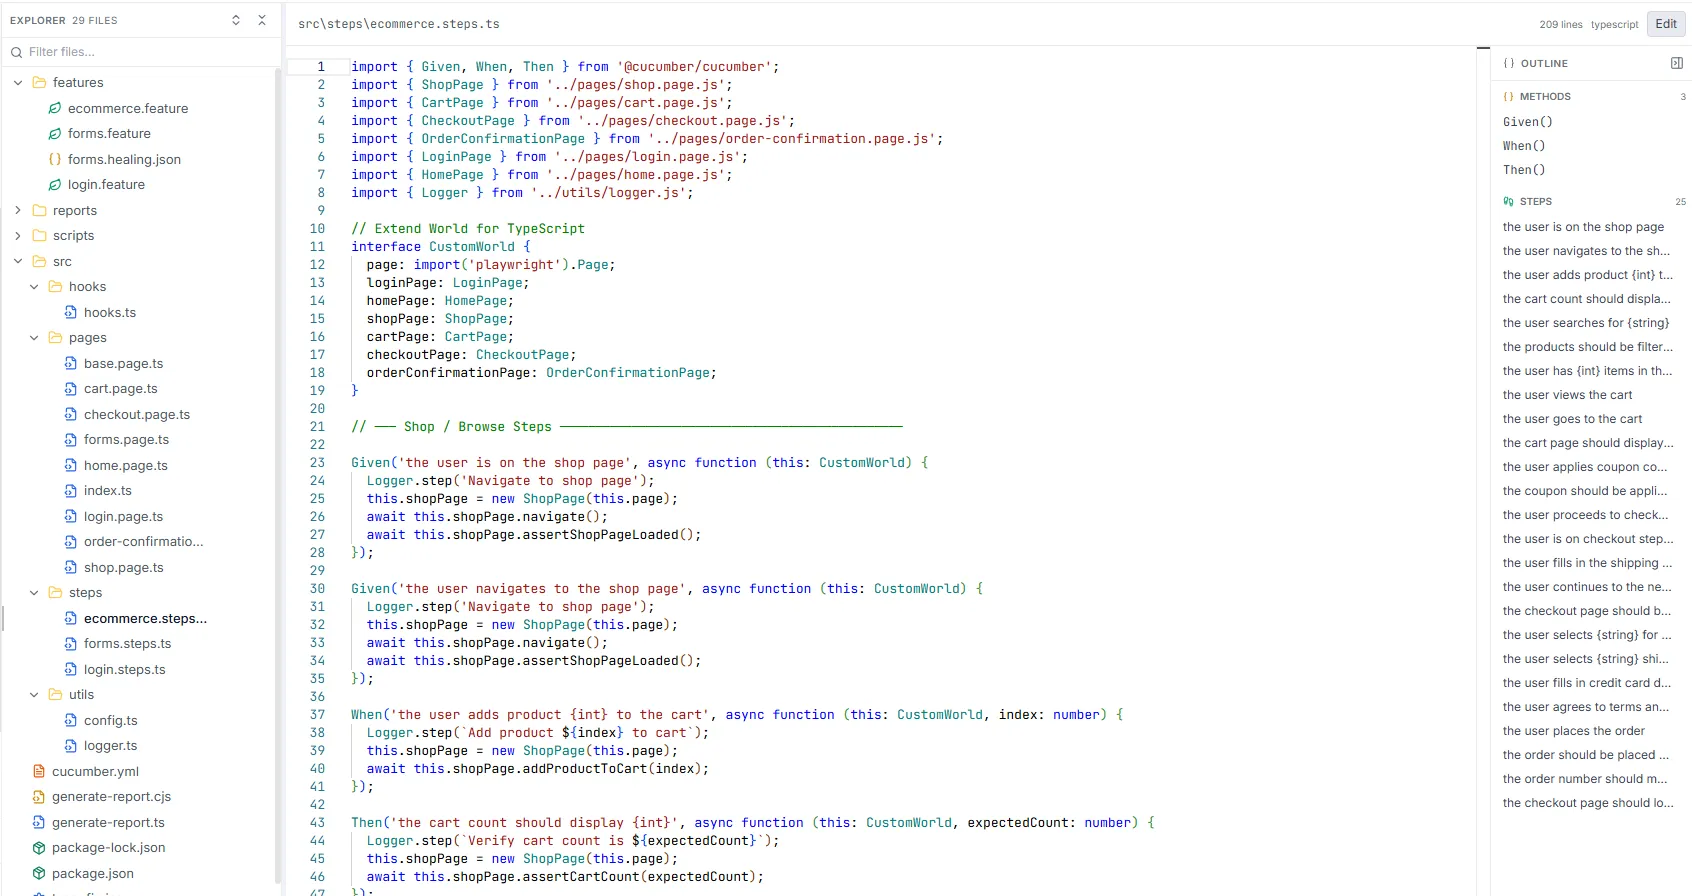
The screen is split into two side-by-side panels. The dividing line between them can be dragged left or right, so you can give more room to the tree when you are hunting for a deeply-nested file, or more room to the viewer when you are reading a long test.
Think of it like the file browser built into a code editor such as VS Code: a navigable tree on one side, the open document on the other. The difference is that Testver’s viewer is test-aware — it recognizes feature files, Robot files, data tables, API definitions, and step definitions, and presents each in a purpose-built view instead of plain text.
Who this guide is for
Section titled “Who this guide is for”- Test authors who want to read or tweak
.feature,.robot, or step-definition files without leaving Testver. - QA engineers reviewing what tests exist and how the project is laid out.
- Developers who need to inspect data files, API definitions, configuration, or source code that the tests depend on.
- Team leads who want to see the git history of a specific file or check what has changed but not yet been committed.
- Anyone who needs to make a quick edit and save it back to disk without opening a separate editor.
Key terms
Section titled “Key terms”| Term | What it means here |
|---|---|
| File tree | The indented, collapsible list of folders and files in the left panel. Folders can be expanded to reveal their contents. |
| Node | A single entry in the tree — either a folder (directory) or a file. |
| Expand / Collapse | Open a folder to show its children, or close it to hide them. Chevron arrows show the state. |
| Filter | Typing in the search box to narrow the tree down to files whose name (or a parent folder’s name) contains your text. |
| Syntax highlighting | Coloring code keywords, strings, and structure so files are easier to read. |
| Line numbers | The running count down the left edge of the viewer that lets you refer to a specific line. |
| Breadcrumb | A horizontal trail of folder names (Home > folder > subfolder) showing where a file sits, with each part clickable. |
| Specialized view | A purpose-built presentation for a known file type — e.g. a scenario list for Gherkin, a grid for CSV. |
| Edit mode | A state where the viewer becomes a writable editor. Triggered by the Edit button. |
| Diff / Changes | A line-by-line comparison showing what has changed in a file but not yet been committed to git. |
| Commit | A saved snapshot in git’s history. The History panel lists the commits that touched a file. |
| Step definition | Code that implements a Gherkin step. Testver can list these as an outline you can click to jump to. |
| Unsaved changes | Edits you have typed but not yet saved to disk. Testver warns you before you lose them. |
How it works
Section titled “How it works”When you open the screen, Testver requests the file tree for your project and renders it on the left. The tree is cached briefly, so re-opening the screen is instant.
When you click a file, Testver reads that file’s contents and its metadata (language, line count, and any extracted structure such as scenarios, keywords, endpoints, or steps). It then picks the best viewer for the file type and shows it on the right.
When you enter Edit mode and press Save, the new contents are written back to the file on disk. There is no separate “apply” step — saving updates the real file in your project folder.
Getting Started
Section titled “Getting Started”Opening the Project Explorer
Section titled “Opening the Project Explorer”- From anywhere in Testver, navigate to the Explorer entry in the main navigation (route
/explorer). - Wait for the tree to load — you will briefly see a Loading project tree… indicator.
- Once loaded, the left panel lists your top-level folders and files, and the right panel shows a placeholder prompting you to select a file.
- Click any file in the tree to open it in the viewer on the right.
Screen layout
Section titled “Screen layout”| Area | Where | What it contains |
|---|---|---|
| Tree toolbar | Top of the left panel | The Explorer label, a live file count (e.g. “128 files”), and the Expand all / Collapse all buttons. |
| Filter box | Below the tree toolbar | A search icon, a Filter files… text input, and a clear (X) button that appears once you type. |
| File tree | Body of the left panel | The scrollable, indented list of folders and files with color-coded icons. |
| Resize handle | Thin vertical strip between the two panels | Drag left/right to change the tree panel’s width. |
| File toolbar | Top of the right panel | The file path, status badge, line count, language, git buttons, and the Edit / Save / Cancel / Run buttons. |
| Git panel | Just below the file toolbar (when open) | The History or Changes panel for the open file. |
| File viewer | Body of the right panel | The actual file content rendered by the appropriate viewer. |
| Dialogs | Centered overlay | The Unsaved Changes confirmation dialog, when applicable. |
At a glance
Section titled “At a glance”- The left panel width starts at 280 pixels and can be dragged between 200 and 500 pixels.
- Folders always sort before files, and within each group entries are sorted alphabetically.
- Folder icons are amber; file icons are color-coded by type (see the icon table below).
- The right panel shows Select a file to view its contents until you click something.
- Press Ctrl+F (or Cmd+F on Mac) to jump straight to the filter box.
The File Tree
Section titled “The File Tree”The file tree is the heart of the left panel. It mirrors the folder structure of your project, with directories you can open and close and files you can click to view.
Expanding and collapsing folders
Section titled “Expanding and collapsing folders”Each folder shows a chevron on its left edge: a right-pointing chevron (collapsed) or a down-pointing chevron (expanded). Clicking a folder row toggles it open or closed. Open folders also switch their icon from a closed Folder to an open FolderOpen icon.
- Click a folder row to expand it and reveal its contents indented beneath it.
- Click the same folder again to collapse it and hide its contents.
- Hover over a folder to see a small file count badge on the right showing how many files it contains (counted recursively).
- Use Expand all (the double-chevron-apart icon in the tree toolbar) to open every folder in the whole tree at once.
- Use Collapse all (the double-chevron-together icon) to close everything back down to the top level.
Filtering and searching the tree
Section titled “Filtering and searching the tree”The Filter files… box at the top narrows the tree to matching entries as you type. A file matches if its name contains your text; a folder is kept if it matches or if any file inside it matches, so the path to a match stays visible.
- Press Ctrl+F (or Cmd+F) anywhere on the screen to focus the filter box. (If your cursor is inside the code editor, this shortcut is left to the editor’s own find, so it will not steal focus.)
- Type part of a file or folder name. The tree updates instantly to show only matches and their ancestor folders.
- Click the X button that appears at the right of the filter box to clear it and restore the full tree.
- Delete your text manually to achieve the same result.
File icons and colors
Section titled “File icons and colors”Every file gets a color-coded icon based on its name or extension. Special full filenames (like package.json or Dockerfile) are matched first; otherwise the extension decides. Unknown types fall back to a plain gray file icon.
| File type / pattern | Icon | Color |
|---|---|---|
| .ts, .tsx (TypeScript) | Code | Blue |
| .d.ts (type declarations) | Code | Light blue |
| .js, .jsx, .mjs, .cjs (JavaScript) | Code | Yellow |
| .py, .pyw (Python) | Code | Sky blue |
| .java | Coffee cup | Orange |
| .kt (Kotlin) / .scala | Coffee cup | Purple / Red |
| .cs (C#) | Hash | Green |
| .csproj, .sln | Settings gear | Light green |
| .rb (Ruby) | Code | Red |
| .feature (Gherkin/BDD) | Leaf | Emerald |
| .robot (Robot Framework) | Terminal | Teal |
| .json, .jsonc | Braces | Yellow |
| .yaml, .yml | Text | Orange |
| .toml | Text | Gray |
| .html, .htm / .xml | Globe | Orange |
| .css / .scss, .sass / .less | Palette | Blue / Pink / Indigo |
| .md, .mdx (Markdown) | Open book | Gray |
| .txt, .rst | Text | Gray |
| .csv | Database | Green |
| .sql / .db, .sqlite | Database | Blue / Amber |
| Images: .png, .jpg, .jpeg, .gif, .webp, .ico | Image | Pink |
| .svg | Image | Amber |
| .env and .env.* | Lock | Yellow |
| .ini, .conf, .cfg, .properties | Cog | Gray |
| Shell: .sh, .bash, .zsh | Terminal | Green |
| .bat, .cmd / .ps1 | Terminal | Gray / Light blue |
| Archives: .zip, .tar, .gz | Package | Amber |
| Security: .pem, .key, .cert | Shield | Red |
| package.json / package-lock.json | Package | Green / Light green |
| pnpm-lock.yaml / yarn.lock | Package | Amber / Light blue |
| tsconfig.json, vite.config.ts, webpack.config.js | Settings gear | Blue / Purple / Blue |
| .gitignore, .eslintrc.json, .prettierrc | Settings gear | Gray / Purple / Pink |
| Dockerfile, docker-compose.yml | File-type | Blue |
| Makefile / Gemfile | Terminal / Text | Amber / Red |
| requirements.txt, pom.xml, build.gradle | Text / Settings | Sky / Orange / Green |
| Anything else | Plain file | Gray |
Sorting and grouping
Section titled “Sorting and grouping”Within every folder, entries are grouped so that directories come first, then files. Inside each of those groups, entries are sorted alphabetically by name (case-insensitive natural order). This ordering is fixed; there are no sort options to change.
Selecting a file
Section titled “Selecting a file”Click any file row to open it in the viewer on the right. The selected row is highlighted with a tinted background and a thin accent bar down its left edge, and its name is shown in a slightly heavier weight.
- Hovering over a file reveals a small language badge on the right (e.g. “gherkin”, “python”) when the file’s language is known.
- Hovering over any row shows its full path as a tooltip.
- Clicking a folder never opens the viewer — it only expands or collapses that folder.
Resizing the tree panel
Section titled “Resizing the tree panel”A thin vertical resize handle sits between the tree and the viewer. The cursor changes to a horizontal resize arrow when you hover it, and the handle tints toward the brand color while you drag.
- Move your pointer to the thin strip between the two panels until the cursor becomes a left-right resize arrow.
- Press and hold, then drag left to shrink the tree or right to widen it.
- Release to set the new width. The width is clamped between 200 and 500 pixels.
The File / Code Viewer
Section titled “The File / Code Viewer”The right panel renders the file you selected. A toolbar across the top shows the file path and controls; below it is the content area, which adapts to the file’s type.
The file toolbar
Section titled “The file toolbar”The toolbar always shows, from left to right: the full file path (in a monospace font), a status badge while editing, the line count (e.g. “312 lines”), the language (e.g. “python”), then the git and action buttons described below.
Syntax highlighting and line numbers
Section titled “Syntax highlighting and line numbers”For ordinary code and text files, the viewer uses a full code editor (Monaco — the same engine that powers VS Code). This gives you syntax highlighting colored by language, line numbers down the left edge, code folding, and smooth scrolling. In read-only mode the content cannot be changed; in edit mode it becomes fully editable.
Specialized views by file type
Section titled “Specialized views by file type”Testver inspects the file’s language and extracted metadata and chooses the most useful presentation. These specialized views are read-only — the moment you enter edit mode, every file type falls back to the plain code editor so it can be edited, including .feature files.
| File type / condition | How it is shown |
|---|---|
| Gherkin .feature (read-only) | A structured Gherkin view that lays out the feature, its scenarios, and steps in a readable form rather than raw text. |
| Robot .robot (read-only) | A Keyword view that presents the Robot file with its keywords surfaced for easy scanning. |
| Data files — .csv, data .json, .yaml (read-only) | A DataTable view that renders the rows and columns as a grid. |
| Files with API endpoints | An API Endpoint view is shown at the top listing the detected endpoints, with the full code editor beneath it (so you see both the summary and the source). |
| Files with step definitions | The code editor with a unified Outline panel listing each step; clicking a step jumps the editor to the matching line. |
| HTML .html | A dedicated HTML viewer (editable when in edit mode). |
| Everything else | The standard code editor with syntax highlighting and line numbers. |
Jumping to a line
Section titled “Jumping to a line”The viewer can scroll to and briefly highlight a specific line. This happens in three situations:
- Deep links — opening
/explorer?file=...&line=42reveals and highlights line 42 once the editor finishes loading. - Step outline clicks — in a step-definition file, clicking a step in the outline finds the matching implementation line and reveals it. Testver tries an exact match first, then a simplified match, then a fuzzy keyword match.
- The highlight is a temporary colored band on the whole line that fades after about 1.5 seconds, and the editor also scrolls that line to the center and places the cursor there.
Edit, Save, Cancel, and Run buttons
Section titled “Edit, Save, Cancel, and Run buttons”The toolbar buttons change depending on whether you are viewing or editing.
| Button | When it appears | What it does |
|---|---|---|
| Edit | Always, when not already editing | Switches the viewer into edit mode. The current content becomes editable and is remembered as the baseline for change detection. |
| Cancel (X icon) | While editing | Discards all edits and returns to read-only view without saving. |
| Save (disk icon) | While editing | Writes the edited content to the file on disk, shows a “File saved” toast, and exits edit mode. Shows “Saving…” and is disabled while the save is in progress. |
| Run (play icon) | Only for files whose type is a test, and only when a run handler is wired up | Starts a test run for this file. |
| History | When git is available for the project | Toggles the git History panel for this file (see 4.6). |
| Changes | When git is available AND this file has uncommitted changes | Toggles the git Changes (diff) panel for this file (see 4.6). |
EDITING and MODIFIED badges
Section titled “EDITING and MODIFIED badges”While you are in edit mode, a small badge appears next to the file path:
- EDITING — you are in edit mode but have not yet changed anything from the original content.
- MODIFIED — you have made at least one real change to the content. This is the trigger for all the unsaved-changes safeguards.
Git History and Changes panels
Section titled “Git History and Changes panels”When the project is under git, two extra buttons can appear in the toolbar, each opening a panel that slides in between the toolbar and the viewer (capped at roughly 40% of the screen height, with its own scrollbar).
History panel
Section titled “History panel”Click History to see the list of commits that have touched the open file. The button highlights in blue while the panel is open. Click it again to close. The panel loads the file’s commit history on demand and shows a loading state while fetching.
Changes panel
Section titled “Changes panel”The Changes button only appears when the open file has uncommitted changes. Click it to see the line-by-line diff of what differs from the last commit. The button highlights in amber while open. Click it again to close. Like History, it loads its data on demand.
The unsaved-changes safety net
Section titled “The unsaved-changes safety net”Once a file is MODIFIED, Testver guards against losing your work in several ways. The exact dialog depends on how you tried to leave.
| Situation | What happens | Your choices |
|---|---|---|
| You click another file in the tree | An Unsaved Changes dialog appears asking what to do before switching. | Discard Changes (switch and lose edits), Save & Switch (save then switch), or close the dialog / click the backdrop to stay on the current file. |
| You navigate away via the sidebar or another route | A route-blocking Unsaved Changes dialog appears warning your changes will be lost. | Discard & Leave, Save & Leave, or close / click the backdrop to stay on the page. |
| You close or reload the browser tab | The browser’s own native “leave site?” prompt appears. | Confirm to leave (losing edits) or cancel to stay — handled by the browser, not Testver. |
| A save fails during Save & Switch / Save & Leave | An error toast is shown and you remain on the current file with edits intact. | Fix the issue and try again, or choose Discard. |
Both Testver dialogs use the same design: an amber warning icon, the heading Unsaved Changes, an explanatory line, and the action buttons. The Save action shows “Saving…” while in progress and is disabled until it completes.
Breadcrumb Navigation
Section titled “Breadcrumb Navigation”Testver includes a breadcrumb component that renders a horizontal trail showing where a file or folder sits in the project: a Home icon at the start, followed by each folder name separated by chevrons, ending in the current item shown in a brighter, heavier style.
- Clicking the Home icon navigates to the project root (an empty path).
- Clicking any folder name in the trail navigates to that folder’s level.
- The final segment (the current item) is emphasized in lighter text and a medium weight.
- Long names are truncated and the whole trail scrolls horizontally if it overflows.
Common Tasks (How Do I…?)
Section titled “Common Tasks (How Do I…?)”| I want to… | Do this |
|---|---|
| Find a file fast | Press Ctrl+F, type part of its name, then click it in the filtered tree. |
| Open every folder at once | Click Expand all (double chevrons apart) in the tree toolbar. |
| Tidy the tree back up | Click Collapse all (double chevrons together). |
| Read a .feature file nicely | Just click it — the Gherkin view renders scenarios and steps automatically. |
| See a data file as a table | Click a .csv, data .json, or .yaml file; the DataTable grid appears. |
| Edit a file | Open it, click Edit, make your changes, then click Save. |
| Throw away edits I just made | Click Cancel (the X in the toolbar). |
| Jump to a step’s implementation | Open the step-definition file and click the step in the Outline panel. |
| See who changed this file and when | Click History (visible when git is available). |
| See exactly what I changed but haven’t committed | Click Changes (visible when the file has uncommitted changes). |
| Run a test file directly | Open it and click Run (shown for test files when running is enabled). |
| Give the tree more room | Drag the resize handle between the panels to the right (up to 500px). |
| Switch files without losing edits | When prompted, choose Save & Switch. |
Tips & Best Practices
Section titled “Tips & Best Practices”- Use the filter instead of scrolling — it is the quickest way to reach a deeply-nested file, and it keeps parent folders visible so you still see context.
- Remember the filter searches names only, not contents; if you need to find text inside files, search within the open file using the editor’s own find.
- Watch the MODIFIED badge — it is your signal that the safety net is armed. If it still says EDITING, you have not actually changed anything yet.
- Before a big edit on a tracked file, open the Changes panel afterward to review your diff before committing elsewhere.
- Use History to understand a file before changing it — recent commits often explain why something is the way it is.
- Specialized views are read-only by design; switch to Edit when you need to change a
.feature, data, or HTML file, and the plain editor will take over. - Drag the panel divider to a comfortable width once and it stays put while you work on the screen.
- Deep links (
?file=...&line=...) are great for sharing an exact spot in a file with a teammate.
Troubleshooting & FAQ
Section titled “Troubleshooting & FAQ”The tree is empty or says “No project files”
Section titled “The tree is empty or says “No project files””Testver found no files to show. Confirm a project is loaded and that it actually contains files. The empty state shows a folder icon with No project files / No files found in this project.
A file won’t open / shows an error
Section titled “A file won’t open / shows an error”If a file fails to load you will see an Error loading file message with the error detail. Try selecting another file and back; if it persists, the file may be unreadable, binary, or too large.
I don’t see the History or Changes buttons
Section titled “I don’t see the History or Changes buttons”History only appears when git is available for the project. Changes appears only when git is available and the open file has uncommitted changes. If a file has no pending changes, the Changes button is correctly hidden.
Ctrl+F isn’t focusing the filter box
Section titled “Ctrl+F isn’t focusing the filter box”If your cursor is inside the code editor, Ctrl+F is intentionally left to the editor’s own find feature. Click somewhere outside the editor (e.g. the tree) first, then press Ctrl+F to reach the file filter.
I clicked a folder but nothing opened on the right
Section titled “I clicked a folder but nothing opened on the right”That is expected — clicking a folder only expands or collapses it. Click a file to open it in the viewer.
My specialized view disappeared when I clicked Edit
Section titled “My specialized view disappeared when I clicked Edit”Also expected. Specialized views (Gherkin, Robot, DataTable) are read-only presentations. Entering edit mode swaps in the plain code editor so the file can be modified; press Cancel or Save to return to the specialized view.
I got an “Unsaved Changes” dialog I didn’t expect
Section titled “I got an “Unsaved Changes” dialog I didn’t expect”It appears whenever the file is MODIFIED and you try to switch files, navigate away, or close the tab. Choose Save to keep your work, Discard to drop it, or stay put. If you truly made no changes, the dialog will not appear — undo back to the original to clear the MODIFIED state.
Does saving change the real file?
Section titled “Does saving change the real file?”Yes. Save writes directly to the file on disk in your project folder. There is no separate apply step and no built-in undo after saving — rely on git (via the History/Changes panels or your own tooling) to recover earlier versions if needed.
Related
Section titled “Related”- Test Explorer — the test-aware view.
- Git — version control operations.
- Output — read run artifacts.