

Dashboard
Introduction
Section titled “Introduction”What is the Dashboard?
Section titled “What is the Dashboard?”The Dashboard is the screen you land on when you open Testver at the root route /. Its job is to answer one question instantly: “How healthy are my tests right now?” It does this without you having to run anything — it reads the tests already written in your project and the history of past runs, then arranges that information into a grid of cards, charts, tables, and lists.
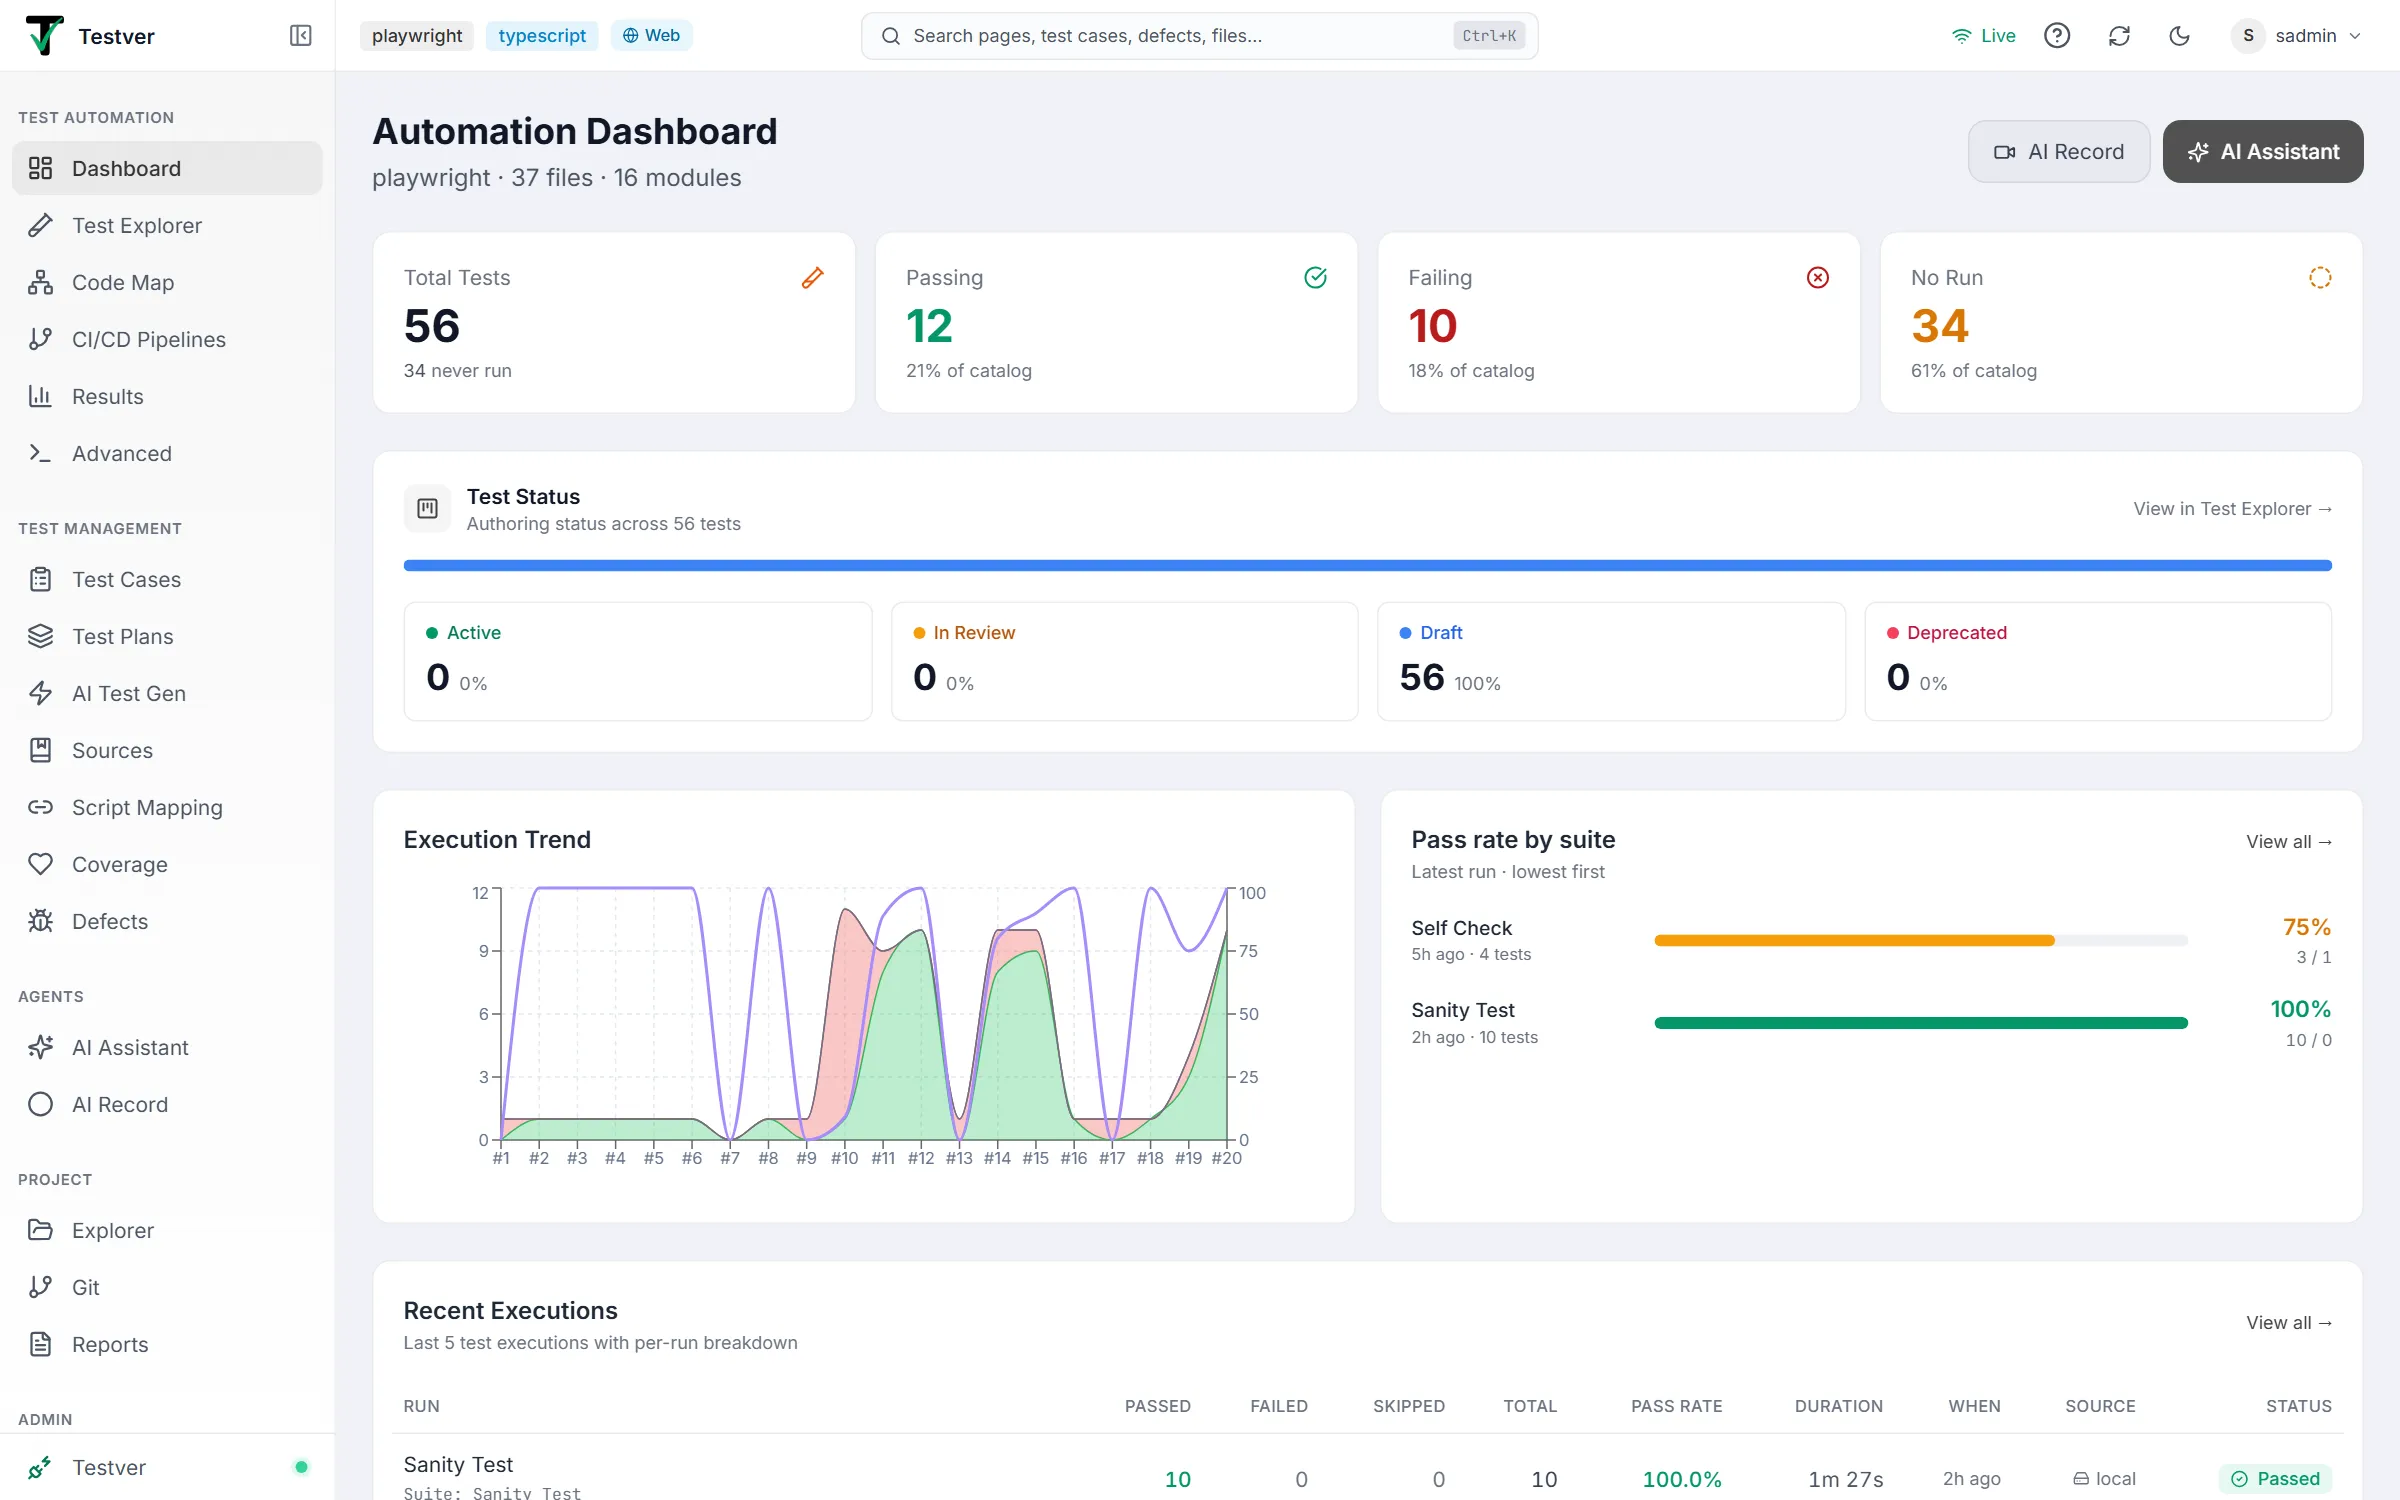
Think of it like the dashboard of a car. You don’t drive the car from the dashboard — the steering wheel and pedals are elsewhere — but a single glance tells you your speed, fuel level, engine temperature, and any warning lights. The Testver Dashboard works the same way: the Health cards are your gauges (how many tests, how many passing/failing), the Execution Trend chart is like a trip history, and Top Failures, Flaky Tests, and Slowest Tests are your warning lights. You take action elsewhere (Advanced → Runner, Test Explorer, AI), but you decide what to do from here.
Almost everything on the Dashboard is a shortcut. Cards and list rows are clickable and navigate you to the deeper screen where you can act — for example, clicking a failure takes you straight to that test in the Test Explorer. The Dashboard itself never changes your project; it only shows and links.
Who this guide is for
Section titled “Who this guide is for”- QA engineers and testers who want a daily health check before triaging or running tests.
- Developers who want to see whether their latest code changes broke any tests.
- Team leads / managers who want a high-level snapshot of pass rates and trends without reading raw logs.
- New Testver users who just opened the app and want to understand what every number, card, and chart on the home screen means.
- Anyone investigating a problem — the Dashboard surfaces the most failing and most unstable (flaky) tests first, so it is a natural starting point for triage.
Key terms
Section titled “Key terms”These terms appear throughout the Dashboard and the rest of this guide. Skim them once and the screen will read much more clearly.
| Term | What it means |
|---|---|
| Test | A single automated check written in your project (one test case). The Dashboard counts these as Total Tests. |
| Catalog | The full set of tests Testver discovered by scanning your project’s source files (the Test Explorer view). The top Health cards are derived from the catalog, not from run history. |
| Run / Execution | One time you executed tests. A run produces a result with passed/failed/skipped counts, a duration, and a status. The Recent Executions table lists these. |
| Pass rate | The percentage of executed tests that passed in a run — passed ÷ total × 100. Shown per-run in Recent Executions and as a trend line in the Execution Trend chart. |
| Passing (last) | A test whose most recent run finished green (status passed). The Passing card counts these across the catalog. |
| Failing (last) | A test whose most recent run finished red (status failed or error). The Failing card counts these. |
| Skipped | A test that was intentionally not executed in a run. Tracked separately and shown as subtext / a grey area in the trend chart. |
| Never run | A test in the catalog that has no recorded run yet (no last status). Counted on the No Run card and shown as subtext on the Total Tests card. |
| Flaky test | A test that sometimes passes and sometimes fails without code changes — i.e. an unreliable test. Measured by a flakiness rate (a percentage). |
| Top failure | A test that has failed repeatedly. Ranked by failure count (how many times it failed) in the Top Failures card. |
| Suite | A named group of tests you build on the Suites tab of the Test Explorer. The Pass rate by suite card ranks these suites by their latest completed run. |
| Script status | The authoring state of a test — Draft, Active, In Review, or Deprecated — set in the Test Explorer. Summarized on the Test Status card. |
| Local | A run executed on your own machine. Marked with a hard-drive icon labelled local in Recent Executions. |
| Cloud | A run executed on a remote cloud provider. Marked with a cloud icon and the provider name in Recent Executions. |
| Framework | The test framework Testver detected for your project (e.g. Playwright, Cypress, WebdriverIO). Shown in the header subtitle and per run. |
| Status | The outcome of a run: Passed, Failed, Running, or Cancelled. |
| Flaky | A test that produces different results on identical code — sometimes passing, sometimes failing. Ranked on the Flaky Tests card. |
Where the numbers come from
Section titled “Where the numbers come from”The Dashboard draws from two distinct sources, and knowing which is which explains why some numbers stay stable while others change after every run.
- Catalog (Test Explorer scan) — The four top Health cards (Total Tests, Passing, Failing, No Run) and the Test Status card come from scanning the actual test scripts in your repository (plus, for Test Status, the per-project script-status store). Passing, Failing and No Run use each test’s most recent result. This is a stable view of your test portfolio. It refreshes automatically about every 30 seconds.
- Run history (results store) — The Execution Trend chart, Recent Executions table, Top Failures, Flaky Tests, and Slowest Tests all come from the history of past executions stored by Testver. These change whenever you run tests.
- Suites — Pass rate by suite reads the suites you built on the Test Explorer’s Suites tab and their latest completed run.
- Live updates — Most widgets poll the server on a timer: the run list every ~10 seconds, the Execution Trend and Top Failures every ~15 seconds, Flaky Tests every ~30 seconds, and the catalog every ~30 seconds. Slowest Tests loads when the page opens. You do not need to refresh the page manually.
- Project header data — The framework name, file count, and module count in the page header come from the current project’s scan info (the same project context shared across the app).
Getting Started
Section titled “Getting Started”Opening the Dashboard
Section titled “Opening the Dashboard”- Launch Testver and open the web UI in your browser.
- Make sure a project is loaded — the Dashboard reads from the currently selected project’s tests and run history.
- Click the first item in the left sidebar (the Dashboard / home link) or navigate to the root route
/. - The page fades in. Within a second or two the cards populate; widgets that depend on run history fill in as their data loads.
The screen layout
Section titled “The screen layout”The Dashboard is a single vertically-scrolling page with generous spacing. From top to bottom it is organized into a header strip, a row of health cards, the Test Status card, a charts row, a full-width runs table, and a final row of three list cards.
| Area | Where | What it shows |
|---|---|---|
| Header & quick actions | Very top, full width | Page title, project subtitle (framework · files · modules), and two action buttons: AI Record and AI Assistant. |
| Health cards | Just below the header | Four equal cards: Total Tests, Passing, Failing, No Run. |
| Test Status | Below the health cards | A distribution bar + per-status counts (Active / In Review / Draft / Deprecated) for the test catalog. |
| Charts row | Below the cards (two columns on wide screens) | Left: Execution Trend composed chart. Right: Pass rate by suite. |
| Recent Executions | Full-width below the charts | A table of the last few executions with per-run pass/fail/skip breakdown, duration, source, and status. |
| Bottom row | Last section (three columns on wide screens) | Top Failures, Flaky Tests, and Slowest Tests side by side. |
At a glance
Section titled “At a glance”- Read the four cards first for the big picture: how many tests you have, how many are currently passing vs failing, and how many have never run.
- Glance at Test Status to see how much of your catalog is Active vs still Draft, In Review, or Deprecated.
- Glance at the Execution Trend chart to see whether pass rate is climbing or sliding over your recent runs.
- Check Pass rate by suite to see which suites are dragging the overall number down.
- Scan Recent Executions to confirm your latest execution and its outcome.
- Use Top Failures and Flaky Tests as your triage queue — they rank the worst offenders first.
- Use Slowest Tests to find what is inflating your suite runtime.
Header & Quick Actions
Section titled “Header & Quick Actions”The header is the strip across the very top of the Dashboard. On the left it identifies the screen and the project; on the right it offers two one-click shortcuts to the AI features.

Title and project subtitle
Section titled “Title and project subtitle”The large heading reads Automation Dashboard. Directly beneath it is a smaller grey subtitle that summarizes the current project, in the form: framework · N files · M modules.
| Subtitle part | Meaning | Fallback |
|---|---|---|
| Framework | The detected test framework for the project (e.g. Playwright). | Shows Auto-detect when no framework is recorded. |
| N files | Total number of files Testver scanned in the project. | Shows the scanned count (0 if none). |
| M modules | Total number of modules (folder groupings) detected. | Shows the detected count (0 if none). |
Quick-action buttons
Section titled “Quick-action buttons”Two buttons sit on the right of the header. They are deliberately not duplicates of the sidebar — they are higher-value shortcuts to the AI tooling.
| Button | Icon | What it does | Navigates to |
|---|---|---|---|
| AI Record | Video camera | Opens AI Record, where you record a flow with AI assistance to capture a new test by demonstrating it. | /ai-record |
| AI Assistant | Sparkles | Opens the AI Assistant (the primary, highlighted action — filled accent colour). | /ai |
Health Cards
Section titled “Health Cards”Directly below the header is a row of four summary cards derived from the catalog (your actual test scripts), not from run history. This gives a stable portrait of your test portfolio. The row shows two cards per row on narrow screens and all four across on wide screens.

What each card shows
Section titled “What each card shows”| Card | Big number | Icon | Subtext |
|---|---|---|---|
| Total Tests | Count of all test cases in the catalog. | Orange test-tube. | Shows “N never run” (and ”, M skipped” if any). If every test has run with none skipped, it reads “All tests have executed.” |
| Passing | Count of tests whose last run passed. | Emerald check-circle (grey if zero). | ”P% of catalog” — passing as a percentage of all tests. Number turns emerald when above zero. |
| Failing | Count of tests whose last run failed or errored. | Red X-circle when failing > 0, otherwise a grey help-circle. | ”P% of catalog” when there are failures; “No failing tests” when none. Number turns red when above zero. |
| No Run | Count of tests that have never run (no last status). | Amber dashed circle (grey if zero). | ”P% of catalog” when some tests have never run; “All tests have run” when none. Number turns amber when above zero. |
How the numbers are computed
Section titled “How the numbers are computed”- Total Tests comes directly from the catalog scan.
- Passing / Failing / Skipped / Never-run are tallied by walking every test in the catalog and bucketing it by its last status. Never-run is the No Run card.
- Percent of catalog (on Passing, Failing and No Run) is that count ÷ Total Tests, rounded to a whole number.
Loading and empty states
Section titled “Loading and empty states”| State | When it appears | What you see |
|---|---|---|
| Loading | While the catalog is being scanned for the first time (no tests counted yet). | All four cards show a long-dash placeholder for the number and the subtext “Scanning project…”. |
| Empty (no tests) | Scan finished but found zero tests. | All four cards show 0 with the subtext “No tests detected”. |
| Populated | Tests were found. | Real counts, coloured icons, and computed subtext as described above. |
Test Status
Section titled “Test Status”Below the health cards is the Test Status card (subtitle “Authoring status across N tests”) — a breakdown of your tests by their authoring status (the same Draft / Active / In Review / Deprecated states you set in the Test Explorer), as opposed to their pass/fail result.

| Element | Meaning |
|---|---|
| Distribution bar | A single segmented bar showing the share of the catalog in each status, ordered Active, In Review, Draft, Deprecated. Hovering a segment shows its count and percentage. |
| Status counts | Four tiles below the bar — one per status — each with a colour dot, the status name, a count, and its percentage of the catalog. |
| View in Test Explorer → | A link (top-right) that opens the full list. Clicking any status tile opens the Test Explorer already filtered to that status. |
Charts
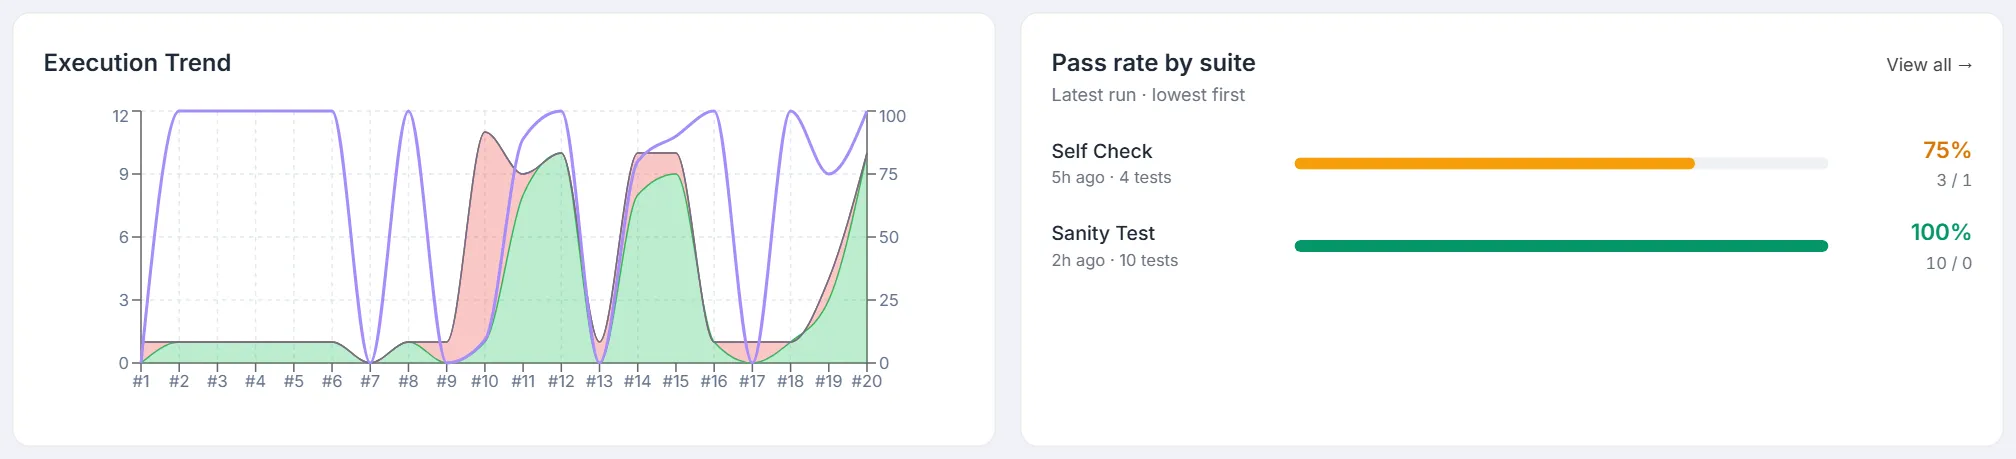
Section titled “Charts”The charts row sits below the health cards and splits into two cards side by side on wide screens (stacked on narrow): the Execution Trend chart on the left and Pass rate by suite on the right.
Execution Trend
Section titled “Execution Trend”Execution Trend plots the outcome of your recent runs (up to the latest 20) as a stacked area chart with an overlaid pass-rate line. It answers “are my runs getting healthier or worse over time?”
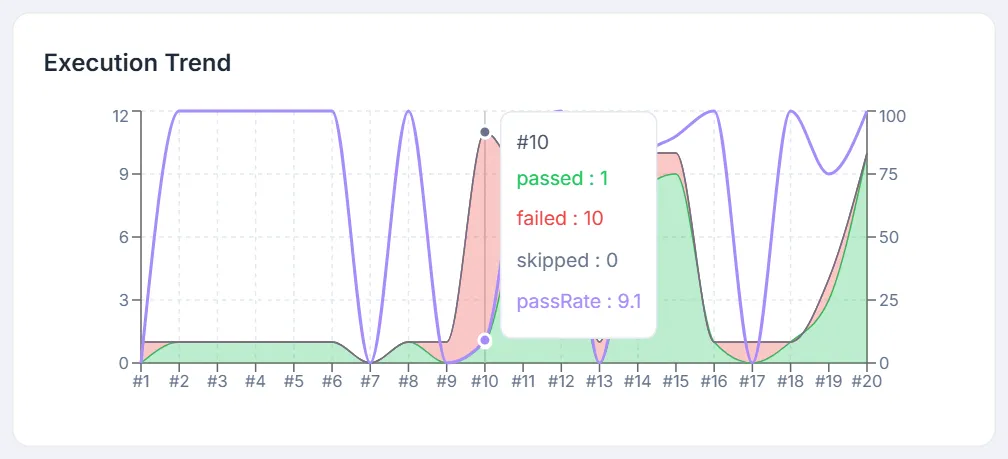
| Element | Axis | Meaning |
|---|---|---|
| Green area | Left Y-axis (count) | Number of passed tests in each run. |
| Red area | Left Y-axis (count) | Number of failed tests in each run (stacked on top of passed). |
| Grey area | Left Y-axis (count) | Number of skipped tests (stacked on top). |
| Purple line | Right Y-axis (0–100%) | Pass rate for each run. |
| X-axis labels | — | Run sequence labels #1, #2, … in chronological order (oldest to newest). |
- Hovering a point shows a tooltip with the passed / failed / skipped counts and pass rate for that run.
- The left axis auto-scales to test counts; the right axis is fixed to 0–100 for the pass-rate line.
- Up to 20 runs are shown.
Pass rate by suite
Section titled “Pass rate by suite”Pass rate by suite sits beside the Execution Trend and breaks the same health question down per suite: which suites are dragging the numbers down? Each row is one of the suites you built on the Test Explorer’s Suites tab, rated by its latest completed run. The subtitle reads Latest run · lowest first: suites that have run are sorted worst pass rate first, never-run suites follow, and up to five rows are shown. A View all → link (top-right) opens the Suites tab.
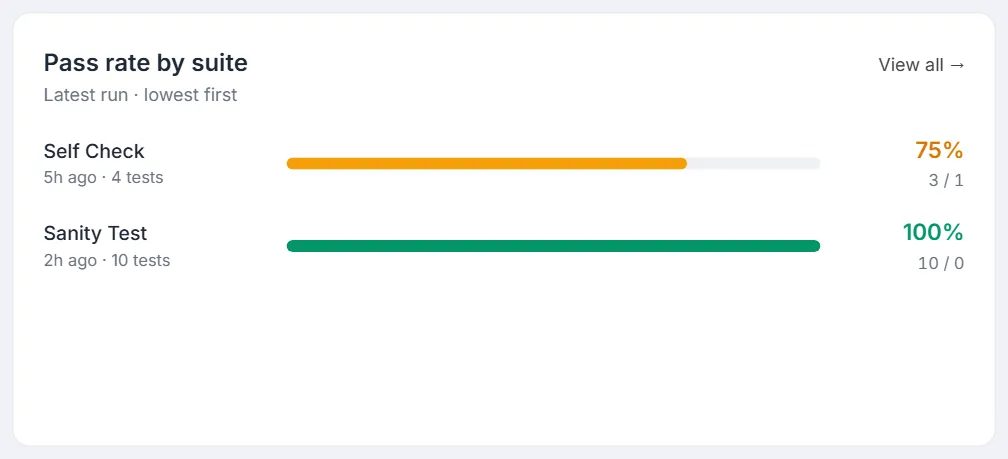
| Element | Meaning |
|---|---|
| Suite name | The suite, shown in readable form. Hover to see the raw name. |
| Sub-line | For a suite that has run: when its latest run finished and how many tests it ran. For one that hasn’t: Never run. |
| Bar & percentage | That suite’s pass rate (passed ÷ total), colour-graded: green at 90% or more, amber at 50% or more, red below 50%. |
| Passed / failed | Under the percentage, the passed and failed counts of that run (for example 3 / 1). A never-run suite shows Not run yet instead. |
Clicking any row opens that suite on the Test Explorer’s Suites tab, so you can go straight from “this suite looks bad” to the tests inside it. If you have no suites yet, the card reads “No suites yet. Create suites in Test Explorer to track their pass rates here.”
Recent Executions
Section titled “Recent Executions”Recent Executions is the full-width table beneath the charts. It lists your latest executions (up to five) with a rich per-run breakdown, so you can see pass/fail counts without opening each run individually. It refreshes about every 10 seconds.
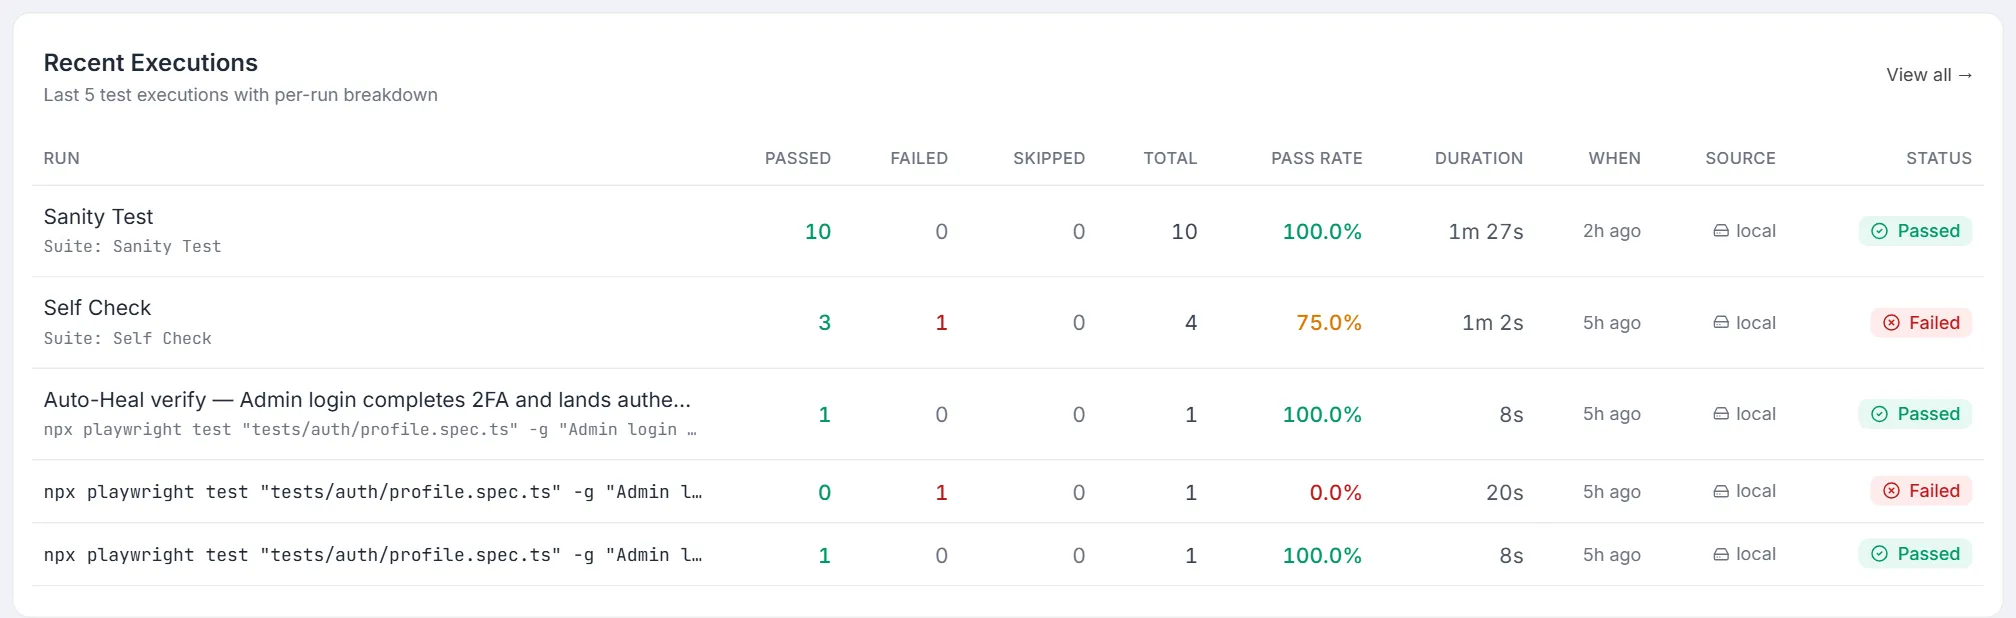
Header and View all
Section titled “Header and View all”- The title is Recent Executions, with the subtext “Last N test executions with per-run breakdown” (N is the number of rows actually shown).
- A View all → link on the right navigates to the full results screen at
/results.
Columns
Section titled “Columns”| Column | Meaning | Notes |
|---|---|---|
| Run | The run’s human-readable label on top, with the underlying command in monospace below it. If there is no label, the command alone is shown. | Always visible. Truncates with the full value on hover. |
| Passed | Number of tests that passed in the run. | Always visible. Green; a long-dash if no summary is available. |
| Failed | Number of tests that failed. | Always visible. Red when greater than zero, grey when zero. |
| Skipped | Number of skipped tests. | Hidden on the smallest screens. |
| Total | Total tests in the run. | Always visible. |
| Pass Rate | Pass percentage for the run, one decimal. | Hidden on smaller screens. Coloured: emerald ≥ 90%, amber ≥ 70%, red below 70%. |
| Duration | How long the run took (e.g. ”45s”, “2m 5s”). | Always visible. Long-dash when unknown. |
| When | Relative age of the run (e.g. “5m ago”, “2h ago”, “3d ago”). | Hidden on the smallest screens. Hover shows the exact start time. |
| Source | Where the run executed: a cloud badge with the provider name, a “local device” marker for a local Appium device, or a hard-drive “local” marker. | Hidden on smaller screens. |
| Status | A coloured pill: Passed, Failed, Running (animated spinner), or Cancelled. | Always visible. |
Clicking a row
Section titled “Clicking a row”Each row is clickable. Clicking anywhere on a run opens that specific run on the results screen, at /results?runId=<that run's id>. Rows highlight on hover and show a pointer cursor to signal they are interactive.
Empty state
Section titled “Empty state”Top Failures
Section titled “Top Failures”Top Failures is the first card in the bottom row. It lists the tests that have failed most often (up to five), ranked by failure count, so the worst offenders are at the top of your triage queue. When more than five tests have failed, a View all → link opens the full list in a dialog.
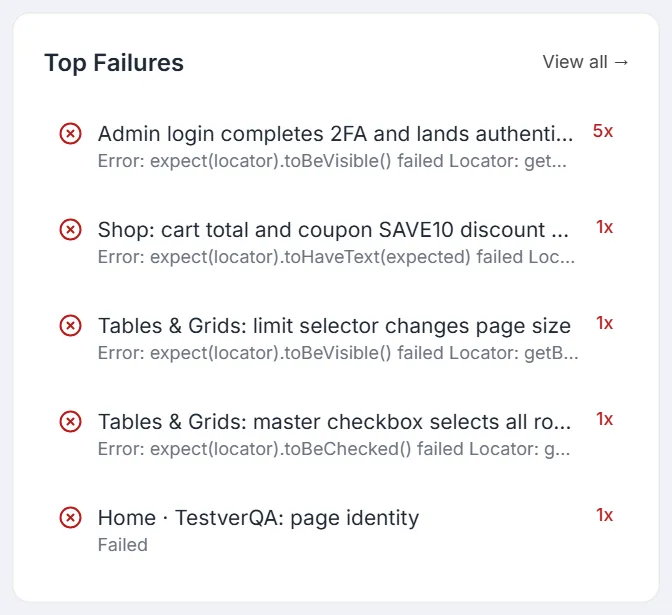
What each row shows
Section titled “What each row shows”| Element | Meaning |
|---|---|
| Red X icon | Marks the row as a failure. |
| Test name (top line) | The name of the failing test. |
| Error line (second line) | The last recorded error message, or “No error details” if none. Truncated; hovering the row shows the full error. |
| Count badge (right) | How many times the test has failed, shown as “Nx” in red (e.g. “7x”). |
Clicking a failure
Section titled “Clicking a failure”Clicking a row deep-links you to that test in the Test Explorer so you can investigate it against the source, at /tests?file=<file>&test=<name>. If the recorded failure has no associated file (older data), it falls back to opening the Test Explorer at /tests without a filter.
Flaky Tests
Section titled “Flaky Tests”Flaky Tests is the middle card in the bottom row. It surfaces tests that pass sometimes and fail other times — the unreliable ones — ranked so you can stabilize them. It shows up to five; when there are more, a View all → link opens the full list in a dialog.
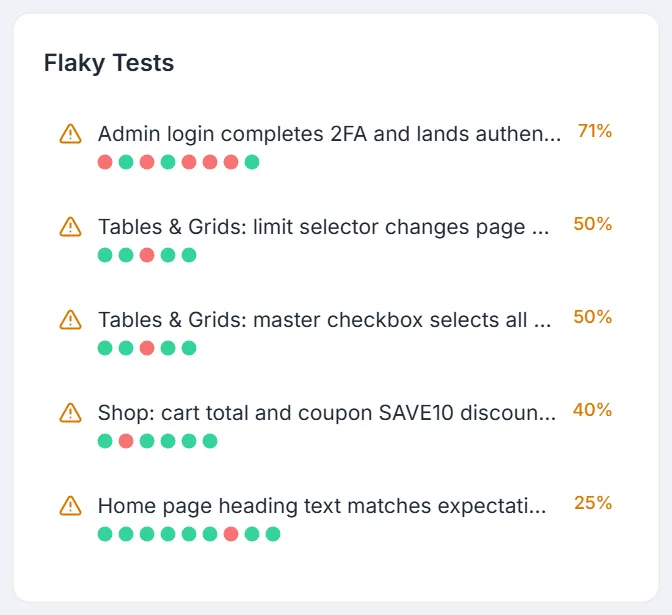
What each row shows
Section titled “What each row shows”| Element | Meaning |
|---|---|
| Amber warning triangle | Marks the row as a flaky test. |
| Test name (top line) | The name of the flaky test. |
| Status dots (second line) | Up to the last ten recent outcomes as small dots: green = passed, red = failed, grey = other/unknown. Reads left to right. Each dot’s status shows on hover. |
| Flakiness badge (right) | The flakiness rate as a percentage in amber (e.g. “40%”) — how unstable the test is. |
Clicking a flaky test
Section titled “Clicking a flaky test”Clicking a row deep-links to that test in the Test Explorer at /tests?file=<file>&test=<name>, landing you on the source file with the specific test selected. When file information is missing (older data), it falls back to /tests without a filter. Hovering a row shows the tooltip “Open <test name> in Results”.
Slowest Tests
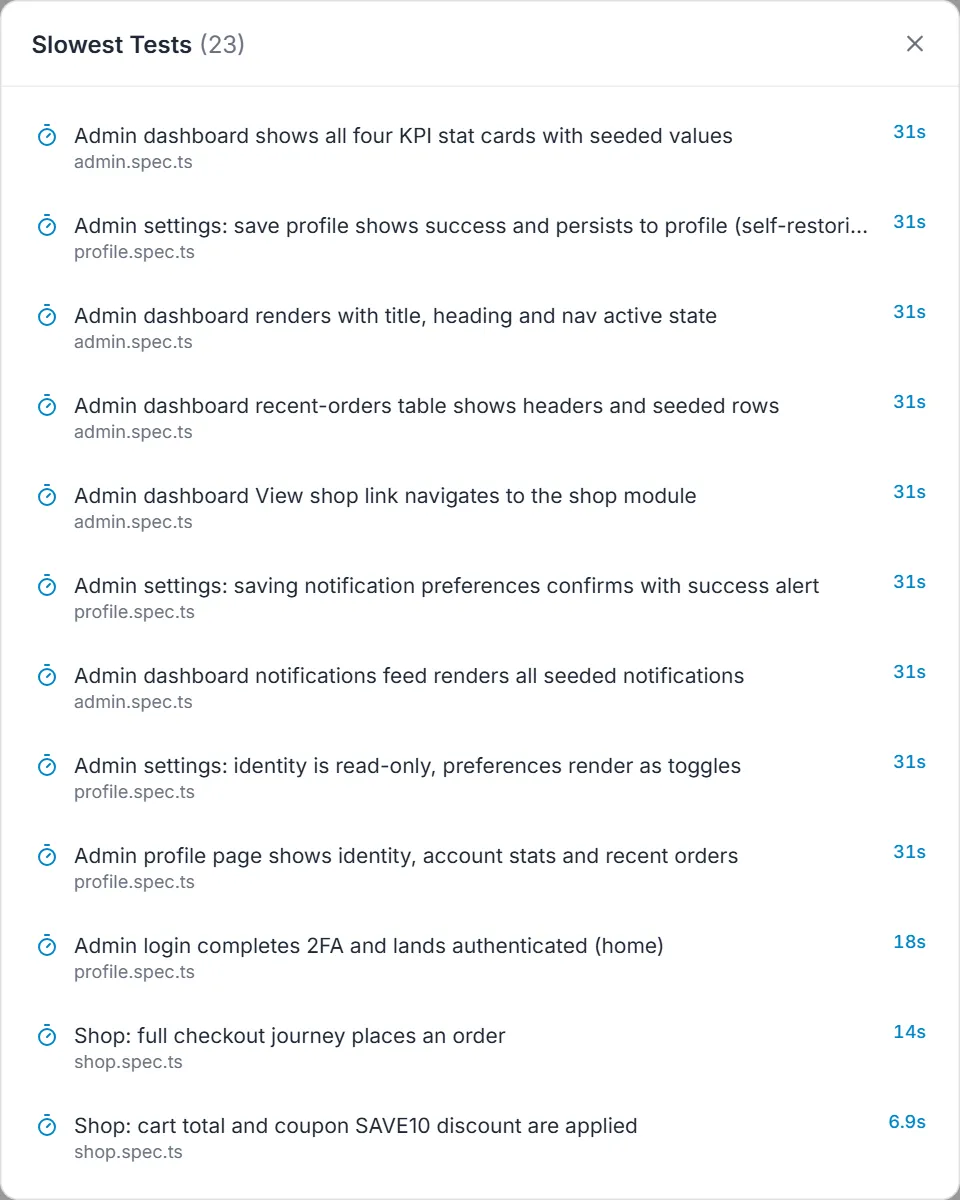
Section titled “Slowest Tests”Slowest Tests is the third card in the bottom row, beside Top Failures and Flaky Tests. It ranks your tests by how long they take, so you can find what’s inflating your suite’s runtime.
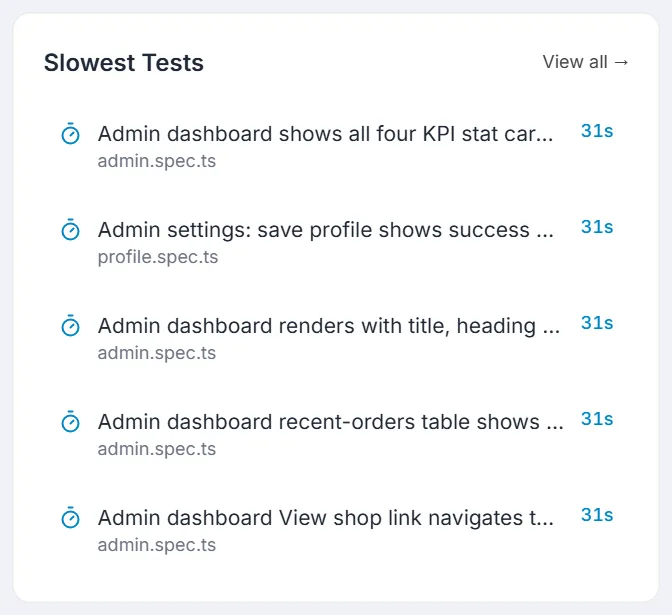
What each row shows
Section titled “What each row shows”| Element | Meaning |
|---|---|
| Timer icon | Marks the row as a duration entry. |
| Test name | The test, shown in readable form (a browseHomeContent method appears as Browse Home Content). |
| Sub-line | The file the test lives in, or its maximum recorded duration when no file is known. |
| Duration | The test’s average duration, in the card’s accent colour. |
Hovering a row shows a tooltip with the full test name, its file, and both the average and maximum duration — useful for spotting a test whose average looks fine but which occasionally runs far longer.
Clicking a row
Section titled “Clicking a row”Clicking a test opens it in the Test Explorer, where you can inspect its source, its run history, and run it on its own.
When more than five tests have timing data, a View all → link opens the full ranked list in a dialog. The empty state reads “No timing data yet. Run tests to see the slowest.”
Common Tasks (How Do I…?)
Section titled “Common Tasks (How Do I…?)”| I want to… | Do this |
|---|---|
| See how many tests I have in total | Read the Total Tests health card at the top. |
| Know how many tests are currently failing | Read the Failing health card (red when above zero). |
| See whether my test health is improving | Watch the purple pass-rate line in the Execution Trend chart trend up or down. |
| Check the outcome of my last run | Look at the top row of the Recent Executions table and its Status pill. |
| Open a specific run’s full details | Click that run’s row in Recent Executions (goes to /results?runId=…). |
| See all my run history, not just five | Click View all → in Recent Executions (goes to /results). |
| Triage the worst failures | Start with Top Failures; click a row to open the test in the Test Explorer (/tests?file=…&test=…). |
| Find unstable tests to stabilize | Use Flaky Tests; the status dots and flakiness % show how erratic each one is. Click to open it in the Explorer. |
| See which suites are failing most | Read the Pass rate by suite card; click a row to open that suite on the Test Explorer’s Suites tab. |
| See how many tests have never run | Read the No Run health card. |
| Find my slowest tests | Read the Slowest Tests card; click a row to open the test. |
| Record a new browser flow with AI | Click AI Record in the header (goes to /ai-record). |
| Ask the AI Assistant for help | Click AI Assistant in the header (goes to /ai). |
| Find out who triggered a run | Open the run from Recent Executions and read its detail on the Results screen. |
Tips & Best Practices
Section titled “Tips & Best Practices”- Use the percent of catalog subtext on the Passing/Failing/No Run cards to gauge scale — “3 failing” feels very different at 3% of catalog versus 30%.
- Remember the health cards are catalog-based and stable, while the lower widgets are history-based and move after every run — a quiet trend chart doesn’t mean your catalog shrank.
- Let the widgets auto-refresh; there’s no need to reload the page. If a number looks stale, wait for the next poll cycle (10–30 seconds depending on the widget).
- Click through rather than copy values — every failure, flaky test, and run row deep-links to the exact screen where you can act.
- Watch the Source column in Recent Executions to confirm whether a run executed locally or in the cloud, which can explain duration differences.
Troubleshooting & FAQ
Section titled “Troubleshooting & FAQ”Why do the health cards show numbers but everything below says “No runs yet”? The cards come from scanning your test catalog, which exists as soon as you have test files. The Execution Trend, Recent Executions, Top Failures, and Flaky Tests come from run history, which is empty until you actually execute tests. Run your tests once and the lower widgets populate.
Why don’t Passing + Failing add up to Total Tests? Because skipped tests and tests that have never run are excluded from both counts. Total Tests includes the whole catalog; Passing and Failing only count tests whose last status was green or red respectively.
The cards are stuck on “Scanning project…”. What’s wrong? The catalog scan hasn’t returned tests yet. On a large repo this can take a moment. If it persists, your project may have no recognizable test files, or the framework wasn’t detected — check the framework shown in the header subtitle.
Recent Executions is missing some columns. Columns like Skipped, Pass Rate, When, and Source are progressively hidden on narrow screens to keep the table readable. Widen your browser window, or scroll the table horizontally, to see them.
A run shows dashes (—) instead of pass/fail counts. That run’s result doesn’t include a detailed summary (it can happen with older runs or certain servers). The row still shows the command, duration, and status; open it via the row click for whatever detail exists.
A run is stuck on “Running” with a spinner. That run is still in progress. The list refreshes about every 10 seconds, so the status updates automatically once the run finishes or is cancelled.
Pass rate by suite shows suites marked “Never run”. That’s accurate, not a bug — those suites exist on the Suites tab but have no completed run. Run them once and the bar appears.
The Dashboard isn’t picking up a run I just finished. The cards and charts read from stored run history. Check the Live / Offline badge in the header — if it reads Offline, the page has lost its connection to the server; reload to re-establish it.
A failure or flaky test opened /tests with no test selected when I clicked it. That entry has no recorded source file (usually older data), so the Dashboard falls back to opening the Test Explorer without a filter. You can locate the test manually from there.
Do the AI Record / AI Assistant buttons start anything? No. They only navigate to /ai-record and /ai respectively; the actual recording or conversation begins on those screens.
Related
Section titled “Related”- Test Explorer — drills into the test catalog.
- Results — full run history.
- Defects — bug tracker.
- Reports — custom dashboards beyond this home view.