

Test Cases
Introduction
Section titled “Introduction”What is the Test Cases screen?
Section titled “What is the Test Cases screen?”The Test Cases screen (Test Management) is where you write and maintain your manual test cases — the human-readable specifications that describe what to test and how to verify it. Each test case carries a title, preconditions, a numbered list of steps (each with an action, an expected result, and optional test data), plus classification fields like priority, type, status, and tags. Test cases live inside a folder tree so you can group them by feature, module, or release.
Think of it as a recipe book for testing. A folder is a chapter (“Checkout”, “Login”, “Reporting”), each test case is a recipe with a name and ingredients (preconditions), and the steps are the numbered instructions where every instruction also tells you what the dish should look like when you get it right (the expected result).
Who this guide is for
Section titled “Who this guide is for”- QA engineers and manual testers who write, edit, and maintain the test case library day to day.
- Test leads / QA managers who organize cases into folders, set priorities, review status, and track automation coverage.
- Automation engineers who pick up a manual case and hand its steps to the AI Assistant to generate a script, or map it to an existing one.
- Anyone onboarding who needs to understand how a test case is structured before running it in a test plan or cycle.
Key terms
Section titled “Key terms”| Term | What it means in Testver |
|---|---|
| Test case | A single manual test: a titled record with preconditions, classification fields, tags, and an ordered list of steps. Each has a unique ID (shown with a # hash icon). |
| Step | One numbered instruction inside a test case. Holds an Action (what to do), an Expected Result (what should happen), and optional Test Data. |
| Expected result | The verification half of a step — the observable outcome that decides whether the step passed. Shown in teal in the detail view. |
| Priority | How important the case is: Critical, High, Medium, or Low. Drives header counts and filtering. |
| Status | Lifecycle of the case definition: Draft, Active, Deprecated, or Archived. |
| Automation status | Whether the case is automated: Manual, Automated, or Needs Update. Feeds the header’s ”% Automated” badge. |
| Review status | Editorial state: Draft, In Review, Approved, or Rejected. |
| Type | Domain category: Web, UI, API, Mobile, Database, Integration, E2E, Security, Performance, Usability, Accessibility, Compatibility, or Localization. |
| Folder / suite | A node in the left-hand tree that groups test cases. Folders can nest; each shows a rolled-up count of the cases inside it (including descendants). |
| Tag | A reusable, colored label you attach to cases for cross-folder grouping and filtering. |
| Manual vs automated | A manual case is executed by a person following the steps; an automated case is linked (via Script Mapping) to code that runs it. The same case record can carry steps and a script mapping. |
How it relates to the rest
Section titled “How it relates to the rest”The Test Cases screen is the hub of Test Management. Each case threads into the surrounding screens, mostly through its detail-view tabs:
| Connects to | Where in the case | What flows across |
|---|---|---|
| Scripts (Script Mapping) | Mapping tab | The linked automated script — path, framework, and sync status, with a View Script (new tab) action that opens the test in the Test Explorer. Mappings are created on the Script Mapping screen. |
| Requirements & sources | Mapping tab + Source filter | The sources a case was generated from (Requirement, Notes/NLP, JIRA, Document); the filter narrows the list to cases tied to a source. |
| Defects | Executions tab | Any defect raised against a run — its ID, title, status, and severity, shown inline with step results. |
| Plans & cycles | Executions tab + row execution dots | How the case performed across plans and cycles: pass rate and step-level outcomes. |
| Coverage & Traceability | Field values | Priority, automation status, and source links feed the Coverage and Traceability Matrix screens. |
Getting Started
Section titled “Getting Started”Opening Test Cases
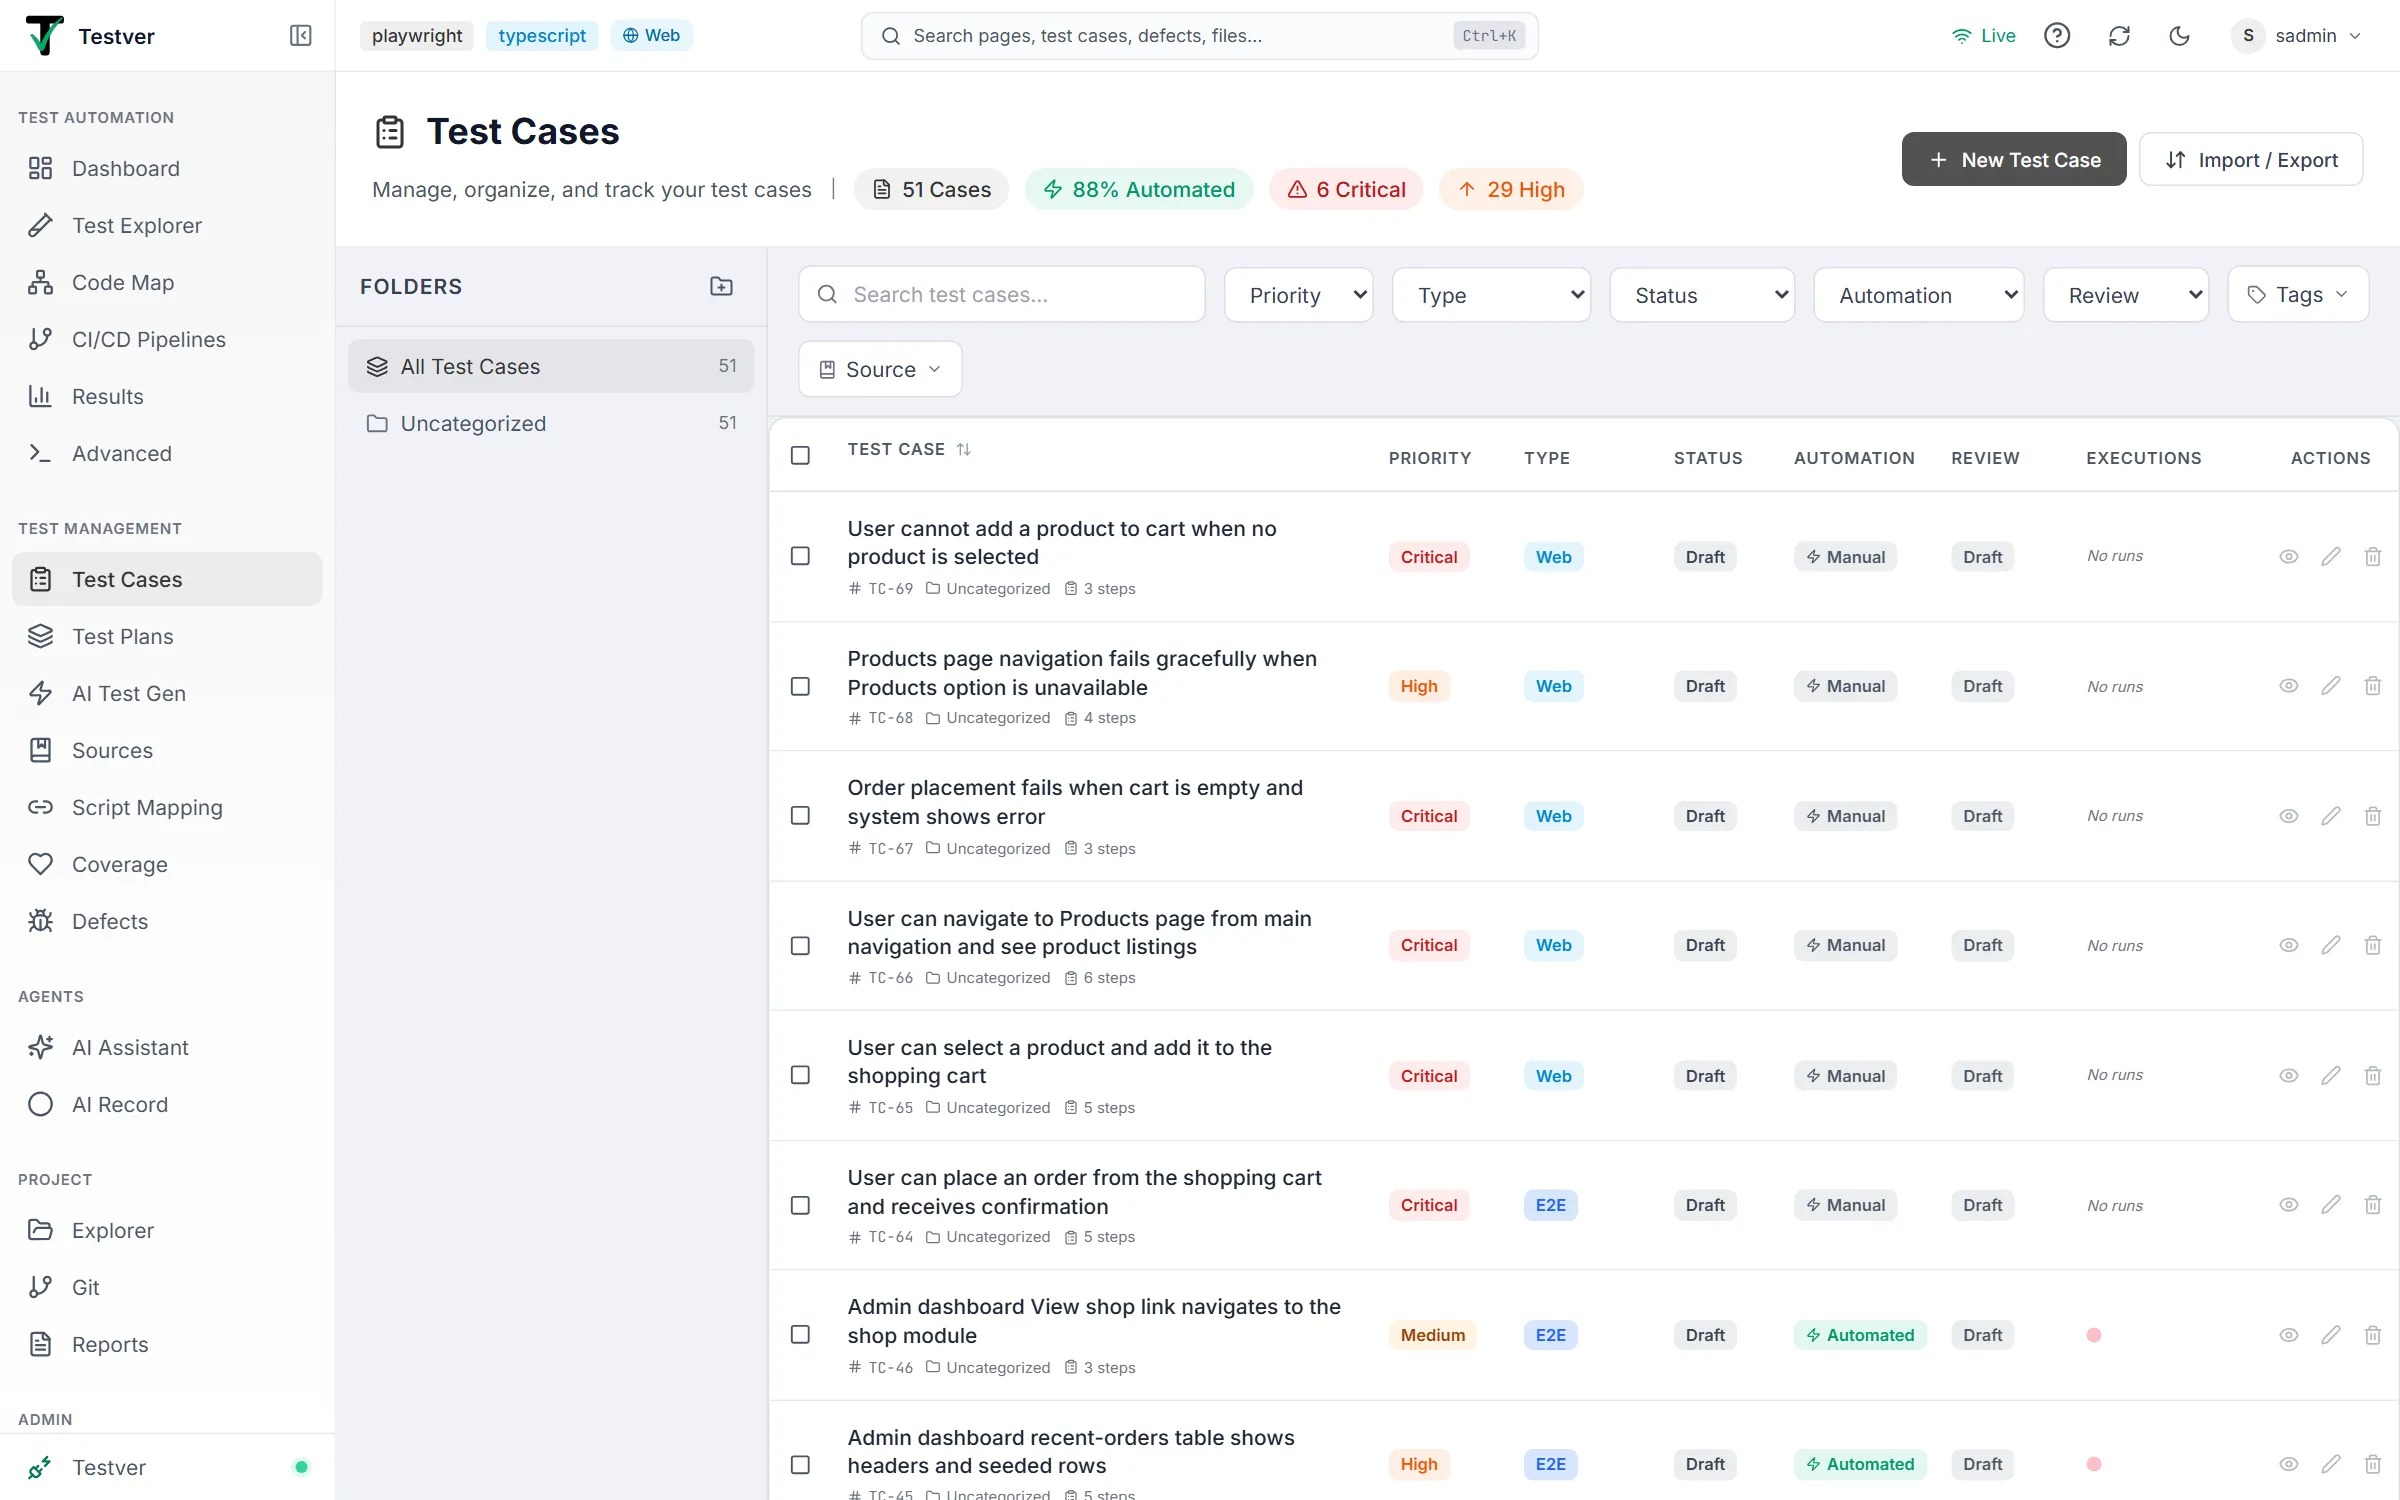
Section titled “Opening Test Cases”- From the left navigation, open Test Management and choose Test Cases (route
/test-cases). - The header shows the title Test Cases, a one-line description, and live summary chips: total Cases, % Automated, and (when present) Critical and High priority counts.
- The screen loads with All Test Cases selected in the left folder panel, so you immediately see the full library.
The screen layout
Section titled “The screen layout”
| Area | Where | What it does |
|---|---|---|
| Header bar | Top | Title, summary chips (Cases, % Automated, Critical, High), the Export button (appears only when rows are selected), the New Test Case button, and the Import / Export button. |
| Folder panel | Left, fixed 288px | Folders tree with All Test Cases at the top and Uncategorized at the bottom. Add-folder (folder-plus) button, per-folder counts, and rename/delete on hover. |
| Filter bar | Right panel, top | Search box plus dropdowns for Priority, Type, Status, Automation, Review, a multi-select Tags filter, a single-select Source filter, and a Clear (n) button. |
| Bulk action bar | Right panel, below filters | Appears when one or more rows are checked: shows the selected count and Move, Tag, Delete, and clear-selection buttons. |
| Test case table | Right panel, main area | The paginated list of cases with columns for Test Case, Priority, Type, Status, Automation, Review, Executions, and Actions. |
| Pagination | Bottom of list | Shown when more than one page exists; “Showing X–Y of N” plus Previous / numbered / Next controls (20 cases per page). |
| Detail slide-over | Right edge overlay | Opens when you view a case; tabs for Steps, Executions, Attachments, Links, History, and Mapping. |
| Create/Edit modal | Center overlay | The full test case editor for creating or editing a case. |
At a glance
Section titled “At a glance”- The Cases chip counts cases in the current filter scope; the folder badges and the All Test Cases badge show global totals.
- % Automated and the Critical / High chips are computed from server-side aggregates over the current filter, so they move with your filters but don’t jitter as you page.
- Each row’s Executions column shows up to the last five colored dots — green (passed), red (failed), amber (blocked), and so on — hover a dot for the plan, cycle, and date.
Organizing: Folders & the Case List
Section titled “Organizing: Folders & the Case List”The Folders panel
Section titled “The Folders panel”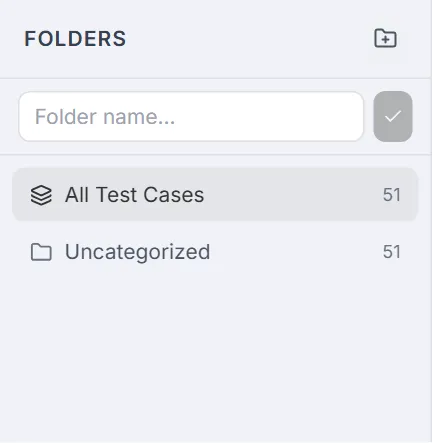
The left Folders panel organizes the whole library. Three kinds of entries appear:
- All Test Cases (top, layers icon) — clears the folder filter and shows everything; its badge is the global total.
- Folder nodes — your created folders, nested by parent. Each shows an open/closed folder icon, its name, and a rolled-up count of cases inside it (including sub-folders).
- Uncategorized (bottom) — cases that belong to no folder; its count is the global total minus everything that lives in folders.
Creating a folder
Section titled “Creating a folder”- Click the folder-plus icon at the top-right of the Folders panel.
- Type a name in the inline Folder name… input.
- Press Enter or click the check button to save. The new folder is created under the currently selected folder as its parent (or at the root if none is selected). Press Escape to cancel.
Renaming & deleting a folder
Section titled “Renaming & deleting a folder”- Hover a folder row to reveal its edit (pencil) and delete (trash) buttons.
- Click edit to turn the name into an inline input; type the new name and press Enter (or blur) to save, Escape to cancel.
- Click delete to open a confirmation dialog. Confirm with Delete Folder.
Selecting a folder to filter
Section titled “Selecting a folder to filter”- Click any folder to filter the list to that folder; the selection is highlighted and pagination resets to page 1.
- Click the chevron to the left of a folder with children to expand or collapse its sub-tree (folders default to expanded).
- There is no drag-to-move in the tree itself — to re-file cases between folders, use the Folder dropdown in the editor or the bulk Move action (see section 5).
The case list table
Section titled “The case list table”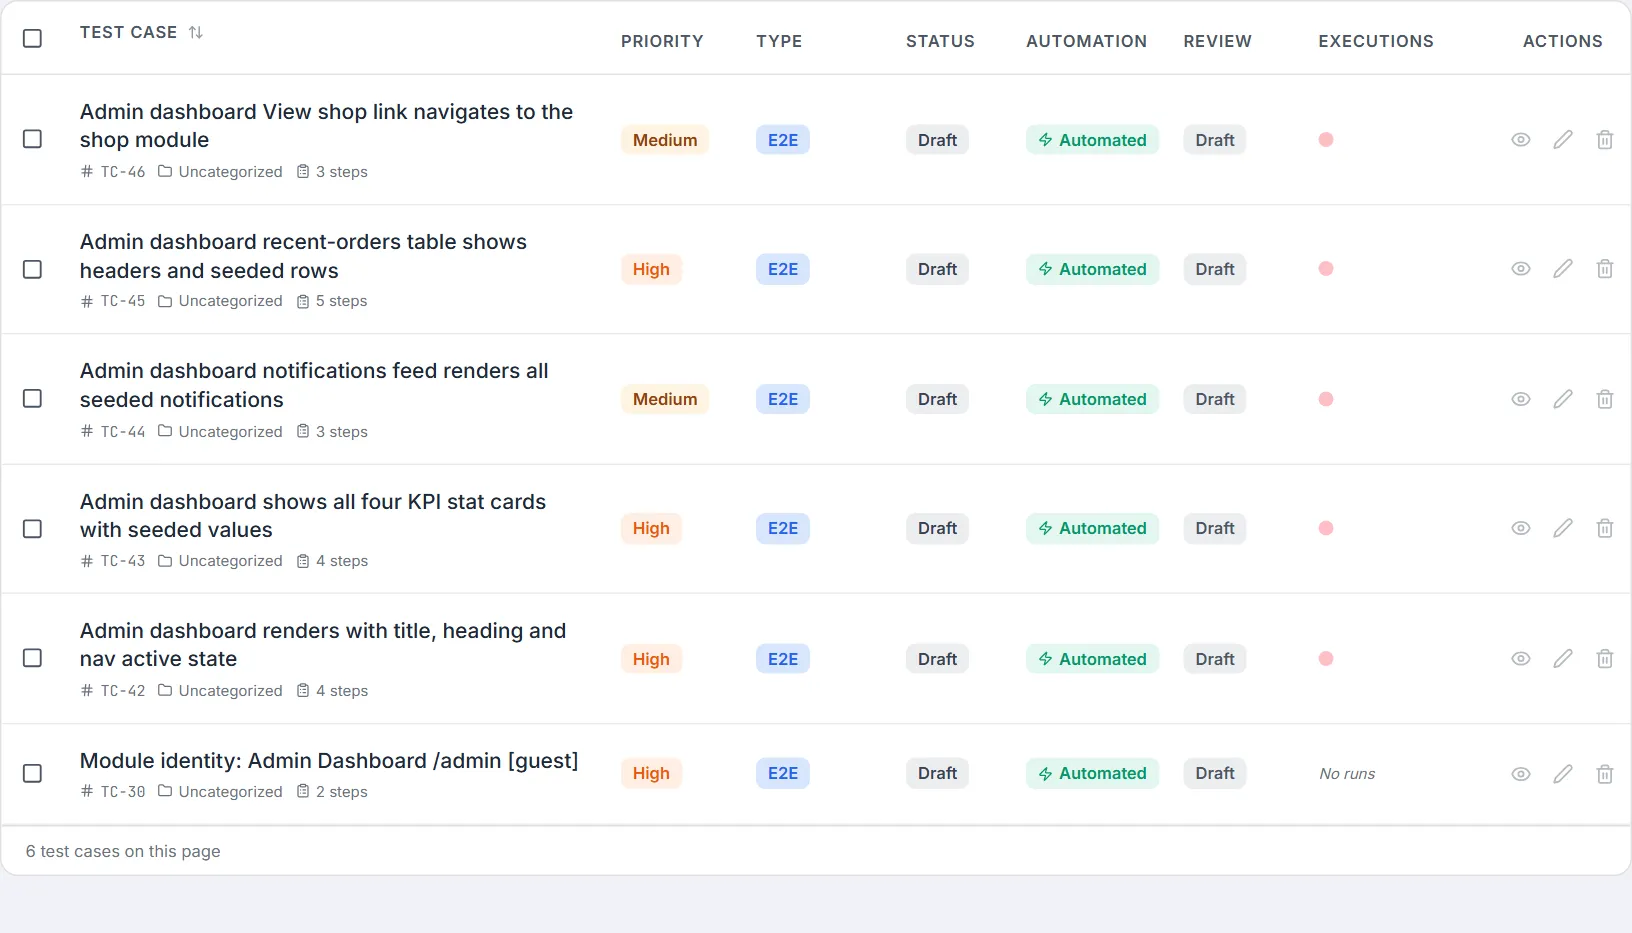
When a folder (or All Test Cases) is selected, the right panel shows the matching cases in a table. The columns are:
| Column | Meaning |
|---|---|
| (checkbox) | Select the row for bulk actions. The header checkbox toggles select-all for the current page. |
| Test Case | The case title (click to open the detail slide-over) plus a metadata row beneath it: the # ID, the folder name, and the step count. Header is sortable by title. |
| Priority | Colored badge — Critical (red), High (orange), Medium (amber), Low (emerald). |
| Type | Colored badge for the domain type (Web, UI, API, Mobile, …), using the app’s type color map. |
| Status | Lifecycle badge — Active (brand), Draft (gray), Deprecated (red), Archived (slate). |
| Automation | Badge with a lightning icon — Automated (emerald), Needs Update (amber), or Manual (gray). |
| Review | Review-status badge — Approved (emerald), Rejected (red), In Review (sky), or Draft (gray). |
| Executions | Up to five colored dots for the most recent runs (oldest → newest). Hover a dot for status, plan › cycle, and date. Shows “No runs” in italics when the case has never been executed. |
| Actions | Hover-revealed row buttons: View details (eye), Edit (pencil), and Delete (trash). |
Search & filters
Section titled “Search & filters”
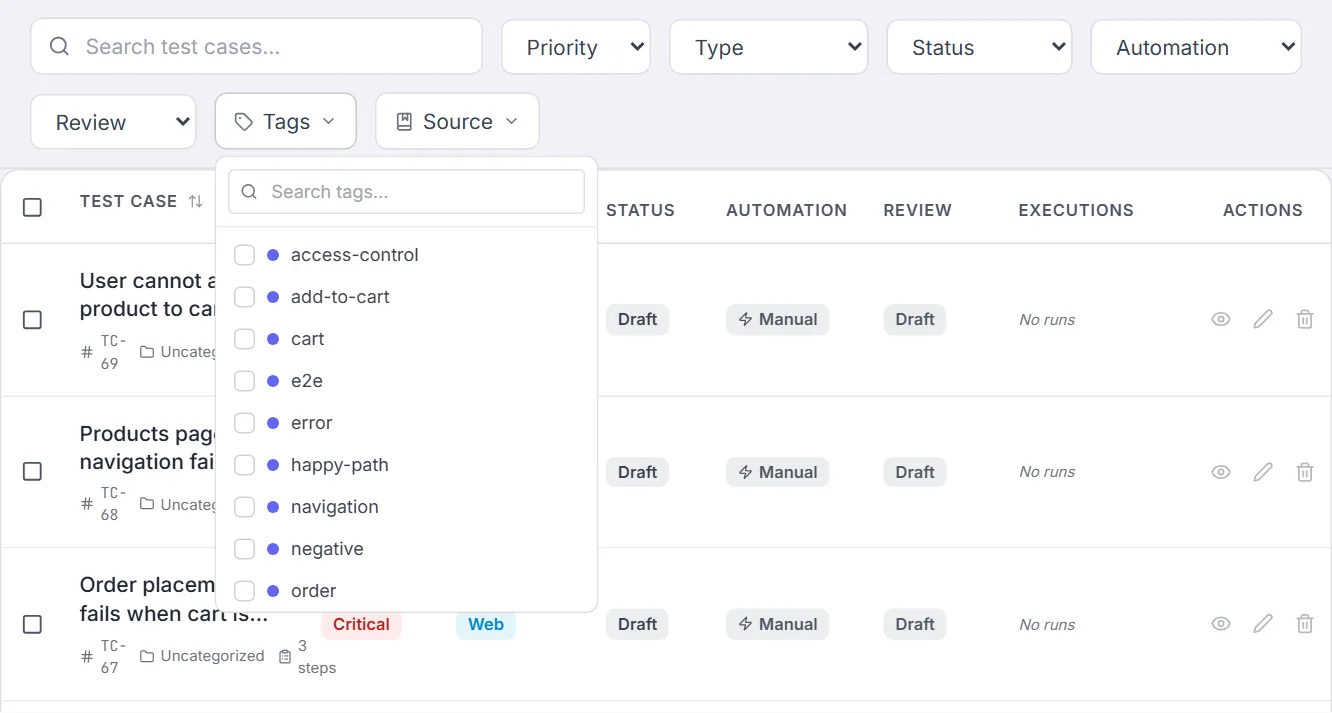
The filter bar above the list combines free-text search with structured filters. All of them stack (AND) and reset pagination to page 1 when changed.
| Control | Filters by | Options |
|---|---|---|
| Search box | Title or test case ID | Free text; type to narrow the list as you go. Matches the title and the ID, so TC-45, tc-45 or just 45 all find that case. |
| Priority | Priority | Critical, High, Medium, Low. |
| Type | Domain type | Web, UI, API, Mobile, Database, Integration, E2E, Security, Performance, Usability, Accessibility, Compatibility, Localization. |
| Status | Lifecycle status | Draft, Active, Deprecated, Archived. |
| Automation | Automation status | Manual, Automated, Needs Update. |
| Review | Review status | Draft, In Review, Approved, Rejected. |
| Tags | One or more tags | Searchable multi-select dropdown; pick any number of tags. Shows a count and a clear (X) when active. |
| Source | Originating source | Searchable single-select; lists only sources that already have ≥1 linked test case, with its type and case count. |
When any filter, search term, tag, or source is active, a Clear (n) button appears at the end of the bar showing how many filters are active; clicking it resets search, dropdowns, tags, and source in one go.
Creating & Editing a Test Case
Section titled “Creating & Editing a Test Case”Click New Test Case in the header (or the Edit pencil on a row) to open the editor modal. The same modal is used for create and edit; the title and primary button read Create Test Case / Create or Edit Test Case / Update accordingly.
Case details
Section titled “Case details”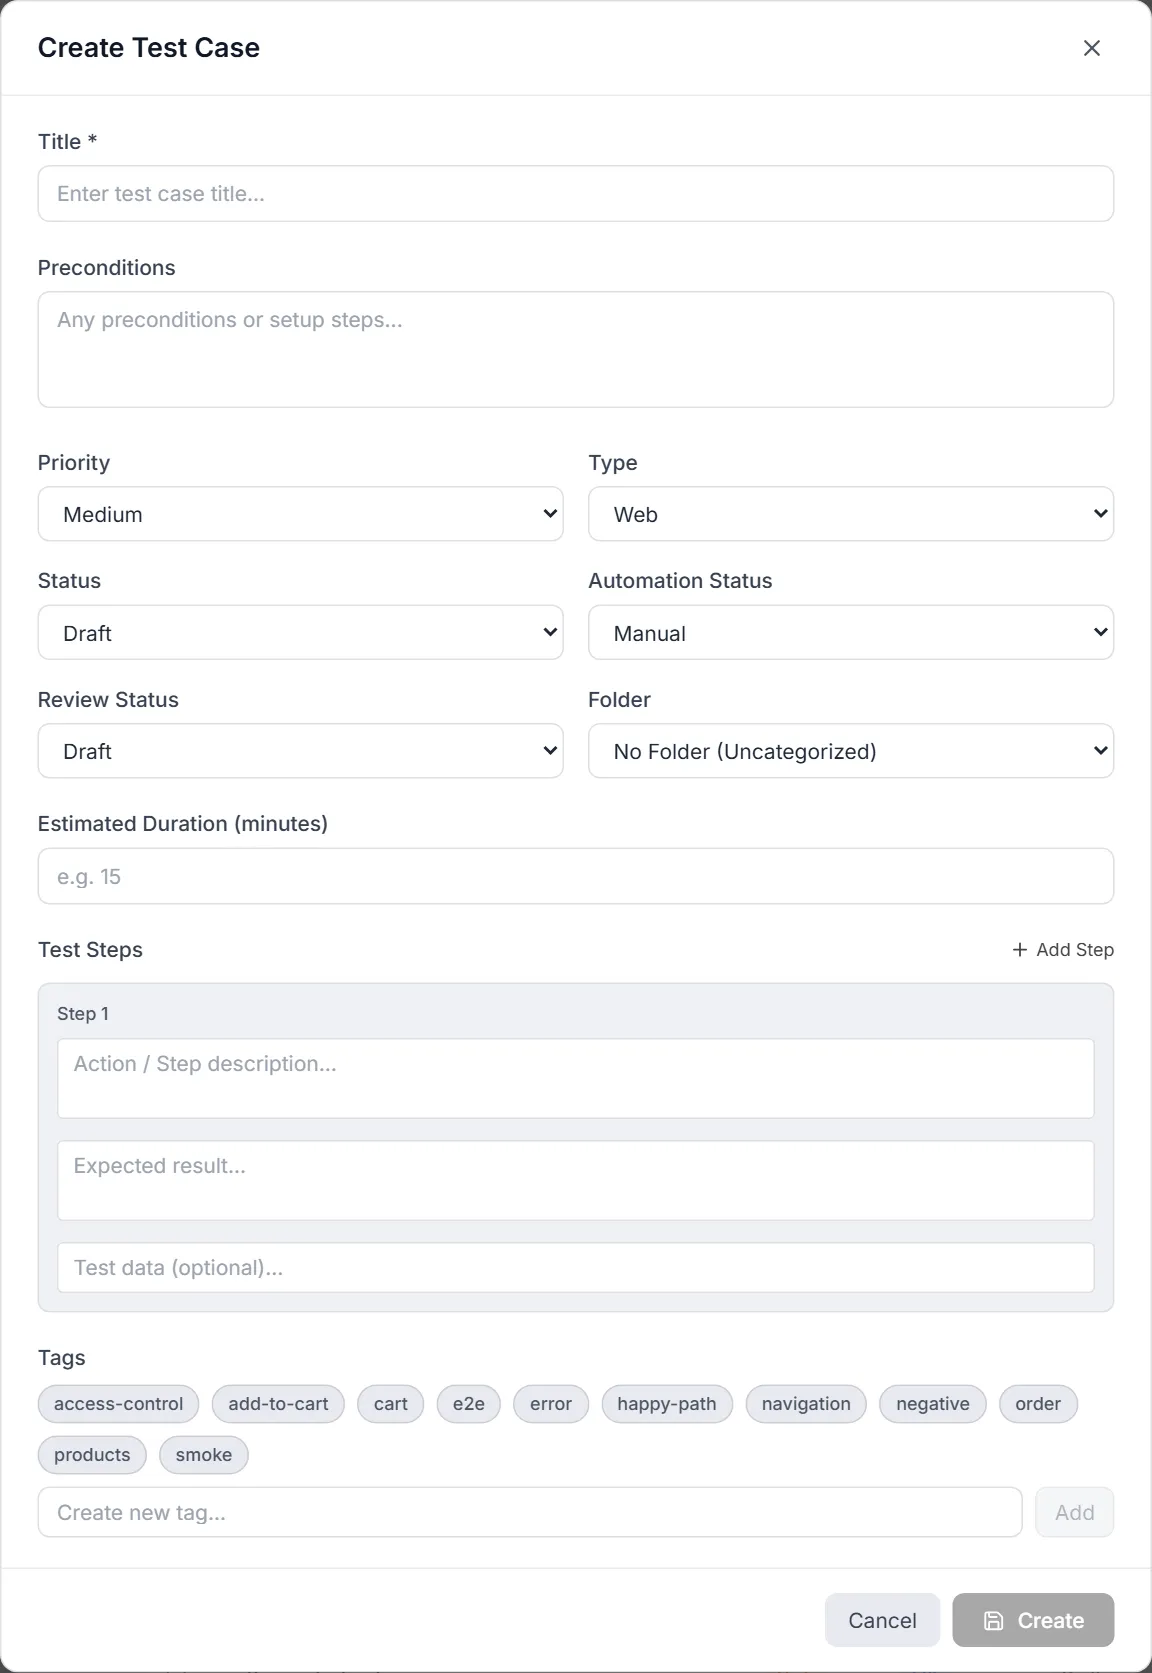
| Field | What to enter |
|---|---|
| Title * | The name of the test case. Required — the Create/Update button stays disabled until it has text. |
| Preconditions | Free-text setup or state that must be true before the steps run (e.g. “User is logged in with an admin account”). Optional, multi-line. |
| Priority | Critical, High, Medium, or Low. Defaults to Medium. |
| Type | Domain category from the type list. Defaults to Web. |
| Status | Lifecycle status. Defaults to Draft. |
| Automation Status | Manual, Automated, or Needs Update. Defaults to Manual. |
| Review Status | Draft, In Review, Approved, or Rejected. Defaults to Draft. |
| Folder | Destination folder from a flattened, indented dropdown, or No Folder (Uncategorized). |
| Estimated Duration (minutes) | Optional number — roughly how long a manual run takes. Stored as an integer. |
| Test Steps | One or more steps, each with Action, Expected Result, and optional Test Data (see 4.2). |
| Tags | Toggle existing tags on/off, or create a new tag inline (see 4.3). |
Test Steps
Section titled “Test Steps”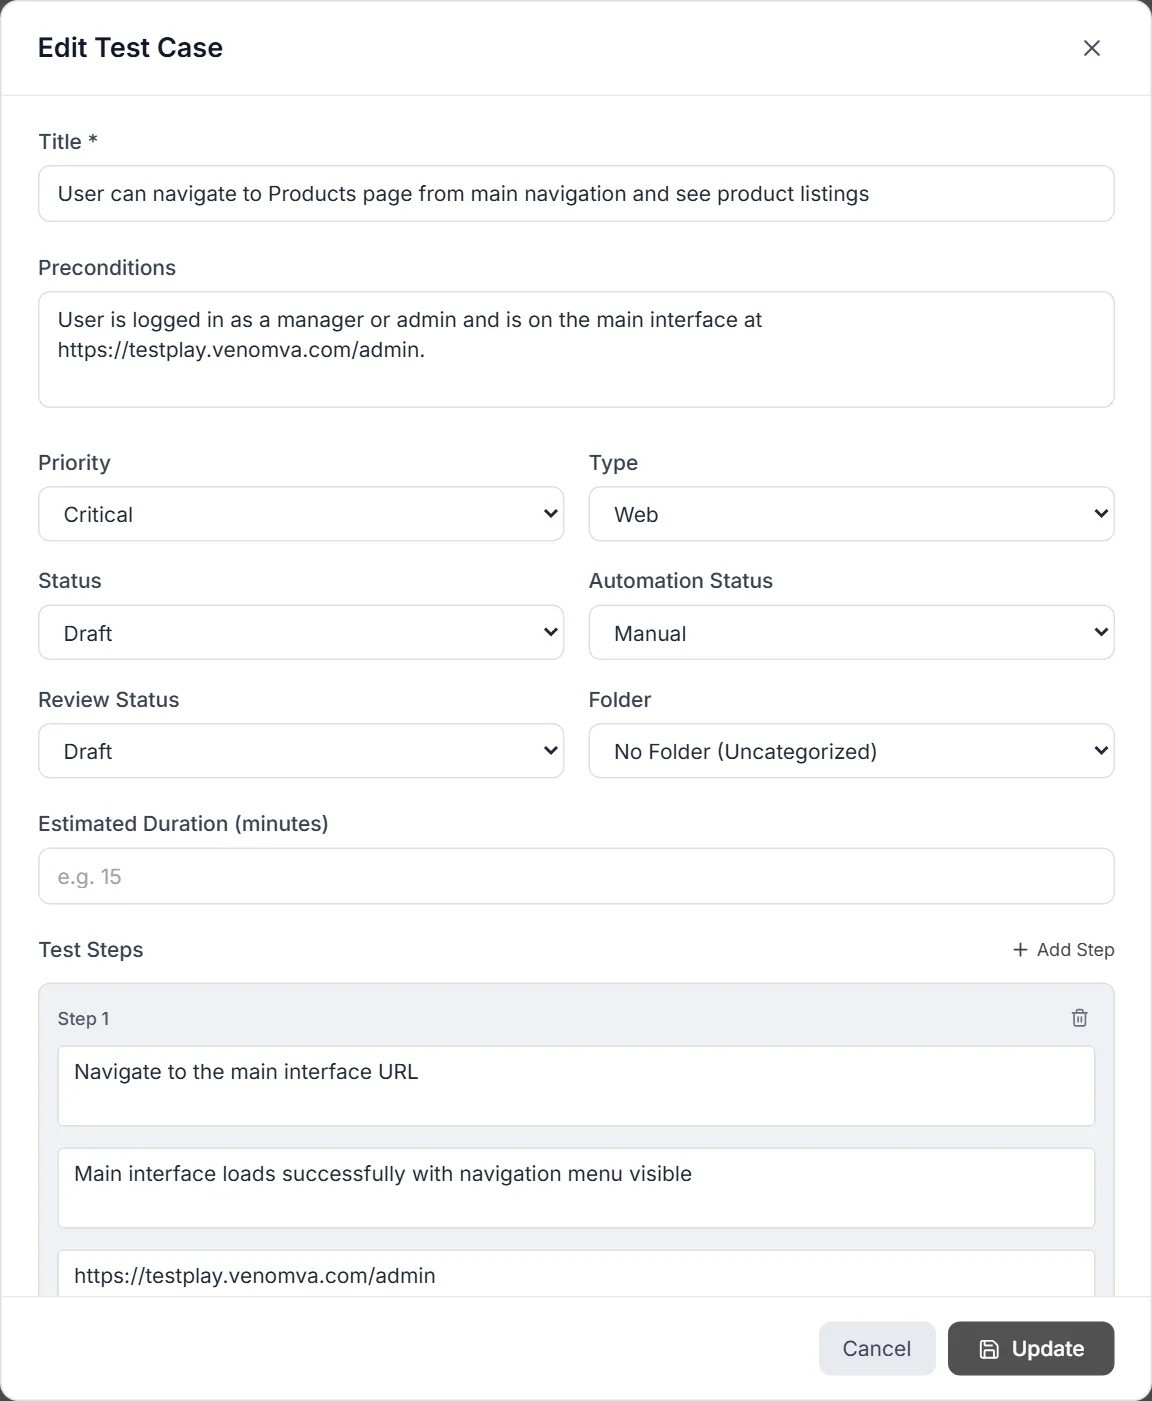
The Test Steps section is the heart of a manual case. Each step is a small card with three inputs and a number.
- The editor starts with one empty step. Fill in the Action (what the tester does), the Expected Result (what should happen), and optionally Test Data (specific input values).
- Click + Add Step to append another step card. Steps are numbered automatically in order.
- Use the trash icon on a step card to remove it (you must keep at least one step card — removal is disabled when only one remains).
- On save, empty steps (those with no action) are discarded; remaining steps are renumbered sequentially starting at 1.
Classification dropdowns
Section titled “Classification dropdowns”- Priority / Type / Status / Automation Status / Review Status / Folder are all simple dropdowns arranged in a two-column grid; pick a value from each.
- Tags appear as togglable pills — click a pill to select/deselect it (a check appears when selected).
- To create a new tag, type its name in the “Create new tag…” box and press Enter or click Add. A random color is assigned and the new tag is immediately selected for this case.
Saving the case
Section titled “Saving the case”- Click Create (new) or Update (edit) at the bottom of the modal. The button shows Saving… while it works.
- On success a toast confirms “Test case created/updated successfully” and the modal closes.
- Click Cancel or the X (or the dark backdrop) to dismiss without saving.
Attachments
Section titled “Attachments”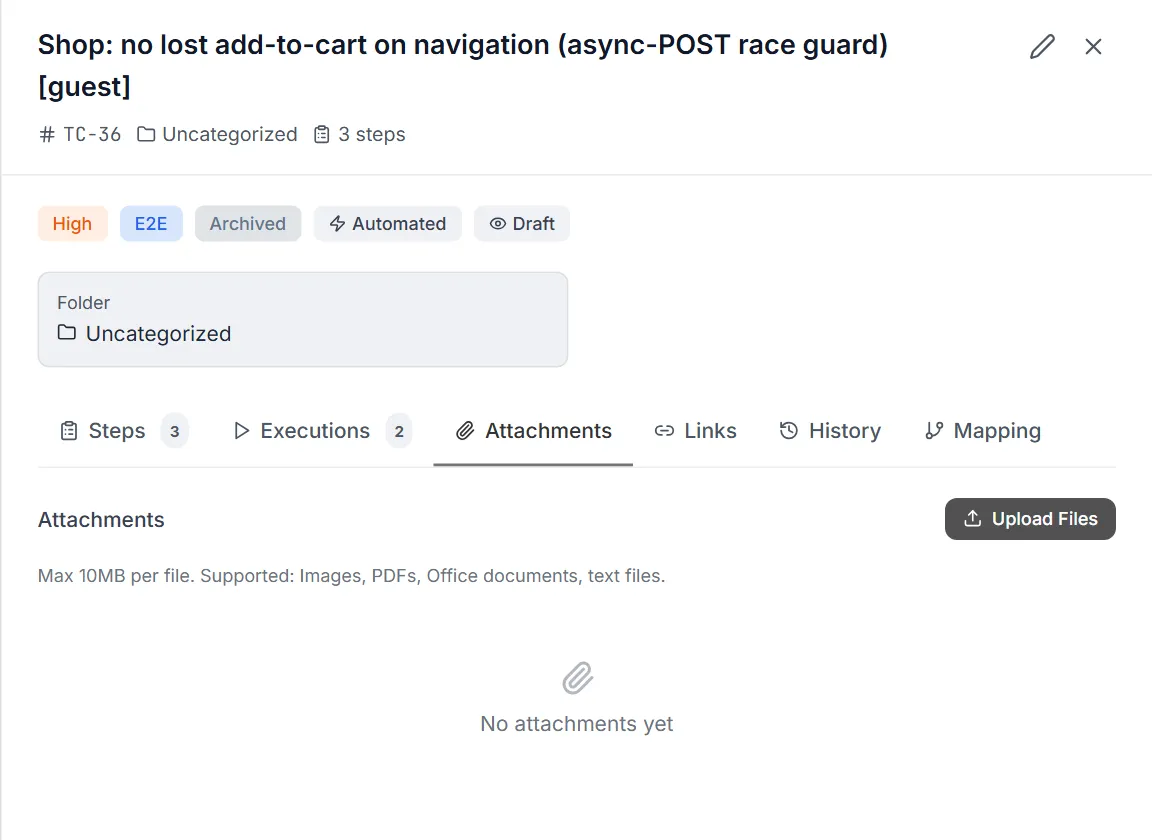
Attachments are managed from the Attachments tab of a case’s detail slide-over, not the create modal.
- Open a case (click its title or the eye icon) and select the Attachments tab.
- Click Upload Files and choose one or more files. Images, PDFs, and Office/text documents are supported.
- Images show a thumbnail and can be previewed in a lightbox; any file can be downloaded or deleted from its hover actions.
Bulk Actions, Import & Export
Section titled “Bulk Actions, Import & Export”Bulk actions on selected cases
Section titled “Bulk actions on selected cases”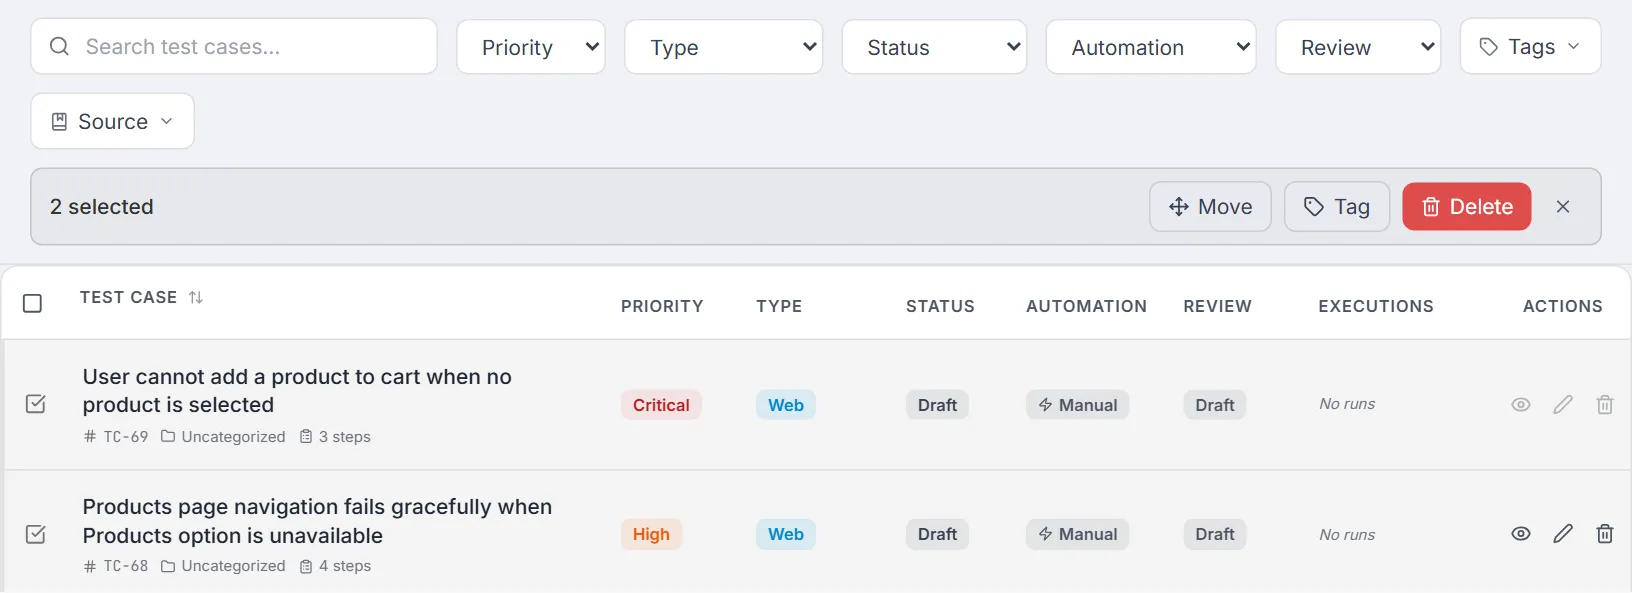
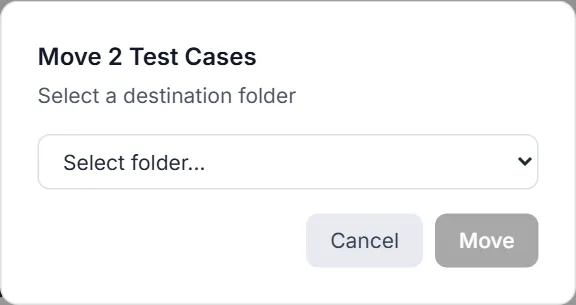
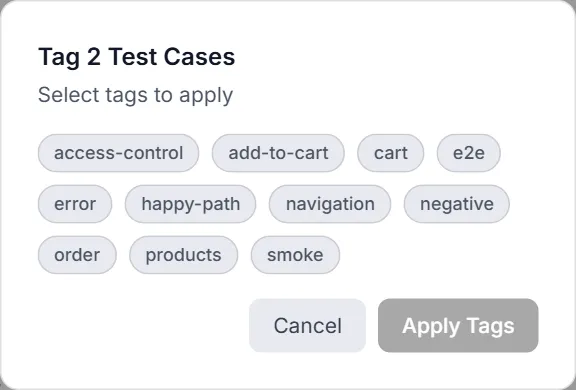
Tick the checkbox on any row (or the header checkbox to select the whole page). A blue bulk action bar appears showing the selected count with these actions:
| Action | What it does |
|---|---|
| Move | Opens the Move to Folder dialog; pick a destination folder and confirm to re-file all selected cases at once. |
| Tag | Opens the Bulk Tag dialog; pick one or more tags to apply to every selected case. |
| Delete | Opens a confirmation dialog and permanently deletes all selected cases (and their steps, versions, and data) on confirm. |
| X (clear) | Deselects everything and hides the bulk bar. |
| Export (n) | Appears in the header while rows are selected; exports just the selected cases (see 5.3). |
Importing test cases
Section titled “Importing test cases”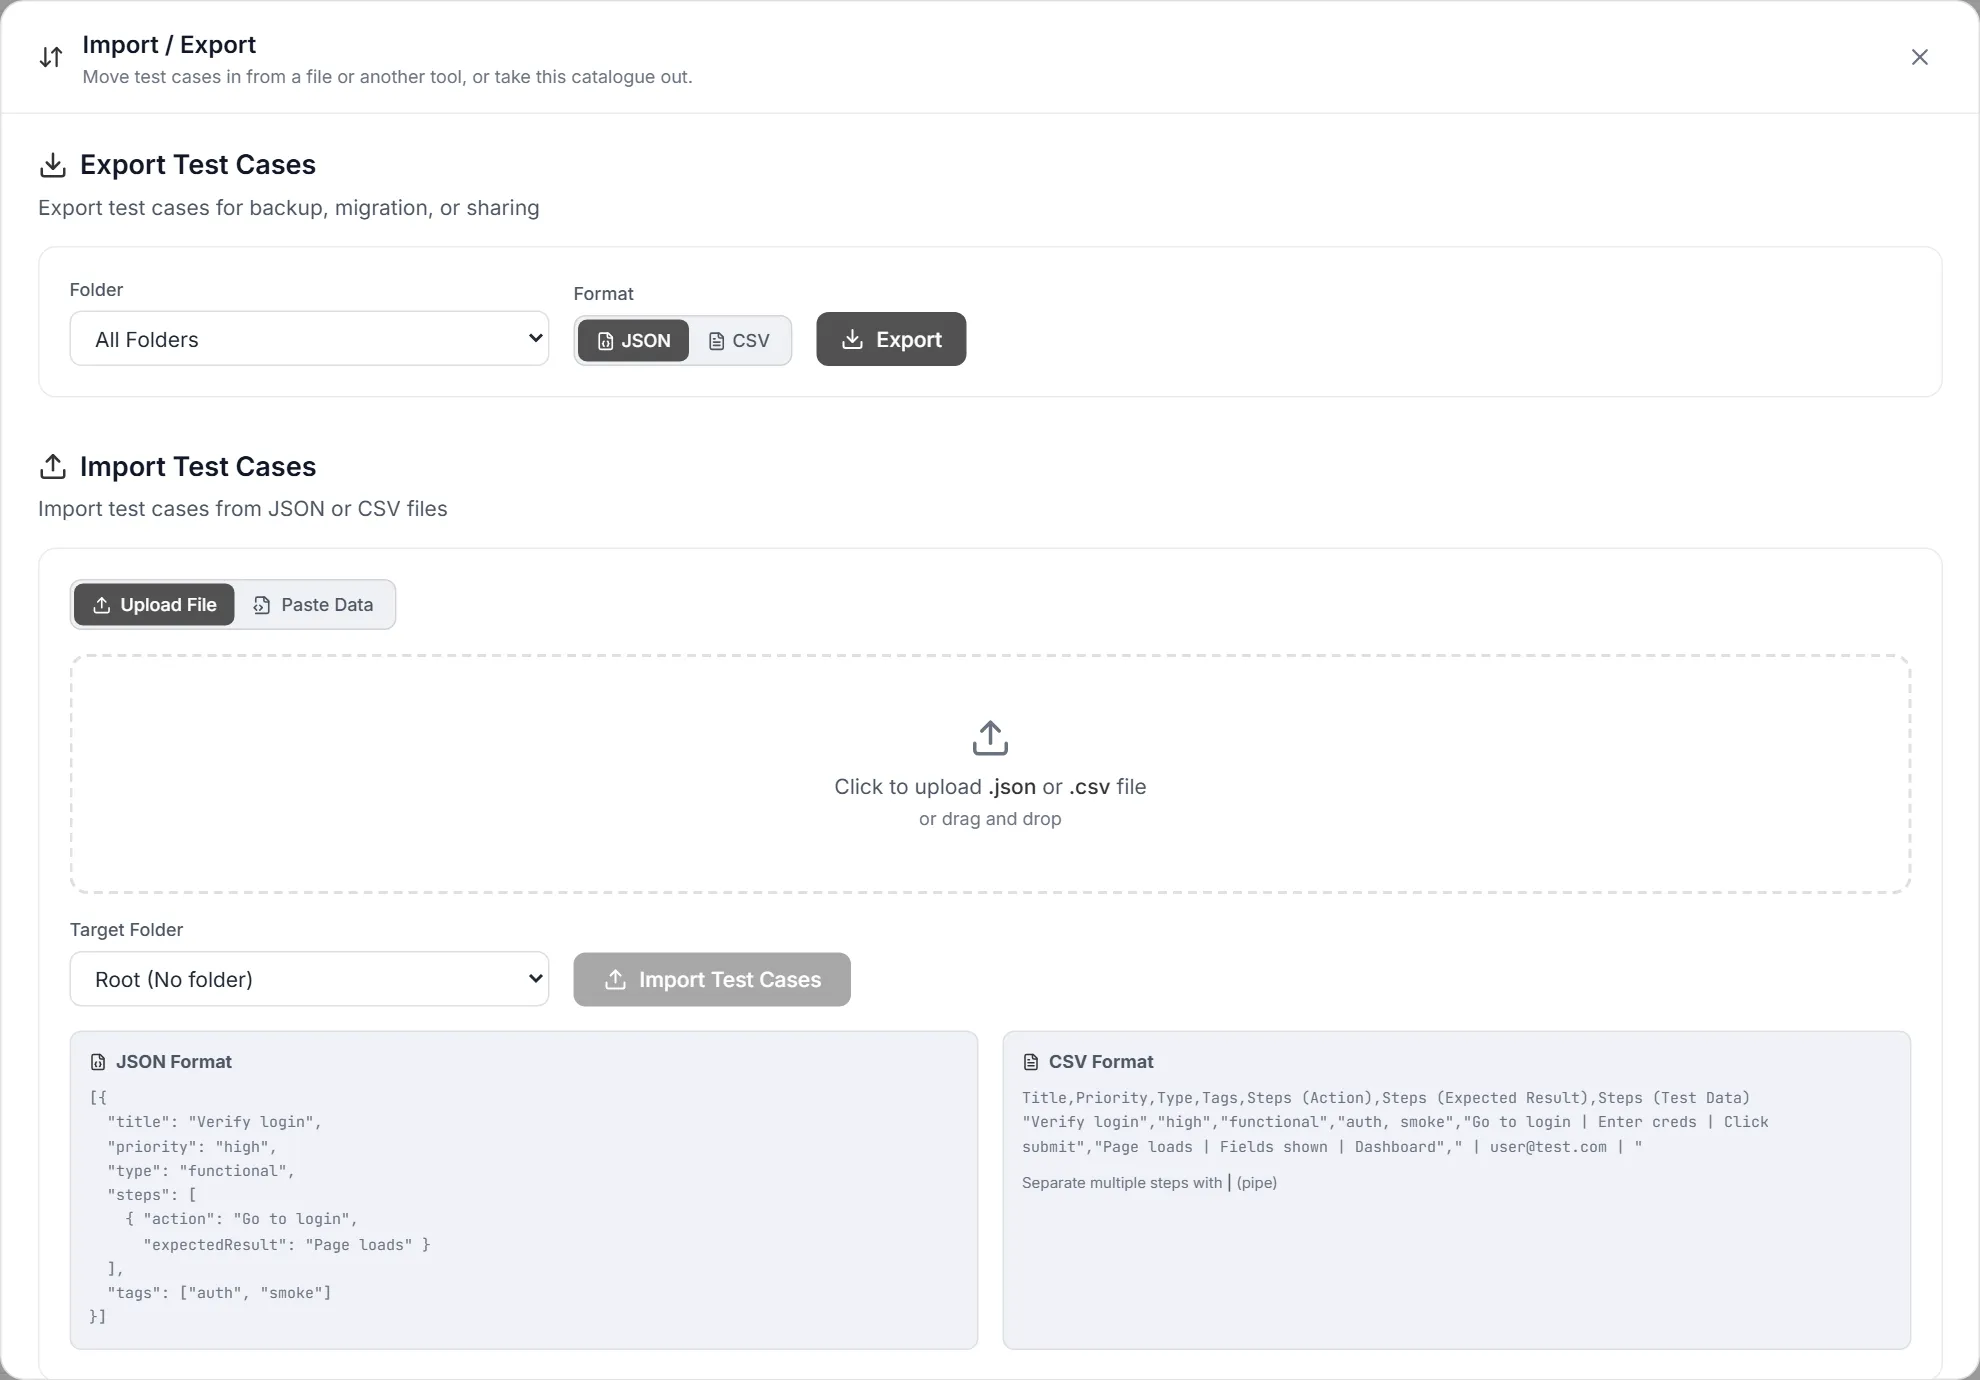
Click Import / Export in the header to open it in a dialog over the catalogue. (It used to be its own left-nav screen; it is still reachable directly at /import-export.) Two import paths exist:
- JSON or CSV import — toggle between Upload File (drag-and-drop or click to pick a
.json/.csv/.txtfile) and Paste Data (paste raw JSON or CSV). Choose a Target Folder (or Root), then click Import Test Cases. A result panel reports how many cases were imported and lists any per-row errors. - Import via AI Assistant — for exports from third-party tools (TestRail, Zephyr, Xray, PractiTest, qTest) or any other tool. Click Import with AI Assistant to open the AI Assistant in API mode with a pre-filled prompt; upload your export (CSV, XML, JSON, or Excel) in the chat and the AI parses, maps fields, normalizes priority/type to Testver’s schema, and creates the cases — reporting per-row issues.
The JSON shape expects an array of objects with
title,priority,type,tags,preconditions, and astepsarray of{ action, expectedResult, testData }. The CSV shape uses columnsTitle, Priority, Type, Tags, Steps (Action), Steps (Expected Result), Steps (Test Data), where multiple steps in one cell are separated by a pipe (|).
[{ "title": "Verify login", "priority": "high", "type": "functional", "steps": [ { "action": "Go to login", "expectedResult": "Page loads" } ], "tags": ["auth", "smoke"]}]Exporting test cases
Section titled “Exporting test cases”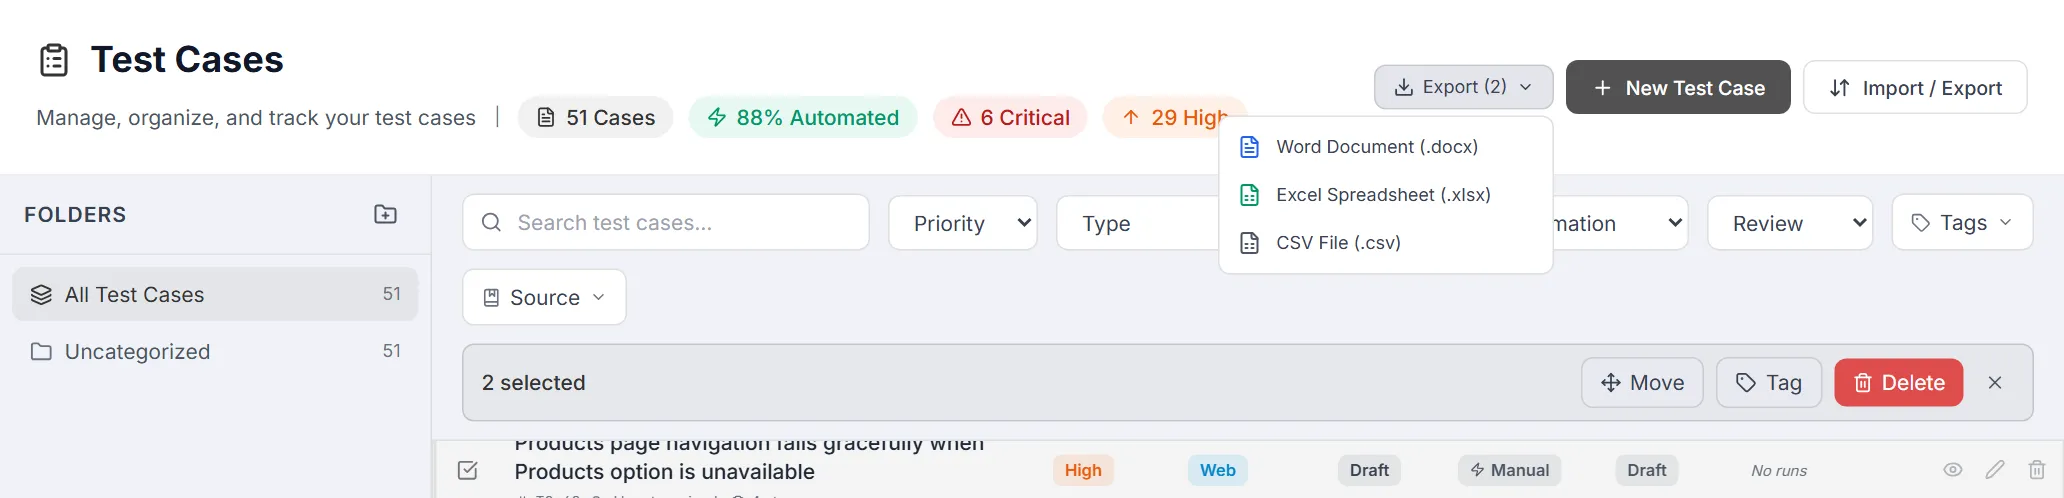
There are two ways to export:
- From the Test Cases header — select rows and use the Export (n) button, which offers DOCX, XLSX, and CSV of the selected cases.
- From the Import / Export screen — pick a Folder (or All Folders) and a format toggle of JSON or CSV, click Export to generate a preview, then Copy the content or Download the file. The preview shows the case count and file size.
Links & mappings
Section titled “Links & mappings”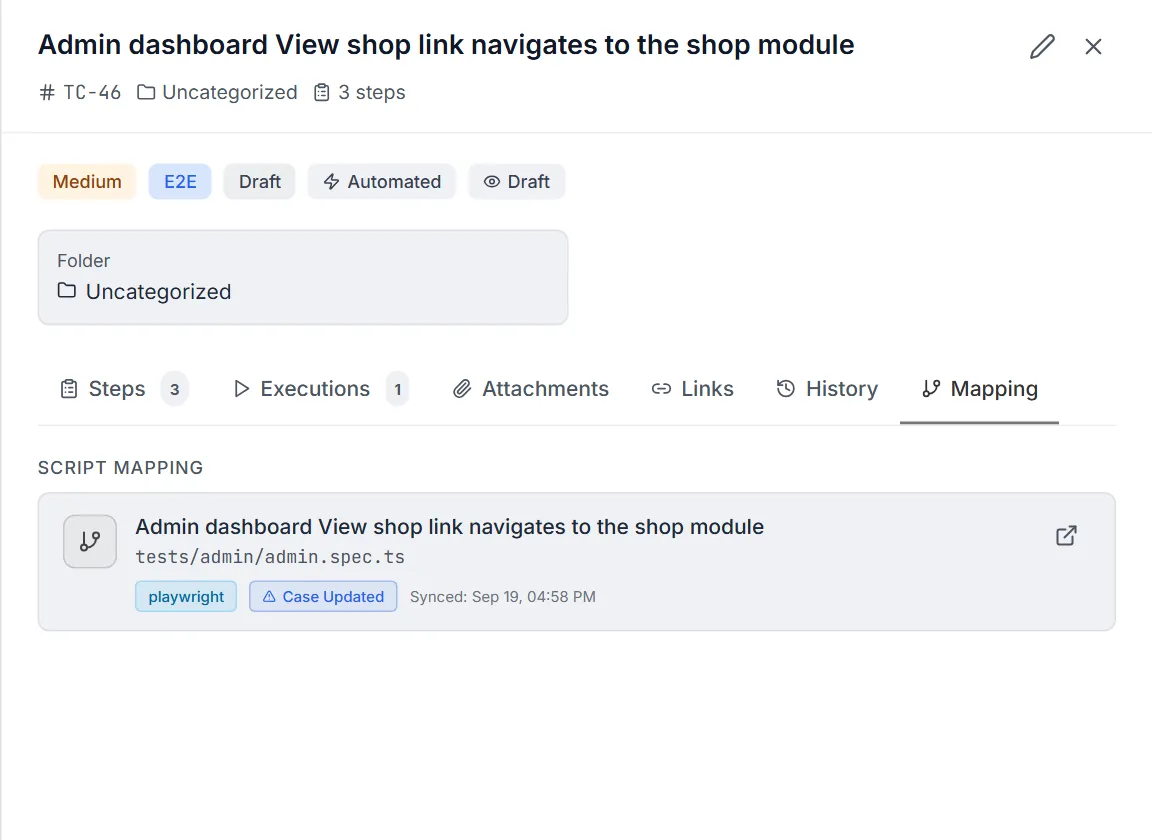
Links and mappings are surfaced from a case’s detail slide-over:
| Link type | Tab | How to use it |
|---|---|---|
| Automated script | Mapping | Shows the mapped script (test name, scriptPath, framework badge, sync status, last-synced time) with a View Script (new tab) button that opens the test in the Test Explorer in a new browser tab — source, run history, and results together. If none, it points to the Script Mapping screen. |
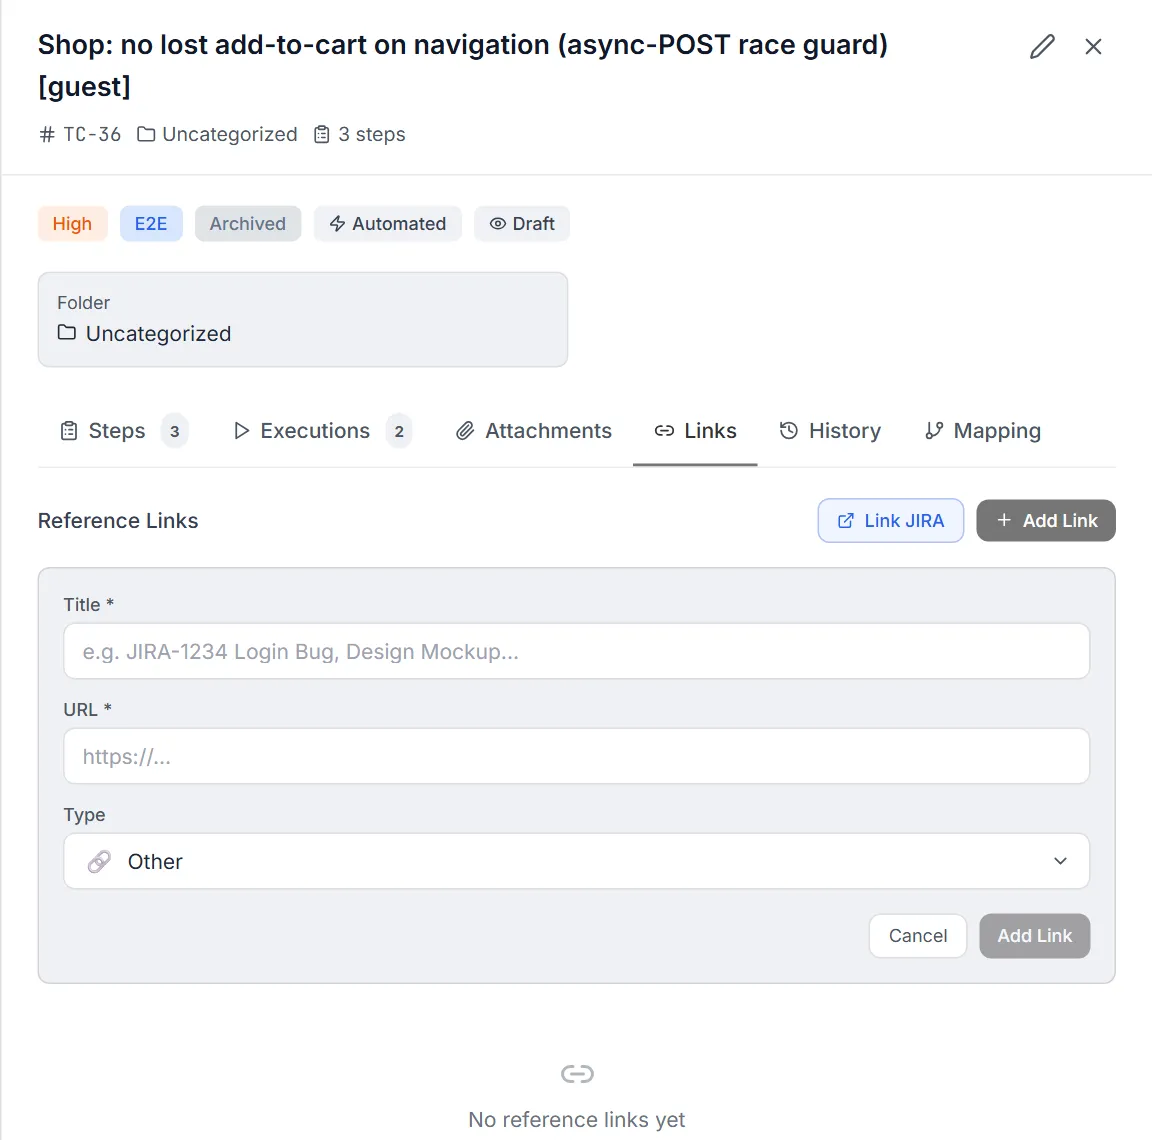
| Reference links | Links | Add typed external links (Jira, Confluence, GitHub, Docs, Design, Other) with a title and URL. Each can be opened in a new tab or deleted; Jira links also offer a one-click post-update comment. |
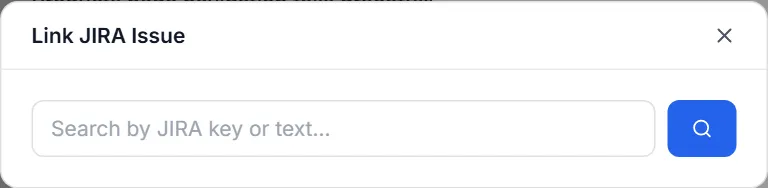
| Jira (direct) | Links | With a Jira connector configured, the Link JIRA button searches by key or text and attaches the matched issue as a reference link. |
| Requirements / sources | Mapping | ”Generated From Sources” lists the Requirement / NLP-Notes / JIRA / Document a case came from, each with an optional external link. |
| Defects | Executions | Any defect raised during a run appears with its ID, title, status, and severity, inline with the step results. |
Execution & Status
Section titled “Execution & Status”The Test Cases screen does not run cases itself — execution happens in test plans and cycles — but it tracks and surfaces results in several places.
Status fields
Section titled “Status fields”| Field | Values | Tracks |
|---|---|---|
| Status | Draft → Active → Deprecated → Archived | Maturity of the case definition itself. |
| Automation Status | Manual / Automated / Needs Update | Whether code exists to run the case automatically. |
| Review Status | Draft / In Review / Approved / Rejected | Editorial sign-off on the case. |
Execution dots
Section titled “Execution dots”
- Execution dots in the list’s Executions column show the last five run outcomes at a glance, color-coded by status, with hover tooltips for plan, cycle, and date.
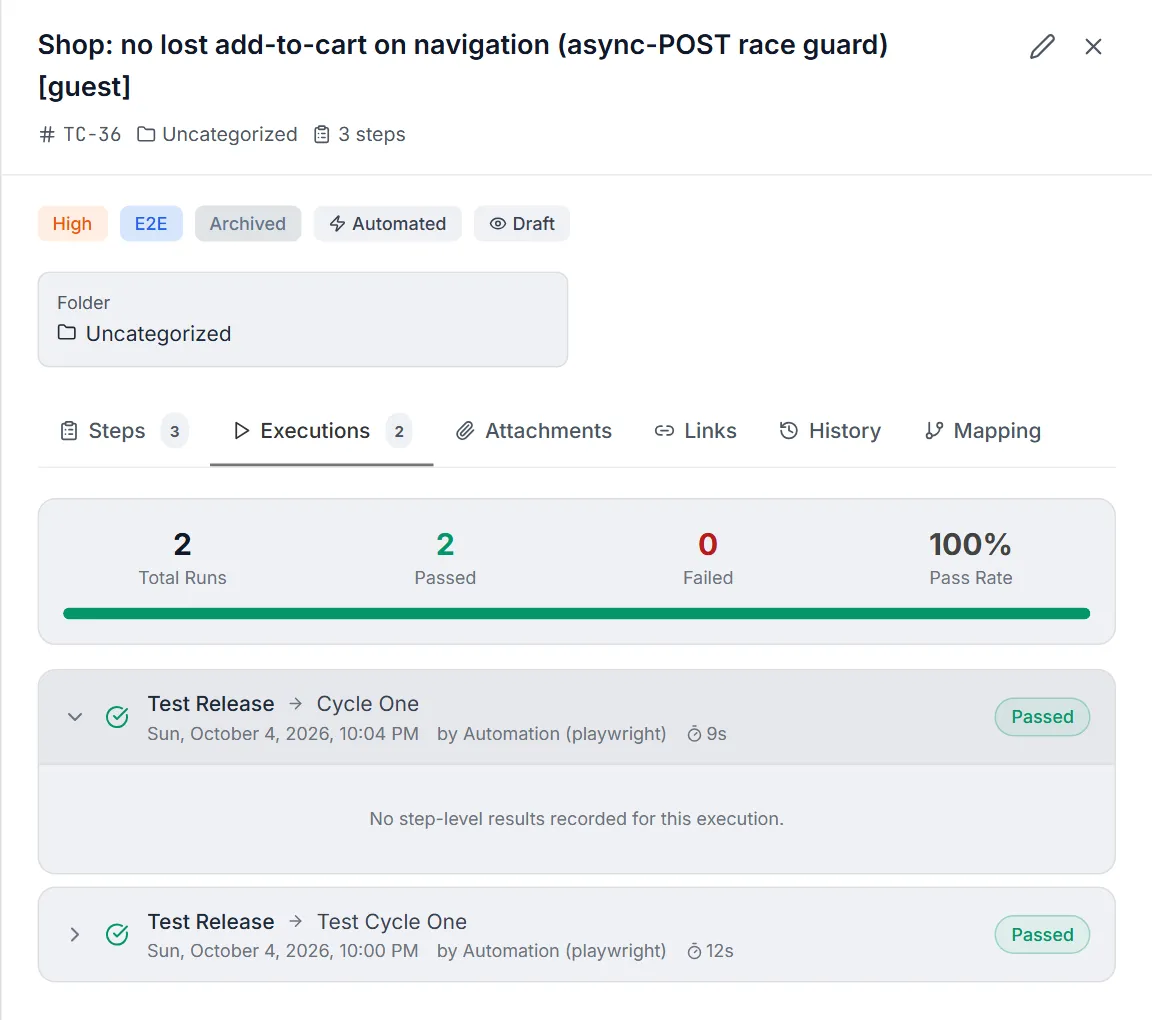
- The Executions tab in the detail view shows a summary (total runs, passed, failed, pass-rate bar) and a per-run list. Expanding a run reveals step-level results (action, expected, actual) and any linked defect or execution notes.
Version history
Section titled “Version history”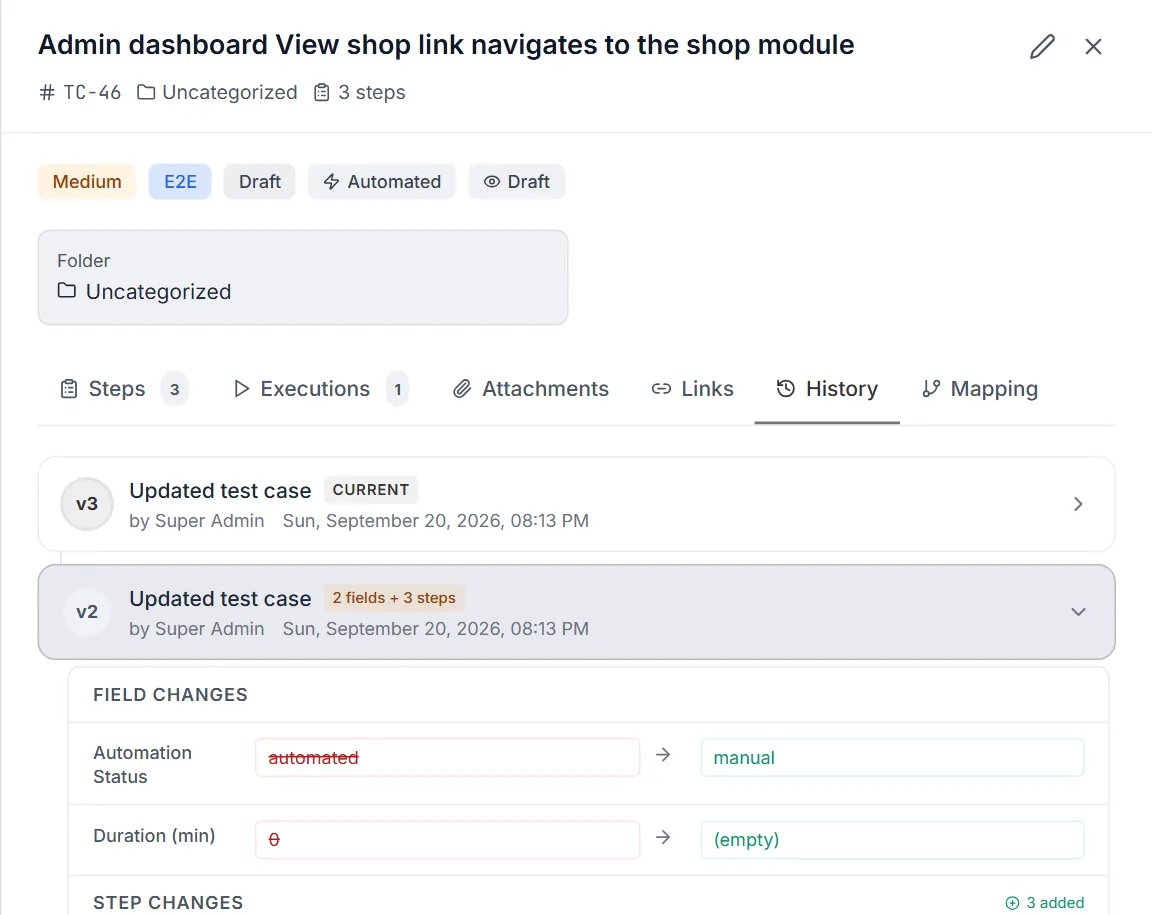
Every edit is versioned. The History tab shows a timeline of versions with a field-by-field and step-by-step diff between consecutive versions (added / removed / modified). Any non-current version offers Restore to this version, which rolls the case back after a confirmation.
Automate with AI
Section titled “Automate with AI”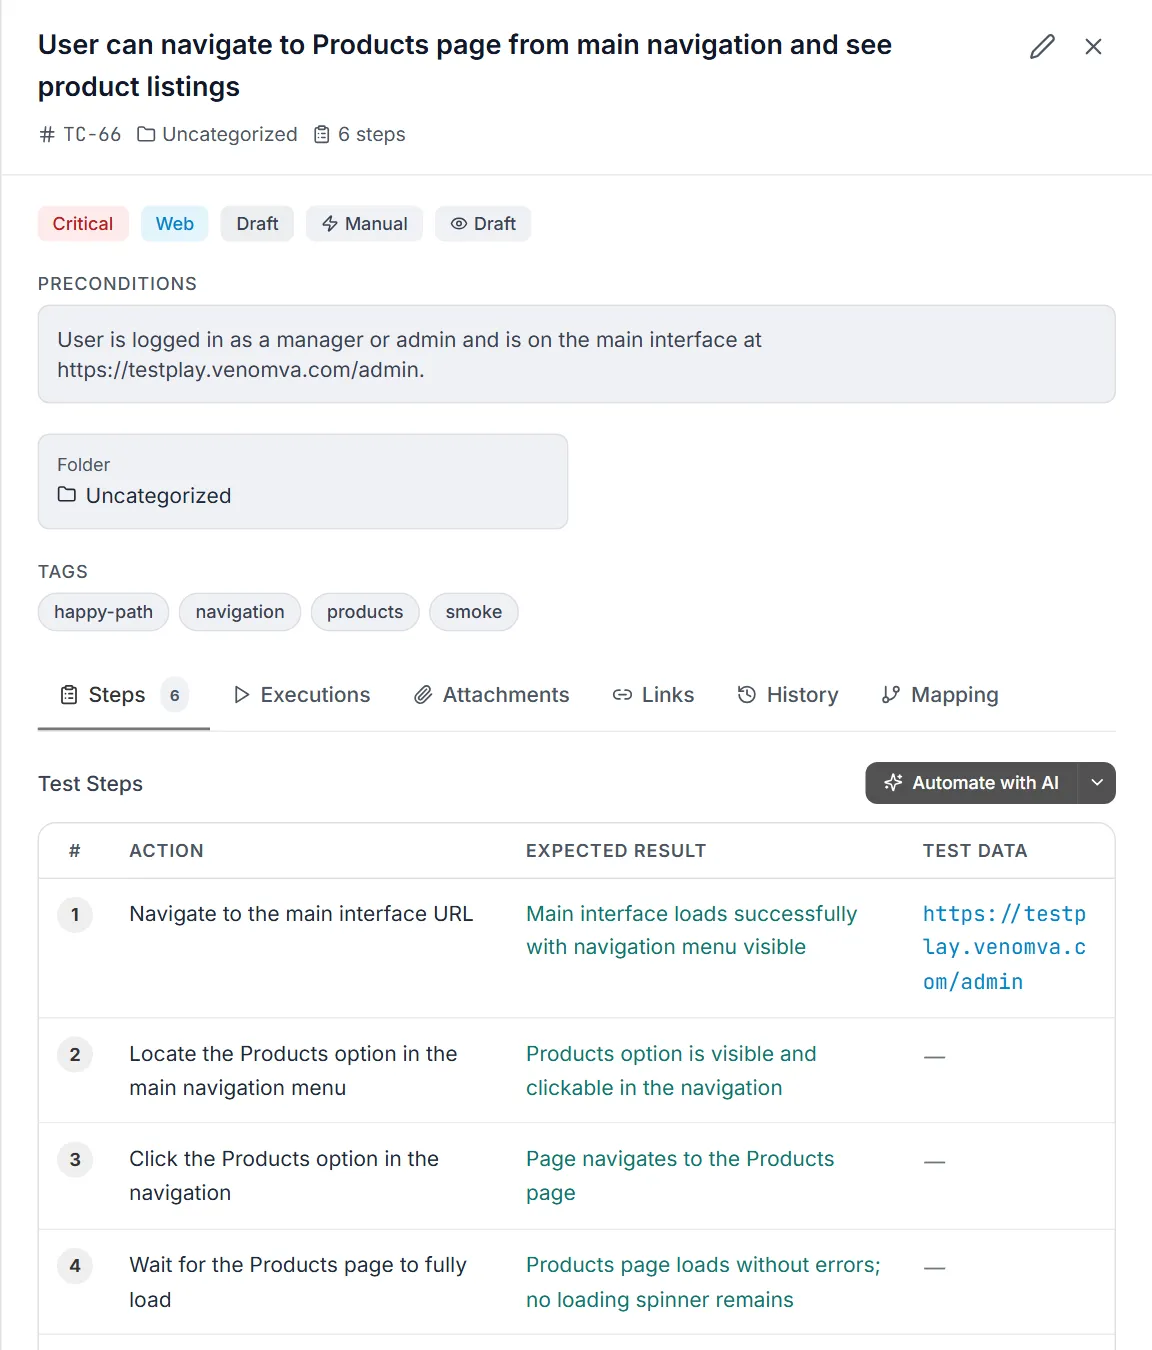
On the Steps tab, the Automate with AI split button sends the case’s steps to the AI Assistant (in Web mode) to generate automation code, and its dropdown can Copy the steps as Gherkin, plain text, or JSON. For already-automated cases the primary button is replaced by a Copy steps button only.
Common Tasks (How Do I…?)
Section titled “Common Tasks (How Do I…?)”| I want to… | Do this |
|---|---|
| Create a test case | Click New Test Case, fill in Title (required) and steps, then Create. |
| Add a sub-folder | Select the parent folder, click the folder-plus icon, name it, press Enter. |
| Move a case to another folder | Edit the case and change Folder, or check it and use bulk Move. |
| Find a specific case | Type in the Search box, or stack the Priority/Type/Status/Tags filters. |
| Show only automated cases | Set the Automation filter to Automated. |
| Tag many cases at once | Check the rows, click Tag in the bulk bar, pick tags, Apply Tags. |
| See how a case has run | Open it and switch to the Executions tab (or read the row’s execution dots). |
| Link a Jira ticket | Open the case → Links tab → Link JIRA (with a Jira connector configured). |
| View the mapped script | Open the case → Mapping tab → View Script (new tab); the test opens in the Test Explorer in a new browser tab. |
| Undo a bad edit | Open the case → History tab → Restore to this version. |
| Export selected cases | Check the rows, click Export (n), pick DOCX / XLSX / CSV. |
| Import from TestRail/Zephyr/etc. | Click Import / Export in the header → Import with AI Assistant, then upload the export in chat. |
| Turn manual steps into code | Open the case → Steps tab → Automate with AI. |
Tips & Best Practices
Section titled “Tips & Best Practices”- One verification per step. Put a single clear expected result on each step so failures point to an exact instruction.
- Use preconditions, not setup steps. Keep “user is logged in” in Preconditions so your numbered steps stay focused on the behavior under test.
- Name folders by feature or module, and let nesting express hierarchy (e.g. Checkout › Payments › Refunds). Counts roll up automatically.
- Tag across folders. Use tags for cross-cutting concerns (smoke, regression, P0) that don’t fit a single folder.
- Keep Review Status honest. Move cases through Draft → In Review → Approved so reviewers know what’s ready.
- Set Automation Status to Needs Update when you change steps on an already-automated case — it flags the script for follow-up.
- Estimate durations so test plans can forecast effort.
- Name import columns clearly (Test Case Name, Priority, Steps) — the AI import maps fields far more reliably when headers are explicit.
- Re-file before deleting a folder, since cases fall back to Uncategorized rather than being removed.
Troubleshooting & FAQ
Section titled “Troubleshooting & FAQ”Why don’t the header chip counts match what I see?
Section titled “Why don’t the header chip counts match what I see?”The header chips are computed from server-side aggregates over your current filter scope, not the visible page. If a folder or filter is active, the numbers reflect only that subset. Clear filters (the Clear (n) button) to see global figures.
I deleted a folder — where did my cases go?
Section titled “I deleted a folder — where did my cases go?”They weren’t deleted — deleting a folder moves its cases to Uncategorized. Open the Uncategorized entry at the bottom of the folder panel to find and re-file them.
My import failed for some rows. What happened?
Section titled “My import failed for some rows. What happened?”The import result panel lists per-row errors so nothing is silently dropped. Common causes are a missing title or an unrecognized priority/type value. Fix those rows in the source file (or normalize values) and re-import — already-imported rows are unaffected.
Why is there no script shown for my case?
Section titled “Why is there no script shown for my case?”That case isn’t linked to a script yet. Create the link on the Script Mapping screen; once mapped, the script path, framework, and sync status appear here with a View Script (new tab) action.
Why are there no execution results for my case?
Section titled “Why are there no execution results for my case?”The case hasn’t been executed in any test plan or cycle yet. Add it to a plan and run a cycle; results then populate the dots and the Executions tab.
Where did the third-party import wizard go?
Section titled “Where did the third-party import wizard go?”The step-by-step third-party wizard is currently replaced by the Import with AI Assistant card, which handles the same tools (TestRail, Zephyr, Xray, PractiTest, qTest) plus any other tool and more formats (CSV, XML, JSON, Excel). Use that card to import.
Why can’t I see more than 20 cases per page?
Section titled “Why can’t I see more than 20 cases per page?”The list is fixed at 20 cases per page by design. Use folders, search, and filters to narrow what you’re looking at; pagination controls appear automatically when there’s more than one page.
Why was my attachment rejected?
Section titled “Why was my attachment rejected?”Files must be 10 MB or smaller. Oversized files are rejected with a toast naming the file. Compress the file or split it, then retry. Supported kinds are images, PDFs, and common Office/text documents.
Related
Section titled “Related”- Test Plans — group cases for execution.
- AI Test Gen — generate cases from sources.
- Sources — requirements & docs that cases come from.
- Coverage — what’s covered, what isn’t.
- Script Mapping — link cases to automation scripts.
- Defects — file defects against test failures.