

Map Test Cases tab
The Map Test Cases tab of the Script Mapping screen (/script-mapping?tab=map) is where you create new links.
The heart of the screen is the Map Test Cases tab — a true two-sided view. The left column holds the things that need automation (unmapped manual cases); the right column holds the automation available to satisfy them (discovered script tests). You bridge the gap by selecting on the left and acting on the right.
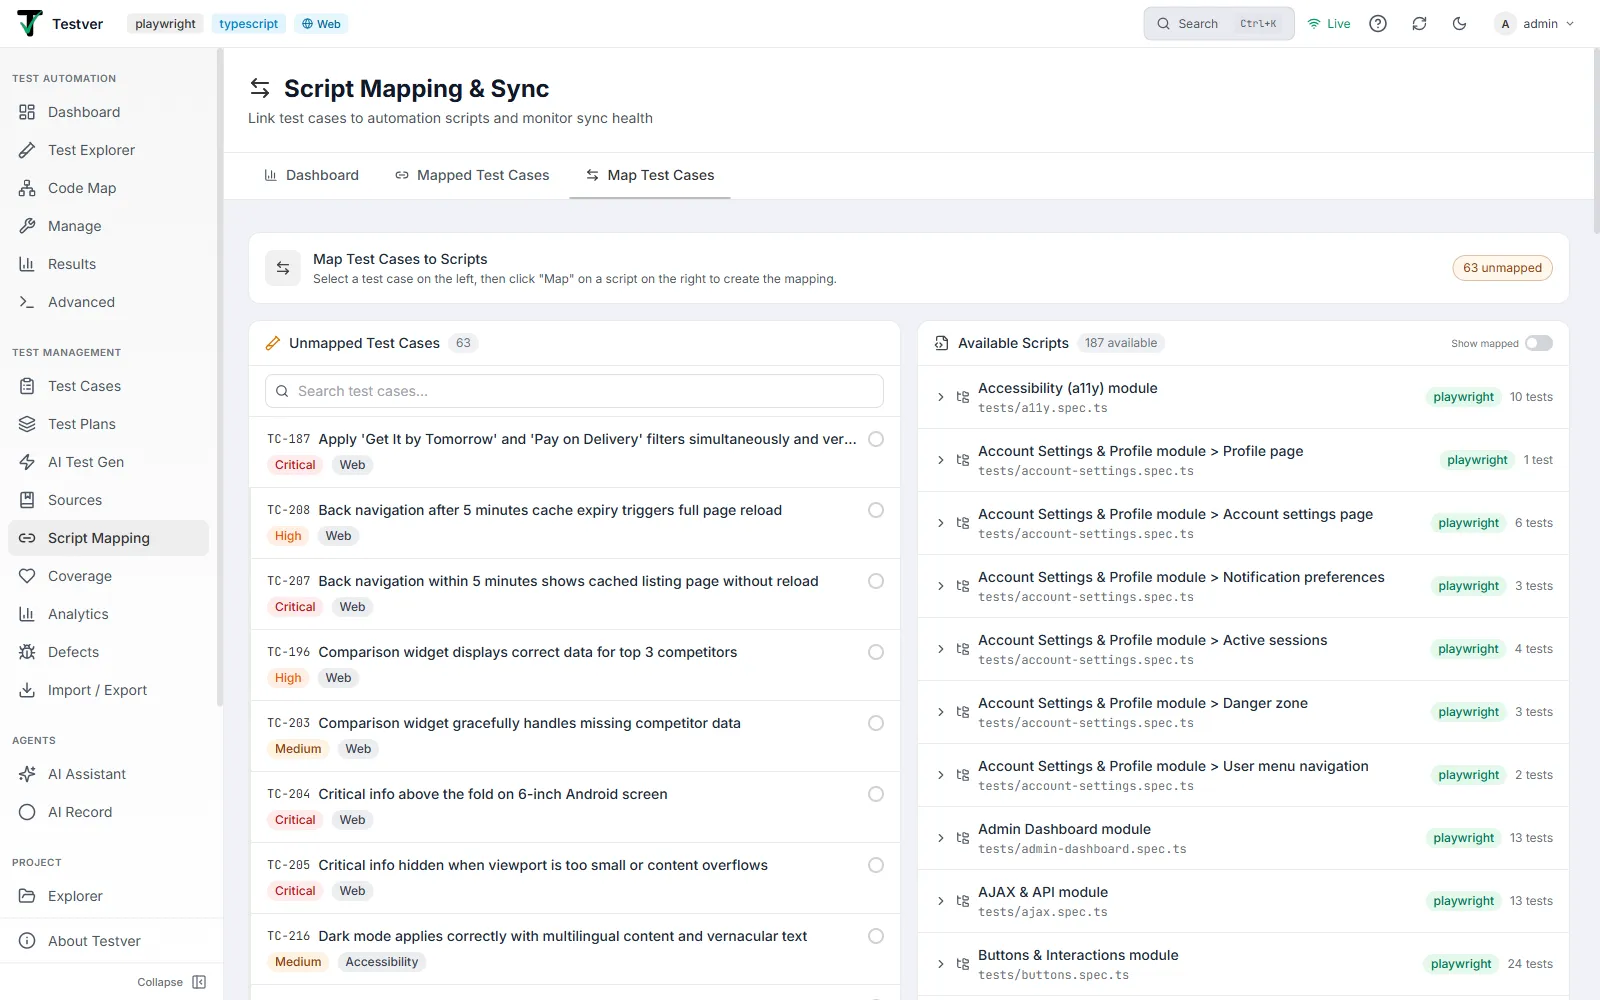
The two-panel layout
Section titled “The two-panel layout”| Element | Meaning |
|---|---|
| Unmapped Test Cases (left panel) | Every manual case that has no mapping yet. Each row shows the case ID (mono, brand colour), the title, plus priority and type badges. A counter pill shows how many remain. |
| Selection radio (left) | Clicking a case selects it (highlighted with a left brand bar and a filled radio dot). Clicking it again deselects. Only one case is the active selection at a time. |
| Available Scripts (right panel) | The discovered test suites, grouped by file. A counter shows how many script tests are currently available to map. |
| Suite header (right) | A collapsible row per script file showing the suite name, the file path (mono), a framework badge, and the test count. Click to expand or collapse its tests. |
| Test row (right) | An individual automated test inside a suite — shows a hash icon, the test name, a framework badge, and the (truncated) file path. |
| Map button (right) | Appears on each test row once a case is selected on the left. Clicking it creates the mapping. Before any case is selected, the row instead reads “Select a test case first”. |
| Mapped chip (right) | A green badge on a test that is already mapped. The row is dimmed to show it is taken. |
| Show mapped toggle (right) | A switch in the panel header. Off (default) hides already-mapped tests so you focus on what is still open; on reveals them too. |
| Unmapped counter pill (banner) | Top of the tab: shows “N unmapped” in amber, or “All mapped ✓” in green when nothing is left. |
Reading coverage at a glance
Section titled “Reading coverage at a glance”The screen signals coverage in several complementary ways. On the right panel, mapped tests carry a green Mapped chip and appear dimmed, so the eye is drawn to the work that remains. The banner pill flips from amber (“N unmapped”) to green (“All mapped ✓”) the moment your last case is linked. On the Dashboard, the Mapped stat card shows both the count and the coverage percentage against the full catalog.
Controls and filters
Section titled “Controls and filters”| Control | Where | Effect |
|---|---|---|
| Search test cases | Map tab, left panel | Filters unmapped cases by title or ID as you type. A clear (×) button resets it. |
| Search mapped cases | Mapped tab | Filters the mapping table by case title, script path, or test name. |
| Sync-status filter | Mapped tab | A dropdown to show only mappings of a chosen status: All / Synced / Script Updated / Script Missing / Case Updated. |
| Show mapped toggle | Map tab, right panel | Reveals or hides already-mapped script tests in the Available Scripts list. |
Mapping a test case to a script
Section titled “Mapping a test case to a script”- Open the Map Test Cases tab.
- In the left Unmapped Test Cases panel, click the manual case you want to automate. It highlights and its radio fills.
- In the right Available Scripts panel, find the suite (script file) that contains the matching automated test, and click its header to expand it.
- Locate the specific test, then click its Map button.
- A success toast confirms “Mapped successfully to <test name>”. The case disappears from the unmapped list and now appears on the Mapped Test Cases tab.
Mapping a case to multiple scripts
Section titled “Mapping a case to multiple scripts”A single manual case can be covered by more than one automated test. When a test is already mapped and you have a case selected on the left, its row shows the green Mapped chip alongside an amber Map Also button. Click Map Also to add an additional mapping for the selected case to that same test — useful when one requirement is verified across multiple scripts.
Removing a mapping
Section titled “Removing a mapping”- Go to the Mapped Test Cases tab.
- Find the row you want to unlink (use search or the status filter to narrow down).
- Click the Unlink (broken-chain) icon in that row’s Actions column.
- Confirm the prompt “Remove mapping for 1 test case(s)?”.
- A toast confirms the unlink. The case returns to the unmapped pool and becomes available to re-map.
How scripts are suggested
Section titled “How scripts are suggested”There is no free-text “guess the script for me” suggester on this screen — mappings are created by explicit selection. What Testver does provide is reverse-engineering awareness: when scripts were mapped in bulk by an automated discovery pass, the screen recognises those mappings (even when the mapped test names don’t line up with currently discovered tests) and marks the whole file as mapped, so auto-generated links don’t reappear as unfinished work. The Show mapped toggle lets you surface those if you want to inspect them.
Bulk actions
Section titled “Bulk actions”On the Mapped Test Cases tab, each row has a checkbox, and the header checkbox selects or clears every visible (filtered) row at once. As soon as one or more rows are selected, a brand-coloured bulk action bar appears showing the count selected and two buttons:
| Bulk action | What it does |
|---|---|
| Unlink Selected | Prompts for confirmation, then removes the mapping for every selected case in one operation. |
| Mark Synced | Sets the sync status of every selected mapping to synced — a fast way to clear stale-drift warnings once you’ve reviewed them. |
Related
Section titled “Related”- Script Mapping overview — the screen and its tabs.
- Mapped Test Cases tab — manage links you already made.
- Dashboard tab — coverage and sync-health numbers.