

GuidesMobile App Automation with AI
Mobile App Automation with AI
Introduction
Section titled “Introduction”What this guide covers
Section titled “What this guide covers”The AI Assistant has a Mobile mode. In it, you pick a device and an app, and then describe what you want in plain English — “log in as the test user and check the order history shows two orders”. The assistant opens the app on the device, taps and types through it while you watch, tells you what it found, and writes the steps into a test in your project’s own Appium framework.
This guide is a tutorial. It starts with one session on one device and builds up, one lesson at a time, to dialogs, hybrid apps, test code, and running and fixing tests on the device you picked. Every lesson has prompts you can copy, what happens when you send them, and what to look for. At the end there is a catalogue of mobile tests you can ask for, with a ready-made prompt for each.
What you can do — at a glance
Section titled “What you can do — at a glance”| Area | What it means | Lesson |
|---|---|---|
| Sessions | Run the app on an Android emulator or phone, an iOS simulator or iPhone on a Mac, or a cloud device from BrowserStack, LambdaTest or Sauce Labs — and watch it live. | 1 |
| Reading the screen | The assistant reads every element on screen — ids, texts, and state such as checked or disabled. | 2 |
| Tapping and typing | Tap, long-press, type into fields, press Back, Home or Enter. | 3 |
| Scrolling, swiping, waiting | Scroll a list until an item shows, swipe carousels, wait for a spinner to go. | 4 |
| Dialogs and the device | Permission prompts and alerts, app switches, portrait and landscape. | 5 |
| Hybrid apps | Web content inside the app (webviews) — switch in, test it, switch back. | 6 |
| End-to-end flows | Whole journeys checked step by step: sign up, search, buy. | 7 |
| Test code | Tests in your project’s own framework, with stable locators and screen objects. | 8 |
| Run and fix | Run a test on the device you picked, read the failure, fix it, run it again. | 9 |
| A new framework | A complete Appium framework from scratch, in the language you choose. | 10 |
| Recording | Tap through a journey yourself in the AI Record agent and get a test in your framework. | 11 |
Who this guide is for
Section titled “Who this guide is for”- Manual testers who want to check an app on a real device by describing it in words.
- Automation engineers who want Appium tests written, run and fixed for them, in the framework they already use.
- Developers who want to check a new build on an emulator or a phone before handing it over.
- Test leads who need to know what mobile automation can cover, and what to ask for.
You do not need to know how to code. You need an app build (an .apk or .aab for Android, an .ipa for an iPhone, or a zipped .app for the iOS simulator) and a device to run it on — see Before you start.
Key terms
Section titled “Key terms”| Term | Meaning |
|---|---|
| App build | The installable file of your app: .apk or .aab for Android, .ipa for real iPhones and iPads, a zipped .app for the iOS simulator. |
| Device | Where the app runs: a real phone, an Android emulator, an iOS simulator, or a device in a cloud provider’s lab. |
| Provider | Who supplies the device: Local Devices (Appium) on your computer, or a cloud provider (BrowserStack, LambdaTest, Sauce Labs) with your own account. |
| Appium | The open-source automation engine that drives mobile apps. Testver talks to it for you. |
| Session | One live connection to one device with one app open. It lasts until you end it. |
| Element tree | The list of everything on the current screen — buttons, fields, texts — with their ids and state. The assistant reads it the way a person reads the screen. |
| Locator | How a test finds an element: an accessibility id, a resource id, a text, or an XPath. |
| Accessibility id | A label the app developer gives an element (Android content-desc, iOS accessibilityIdentifier). The most stable locator. |
| Native / webview | A native screen is built with the platform’s own controls. A webview shows web content (HTML) inside the app. An app with both is hybrid. |
| Context | Which part the assistant is driving: NATIVE_APP, or a WEBVIEW_… for web content. |
| Screen object | A class in your tests that holds one screen’s locators and actions — the mobile version of a page object. |
How Mobile mode works
Section titled “How Mobile mode works”- You pick a provider, a device and an app in the Mobile session bar and click Start session. A live mirror of the device opens next to the chat.
- You type what you want, in words.
- The assistant picks the right action — open the app, tap, type, scroll — and shows each one as a tool call in the conversation.
- Each action first asks for your permission (unless you switched the chat to Auto — see below).
- After every action the assistant reads the screen again, once it has stopped changing, so it always works from what is really there.
- It tells you what passed and what did not — and, when you ask, writes the steps into a test in your project, runs it on the same device, and fixes it until it passes.
Mobile mode has no web browser and no API tools. It works with your app on the device, your project’s files, and your tests.
Before you start
Section titled “Before you start”Open Mobile mode
Section titled “Open Mobile mode”-
Mobile mode is shown when your workspace is set up for mobile testing. If you don’t see it, open Settings → General → App Mode and choose Mobile (see App Mode).

-
Open the AI Assistant (Agents → AI Assistant).
-
In the mode picker next to the message box, choose Mobile — or, on the welcome screen, click the Mobile row.
-
A Mobile session bar appears above the message box. You will use it in Lesson 1.
Manual or Auto permissions
Section titled “Manual or Auto permissions”Next to the mode picker is the Manual / Auto permission picker. It belongs to the chat:
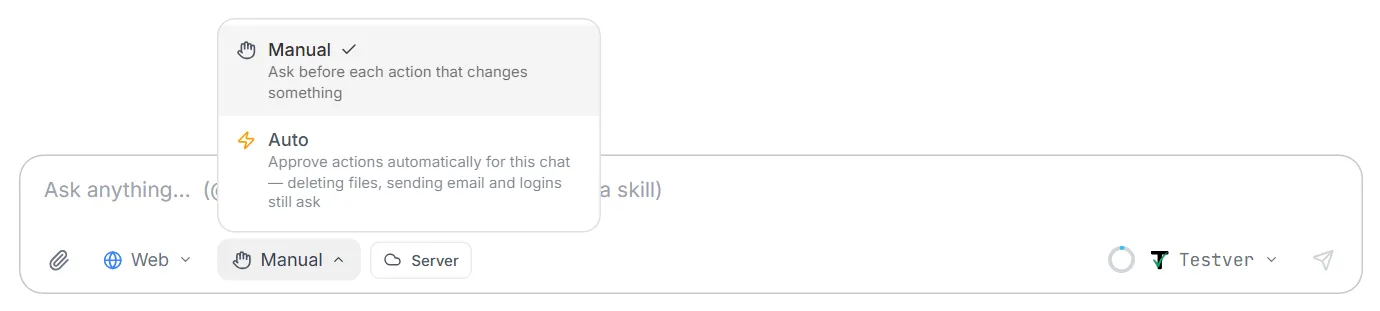
- Manual (the default) — the assistant asks before each action. You see what it wants to do and click Allow, Always allow for that action, or Deny.
- Auto — those actions run without asking. Choose it when you trust the device and the app build, and want the assistant to work through a long flow uninterrupted.
| What the action does | Examples | Asks in Manual mode? |
|---|---|---|
| Reads your project | Read a file, search the project, look up a test | No |
| Reads the device | Read the screen, take a screenshot, list the app’s contexts, wait for something to appear | No |
| Uses the device | Open the app, tap, type, swipe, scroll, press a key, answer a dialog, rotate, switch context | Yes |
| Changes your project | Write or edit a test, a screen object, a config file | Yes |
| Runs something | Run a test, run a command | Yes |
| Deletes a file | Remove a file from the project | Yes — even in Auto |
Where the app can run
Section titled “Where the app can run”| Device | Runs on your computer? | What it needs |
|---|---|---|
| Android emulator | Windows, macOS, Linux | Appium with the UiAutomator2 driver, the Android SDK (with ANDROID_HOME set), and an emulator (AVD) from Android Studio. Start it in Settings → Connectors → Local Devices (or Android Studio) before you pick it. |
| Android phone | Windows, macOS, Linux | The same, plus the phone plugged in over USB with USB debugging allowed for this computer. |
| iOS simulator | macOS only | Xcode and Appium’s XCUITest driver. Start the simulator in Settings → Connectors → Local Devices (or Xcode) before you pick it. |
| iPhone / iPad | macOS only | Xcode, the XCUITest driver, libimobiledevice, and WebDriverAgent signed with your Apple team. |
| Cloud device | Any | An account with BrowserStack, LambdaTest or Sauce Labs, saved in Settings → Connectors. No Appium on your computer. |
All local devices go through Settings → Connectors → Local Devices (Appium): turn it on, and its checklist tells you what is missing and gives you the command to install it. See Local Devices (Appium). Appium must run on the same computer as Testver; Testver does not start it for you.
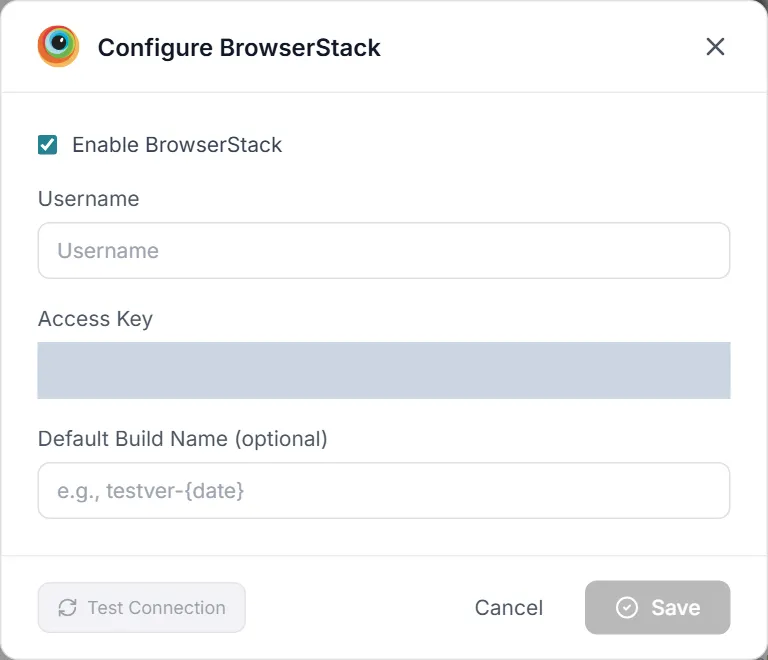
Cloud providers are set up once in Settings → Connectors → Cloud Testing Providers — enter your username and access key, click Test Connection, then Save. See Cloud Testing Providers.

What to have ready
Section titled “What to have ready”-
An app build. The file must match where it runs:
Device App file Android (emulator, phone or cloud) .apk(or.aab)Real iPhone / iPad, or a cloud iOS device .ipa, signed for the deviceiOS simulator a simulator build: the .appfolder from an iOS Simulator build in Xcode, zipped (e.g.Shop.app.zip) — an.ipacan’t be installed on a simulatorTestver checks an iOS build against the target and tells you before starting when they don’t match.
-
A test account for the app, if it needs a login. Give the assistant test credentials only — never a real customer’s.
-
A device ready to use: a phone unlocked and connected, an emulator listed in Local Devices, or a cloud provider showing ready in the session bar.
-
Optional: your Appium test project open in Testver, if you want tests written into it (Lessons 8–9). Without one, Lesson 10 builds one.
Lesson 1: Your first session
Section titled “Lesson 1: Your first session”Try it:
- In the Mobile session bar, open the provider picker and choose a provider that says ready — for example Local Devices (Appium). One that says no creds needs setting up in Connectors first.
- Open the device picker. Type to search (e.g. Pixel, iPhone). Real devices are listed first. A device that can’t be used yet is greyed out with the reason (e.g. Tap “Allow” on the phone’s USB debugging prompt).
- Open the app picker and choose a build — or click Upload app build at the bottom of the list (
.apk,.aab,.ipa, or a zipped simulator.app). A progress bar shows the upload; the new build is then selected. - Click Start session. A local device usually starts quickly; a cloud device usually takes 30–60 seconds the first time, and up to about 4 minutes when the provider is busy.
- Then ask:
Open the app and tell me what’s on the first screen.
What happens: the bar shows a green Live · pill with the device name, and the right-hand panel shows a live mirror of the device. The assistant asks to open the app (Manual mode), opens it, and describes the first screen — its title, the buttons, the fields, and anything blocking it, such as a permission prompt.
The live view
Section titled “The live view”| Part | What it does |
|---|---|
| Device mirror | A live picture of the device screen, refreshed continuously. Drag on it to scroll the app. |
| Pause / Resume | Stops and restarts the picture (the session stays open). |
| Provider link (cloud only, arrow icon) | Opens the provider’s own page for this session in a new tab. |
| End session (X) | Closes the session, after a confirmation. |
| Divider | Drag it to make the mirror wider or narrower. |
While a session is live, the provider, device and app pickers are hidden — a session is fixed to what it started with. To change any of them, click End session and start again.
The app library
Section titled “The app library”The builds you upload go into the project’s app library, shared by the AI Assistant, AI Record and the Runner: upload once, pick it anywhere.
| Fact | Detail |
|---|---|
| Same file twice | Recognised by its contents and kept once — no second copy, no second upload. |
| Cloud providers | The build is uploaded to your provider the first time it’s used there, and reused after that. |
| Names | Give builds names such as Dev or QA in Settings → Run Configuration → App Builds, where you can also add .aab files. |
| Size | Up to 1 GB per file. |
Example prompts
Section titled “Example prompts”Open the app and describe the first screen, including any dialogs on top of it.
Open the app and list every button and field on the screen with its accessibility id.
Open the app, wait for the splash screen to finish, and tell me which screen it lands on.
Lesson 2: Reading the screen
Section titled “Lesson 2: Reading the screen”The assistant does not look at pixels. It reads the element tree — every element on the screen with its type, accessibility id, resource id, text and state.
Try it:
Read the settings screen and tell me which switches are on and which are off.
What happens: the assistant reads the screen and answers from the tree. Element state is part of it, so it can tell you about switches and boxes without tapping anything:
| State | Meaning |
|---|---|
| checked / unchecked | A switch, checkbox or radio button is on / off |
| disabled | The element can’t be used right now (e.g. a greyed-out Continue) |
| selected | The current tab or item |
| focused | The field the keyboard types into |
| scrollable | A list or page that can scroll |
Banners in the tree
Section titled “Banners in the tree”The tree can start with a warning. The assistant acts on them first:
| Banner | Meaning |
|---|---|
| ⚠ SYSTEM DIALOG/ALERT DETECTED | A permission prompt, alert or crash dialog is covering the app (Lesson 5). |
| ⚠ FOREGROUND CHANGED | The last action opened another app or screen — the tree is the new one. |
| hybrid screen — a WebView is present | Part of the screen is web content (Lesson 6). |
Big screens
Section titled “Big screens”A long screen is cut short when it is read. Ask the assistant to look for something specific — “find the Delete account button” — and it filters the tree to matching elements. A screenshot is available too, but the assistant only uses it when it really needs pixels; the tree says more.
Example prompts
Section titled “Example prompts”Which fields on this screen are required, and which buttons are disabled until they are filled?
Find every element on this screen that has no accessibility id and list them.
Is the “Remember me” checkbox ticked on the login screen?
Which tab is selected in the bottom navigation bar?
Lesson 3: Tapping, typing and keys
Section titled “Lesson 3: Tapping, typing and keys”Try it:
Tap “Sign in”, enter qa.user@example.com as the email and the password from my test account, then tap “Continue” and tell me where it lands.
What happens: each step is a tool call — tap, type, type, tap. After every step the assistant reads the screen again and checks it changed the way it should. A tap that “worked” is not enough: if Continue leads to an error message, it tells you.
| Action | Say | Notes |
|---|---|---|
| Tap | ”Tap Sign in” | The assistant finds the element by its accessibility id first, then its resource id, then its text. |
| Long-press | ”Long-press the first message” | For context menus and drag handles. |
| Type | ”Type Ann into the first-name field” | The field is cleared first, unless you say “add to it”. |
| Hardware keys | ”Press Back”, “Press Home”, “Press Enter” | Android also has volume up / down and power. iOS has Home only. |
| Tap a point | ”Tap the middle of the screen” | A last resort, for system screens with nothing to find an element by. |
Example prompts
Section titled “Example prompts”On the login screen, tap Sign in without filling anything and tell me which error messages appear.
Add the first product to the cart, open the cart, and check the quantity is 1 and the total matches the product price.
Long-press the first item in the inbox and tell me which options the menu offers.
Fill the sign-up form with a new test user (any valid name, email ending in @example.com, password Test1234!) and submit it.
Lesson 4: Scrolling, swiping and waiting
Section titled “Lesson 4: Scrolling, swiping and waiting”Scroll to an element
Section titled “Scroll to an element”When an item is below the bottom of the screen, the assistant scrolls until it is visible — using the platform’s own scrolling, and stopping at the end of the list.
Scroll the product list down to “Wireless Headphones” and open it.
For carousels, swipe-to-dismiss and other gestures:
Swipe left through the onboarding pages until the “Get started” button appears, then tap it.
Wait for something
Section titled “Wait for something”After a tap that loads something, the assistant waits for an element to appear or disappear — a spinner to go, a success message to show — instead of a fixed pause.
Tap “Place order” and wait until the “Order confirmed” message appears (up to 30 seconds).
| Wait | Detail |
|---|---|
| For an element to appear / to be gone | 10 seconds unless you say otherwise; up to 30 seconds |
| A fixed pause | Only when there is nothing to wait for; up to 10 seconds |
Example prompts
Section titled “Example prompts”Scroll to the bottom of the Settings screen and tell me the app version shown there.
Pull down on the inbox to refresh and check the newest message is still at the top.
Swipe away the first notification in the list and check it’s gone.
Search for “shoes”, wait for the spinner to disappear, and count the results on the first screen.
Lesson 5: Dialogs, app switches and rotation
Section titled “Lesson 5: Dialogs, app switches and rotation”Permission prompts and alerts
Section titled “Permission prompts and alerts”When a dialog covers the app — “Allow ShopApp to access your location?”, “Delete this item?” — the assistant handles it before anything else. It can accept (Allow, OK) or dismiss (Deny, Cancel) it.
Open the store finder. If it asks for location access, deny it, and tell me what the app shows instead.
App switches
Section titled “App switches”Some taps leave your app — a link opens the browser, Share opens a share sheet, a login opens another app. The assistant notices (the ⚠ FOREGROUND CHANGED banner) and tells you where it ended up. Ask it to press Back to return.
Rotation
Section titled “Rotation”Rotate the device to landscape and check the video player fills the screen, then rotate back to portrait.
The assistant can read the current orientation and switch between portrait and landscape, then reads the screen again — layouts often change.
Example prompts
Section titled “Example prompts”Open the camera feature, allow camera access when asked, and tell me which screen opens.
Tap “Delete account” and check the confirmation dialog appears — then cancel it and check the account still exists.
Tap “Terms of service” and tell me whether it opens inside the app or in another app.
On the checkout screen, rotate to landscape and check every field and the Pay button are still reachable.
Lesson 6: Hybrid apps and webviews
Section titled “Lesson 6: Hybrid apps and webviews”Many apps show some screens as web content inside the app — a help page, a checkout, a whole app built with web technology. Those parts are webviews.
Try it:
Open Help → FAQ. It’s a web page inside the app — switch into it, check the first question is “How do I reset my password?”, then switch back to the app.
What happens: the assistant lists the app’s contexts — NATIVE_APP and one or more WEBVIEW_… — switches into the web one, finds elements there by CSS or XPath, and switches back to NATIVE_APP when it is done. While it is inside a webview, a chip with the context name appears in the Mobile session bar.
| You see | Meaning |
|---|---|
Only NATIVE_APP | The app has no webview the assistant can enter. |
A WEBVIEW_… context | Web content the assistant can read as HTML. |
| Content visible on screen but missing from the tree | It is probably in a webview — ask the assistant to switch into it. |
Example prompts
Section titled “Example prompts”List the contexts on the checkout screen and tell me which parts are native and which are web.
In the in-app help center, switch to the webview, search for “refund”, and check at least one article comes up.
On the payment page (a webview), fill the card form with the provider’s test card, submit it, then switch back to the app and check the “Payment received” screen.
Lesson 7: Exploring a whole flow
Section titled “Lesson 7: Exploring a whole flow”Put the lessons together and describe a whole journey. The assistant works through it step by step and reports each check.
Try it:
This is our QA build. Sign up as a new test user, confirm the welcome screen shows their first name, add two products to the cart, check out with the test card, and check the order appears under My orders. Tell me each step’s result.
What happens: the assistant works through each step, reading the screen after every action. It reports what passed, what failed, and — for a failure — what the screen showed instead (“After Place order the screen still shows the cart, with the message ‘Card declined’”).
Example prompts
Section titled “Example prompts”Log in, change the display name on the profile to “QA Bot”, log out and back in, and check the new name stuck.
Go through onboarding without skipping anything and list every screen in order, with its title and buttons.
Try to log in with a wrong password three times and tell me what happens on each try.
Add an item to the wishlist, press Home, open the app again from the home screen, and check the wishlist still has the item.
Lesson 8: Turning it into a test
Section titled “Lesson 8: Turning it into a test”Everything so far runs in the chat. To get test code in your repository — code your CI can run — ask for it.
Try it:
Write a test for the login flow we just did: valid login lands on Home, and a wrong password shows “Invalid credentials”.
What happens: the assistant looks at your project, finds your framework and how its tests are organised, and writes the test the way your project already does it — reusing your screen objects or adding new ones. It builds the locators from what it saw on the device, not from guesses, preferring accessibility ids. Then it asks to run the test (Lesson 9).
| Your project uses | Tests are written in |
|---|---|
| WebdriverIO with Appium | TypeScript or JavaScript |
| pytest with the Appium Python client | Python |
| Java (Maven or Gradle, TestNG) with the Appium Java client | Java |
| .NET (NUnit) with the Appium client | C# |
| RSpec with the Appium Ruby client | Ruby |
Robot Framework projects that use AppiumLibrary run on the device too.
What good tests look like
Section titled “What good tests look like”| Practice | Why |
|---|---|
| Accessibility ids first, then resource ids, XPath last | They survive layout and text changes. |
| A comment on each locator saying what it is | You can read the test without the app open. |
| One screen object per screen | One place to fix when a screen changes. |
| Waits for elements, not fixed sleeps | Faster, and not flaky. |
| Plain-word test titles | Testver runs a test by its title. |
| Device and app read from Testver’s settings, not written into the test | The same test runs on any device you pick. |
Fix or extend an existing test
Section titled “Fix or extend an existing test”Type @ in the message box, pick the test, and say what to change:
(With LoginTest attached — type @ and pick it) Add a check that the “Forgot password?” link opens the reset screen.
Example prompts
Section titled “Example prompts”Write a test for adding a product to the cart and checking the cart badge shows 1. Reuse the existing screen objects.
Create a screen object for the Settings screen with its switches, and a test that turns notifications off and checks it stays off after reopening Settings.
Write a data-driven test for the sign-up form: one valid user and three invalid emails, each with the error message it should show.
(With CheckoutTest attached) The Pay button’s id changed — read the checkout screen on the device and update the locator.
Lesson 9: Running and fixing tests on the device
Section titled “Lesson 9: Running and fixing tests on the device”Try it:
Run the login test on the device and fix it if it fails.
What happens:
- The assistant runs that test by name — the same way Test Explorer’s Run button does, using your project’s run command.
- Testver points the run at the device and app you picked. You don’t put a device name or Appium address in the test.
- With a session live, the run uses that session — no second device boot. A Test driving this session banner covers the live view while it runs, and the assistant’s own taps wait. Control comes back when the run ends.
- If the test fails, the assistant reads the output, looks at the device, changes the test, and runs it again — until it passes, or it explains what is wrong with the app.
With no session live, a run uses the device and app you used last on that provider. An Android emulator that has been closed since is started again. With no device picked and nothing used before, the run goes to Local Devices when it is on, and only then to the default cloud provider set in Settings — never to some other paid cloud provider you didn’t pick. If the cloud run can’t be set up, the assistant reports the problem instead of running the test on your machine.
| You want | Say |
|---|---|
| Run one test | ”Run the checkout test” |
| Run and fix | ”Run the login test and fix it if it fails” |
| Find tests first | ”Which tests cover the cart?” |
| A fresh app each run | Set App launch mode in Local Devices — fresh start (clear data) or keep data |
| Many tests, a suite, a schedule | Use the Runner, Test Explorer or Schedules |
Example prompts
Section titled “Example prompts”Run the onboarding test on the Pixel emulator and tell me why it fails, without changing anything yet.
Run the search test. If a locator fails, read the screen on the device, fix the screen object, and run it again.
The checkout test is flaky on the cloud device — run it, find the step that isn’t waiting properly, and fix the wait.
Which mobile tests failed in the last run? Fix the login one and run it again.
Lesson 10: Building a mobile framework from scratch
Section titled “Lesson 10: Building a mobile framework from scratch”No Appium project yet? The assistant can create one.
- In Settings → Skills, turn on Framework Architecture and Framework: Appium (an admin may need to).
- In Mobile mode, type
/at the start of the message box and pick Framework Architecture, then/again and pick Framework: Appium. Both show as chips above the message box. - Describe what you want:
Create an Appium framework in TypeScript with WebdriverIO for ShopApp.apk on an Android emulator. First scenario: the app opens on the login screen.
What happens: if you didn’t name the app, the device and a first scenario, the assistant asks. Then it creates the project, puts the app and device settings in configuration (never inside a test), writes one smoke test, and runs it to prove everything works.
| Language | Runner |
|---|---|
| TypeScript / JavaScript | WebdriverIO |
| Python | pytest |
| Java | TestNG (Maven or Gradle) |
| C# | NUnit |
| Ruby | RSpec |
The framework reads the device and app Testver hands it when it runs, and falls back to its own .env values when you run it outside Testver. Cloud credentials stay in Settings → Connectors, not in the project. See Framework scaffolding — Appium for the full lesson.
Example prompts
Section titled “Example prompts”Scaffold Appium with Python and pytest for ShopApp.ipa on a BrowserStack iPhone; first test: log in and see the home screen.
Set up an Appium Java TestNG framework for our Android app on a local phone, with screen objects and a base screen for swipes; start with the onboarding carousel.
Lesson 11: Recording a journey with AI Record
Section titled “Lesson 11: Recording a journey with AI Record”Sometimes it is quicker to show than to tell. When you would rather tap through a journey yourself, use the dedicated AI Record agent: you record the steps on the device, and the AI writes the test in your own framework and style. It uses the same providers, devices and app library as Mobile mode.
Try it:
- In the left navigation, open Agents → AI Record. In a workspace with both web and mobile, switch the header toggle to Mobile.
- On Record Mobile App Interactions, pick the Provider, the Device and the App — the same app library you use in Mobile mode, so a build you uploaded there is already listed. A green dot on the status line means a live session is reused.
- Click Start Recording. The device mirror appears on the right.
- Tap through the journey: click the mirror, or tap the phone or emulator itself — both are recorded, with a thumbnail of each step. Type into the focused field, or send hardware keys, from the box below the step timeline.
- Add checks as you go: click Assert (the shield) and tap the element to verify — is visible, contains the text, is enabled and more. Annotate adds a note to a step for the AI, and Custom step adds a part that isn’t a tap (reuse your login helper, read test data).
- Click Stop, choose New Test (give it a name) or Add to Existing Test, and generate. The AI reads your project and writes the test in its framework, language and style.
What happens: every tap, typed value, key and check becomes a numbered step you can edit, reorder or delete before generating. The generated test lands in your project like any other test — find it in Test Explorer and run it by name. Recordings are kept in Recording History, and an unfinished one comes back as a draft.
Then continue in Mobile mode
Section titled “Then continue in Mobile mode”A recorded test is an ordinary test in your project, so the AI Assistant can take it from there: attach it with @ and ask it to run it on a device, fix a failure, or bring it in line with your screen objects (Lessons 8 and 9).
See AI Record for every option — passwords, custom steps, values between steps, and merging into an existing test.
Example prompts
Section titled “Example prompts”(In Mobile mode, with the recorded test attached — type @ and pick it) Run this test on the Pixel 8 emulator and fix anything that fails.
(With the recorded test attached) Move its locators into our existing screen objects and keep the steps as they are.
The catalogue: every kind of mobile test, with a prompt
Section titled “The catalogue: every kind of mobile test, with a prompt”Use these as starting points — swap in your own screens and data.
Smoke and launch
Section titled “Smoke and launch”| Test | Prompt |
|---|---|
| App starts | ”Open the app and check it reaches the login screen without an error dialog” |
| First run | ”Go through onboarding and check it ends on Home” |
| Skip onboarding | ”Tap Skip on the first onboarding page and check it lands on Home” |
| Splash timing | ”Open the app and wait for Home — tell me if it takes more than 10 seconds” |
Forms and input
Section titled “Forms and input”| Test | Prompt |
|---|---|
| Valid login | ”Log in with the test user and check the Home screen greets them by name” |
| Wrong password | ”Log in with a wrong password and check the error text, and that the field isn’t cleared” |
| Required fields | ”Submit the sign-up form empty and list every error message” |
| Field formats | ”Try three invalid emails in sign-up — each must show an error” |
| Disabled button | ”Check Continue stays disabled until both fields are filled” |
| Keyboard Enter | ”Type in the search box, press Enter, and check results appear” |
Navigation, lists and gestures
Section titled “Navigation, lists and gestures”| Test | Prompt |
|---|---|
| Tabs | ”Tap each bottom tab in turn and check its screen title” |
| Back button | ”Open a product, press Back, and check the list keeps its scroll position” |
| Long lists | ”Scroll the catalog to the last item and check it loads more” |
| Carousel | ”Swipe through the banner carousel and count its pages” |
| Long-press menu | ”Long-press a message and check Delete is in the menu” |
| Swipe to delete | ”Swipe the first cart item left, delete it, and check the total updates” |
Dialogs, permissions and the device
Section titled “Dialogs, permissions and the device”| Test | Prompt |
|---|---|
| Permission allowed | ”Open Scan, allow camera access, and check the scanner opens” |
| Permission denied | ”Open Scan, deny camera access, and check the app explains why it needs it” |
| Confirm dialog | ”Tap Delete account, cancel the dialog, and check nothing was deleted” |
| Rotation | ”Rotate the product page to landscape and back — check nothing is cut off” |
| Leaving the app | ”Tap Share on a product and check the share sheet opens; press Back to return” |
| Home and return | ”Press Home, open the app again, and check it is on the same screen” |
Hybrid apps
Section titled “Hybrid apps”| Test | Prompt |
|---|---|
| Webview content | ”Switch into the Help webview and check the page title” |
| Webview form | ”Fill the feedback form in the webview and check the thank-you message” |
| Back to native | ”After the webview checkout, check the native order-confirmed screen” |
Accessibility basics
Section titled “Accessibility basics”| Test | Prompt |
|---|---|
| Missing labels | ”List every tappable element on Home without an accessibility id” |
| Unlabelled icons | ”Which icon buttons on the toolbar have no text or accessibility label?” |
These are checks of what the element tree shows, not a full accessibility audit.
Test code
Section titled “Test code”| Test | Prompt |
|---|---|
| New test | ”Write a test for this flow and run it on the device” |
| Screen object | ”Create a screen object for the Cart screen” |
| Data-driven | ”Run the login test for every user in test/data/users.json” |
| Locator fix | ”The Search test can’t find the search field — read the screen and fix it” |
| Flaky wait | ”Replace the fixed sleeps in the checkout test with waits for elements” |
Writing good prompts
Section titled “Writing good prompts”- Say it is a test build — “this is our QA build”, “use the test account”.
- Name things the way the screen does — “the Save button”, “the Email field”, “the second tab”.
- Say what “correct” means — the text, the screen, the count you expect — not just “test the login”.
- Ask for the unhappy paths — wrong input, denied permissions, cancelled dialogs.
- One flow per request, then “now write it as a test”, then “run it”.
- Mention dialogs you expect — “it will ask for notifications; allow them”.
Where things are stored
Section titled “Where things are stored”| What | Where |
|---|---|
| App builds (the app library) | .testver/mobile-apps/ in your project |
| Tests generated by AI Record | Your project’s test folders, as the AI writes them (a new test, or merged into an existing one) |
| Tests the assistant writes | Your project’s own test folders, following its conventions |
| Local Devices and cloud provider settings | Settings → Connectors |
| Build names (Dev, QA…) | Settings → Run Configuration → App Builds |
Limits
Section titled “Limits”| Item | Limit |
|---|---|
| App upload | 1 GB per file |
| Wait for an element | 10 seconds by default, up to 30 seconds |
| Fixed pause | Up to 10 seconds |
| Long-press | 0.2 to 10 seconds |
| Scrolling to an element | Up to 6 swipes by default, up to 15 |
| Hardware keys | Android: back, home, enter, volume up / down, power. iOS: home only |
| Orientation | Portrait and landscape |
| Idle cloud session | Closes after 10 minutes with nothing done on the device. A banner counts down 90 seconds before, with Keep session open. Testver keeps the session alive on the provider until then, so the provider’s own idle timeout doesn’t end it first |
| Cloud session start | Up to about 4 minutes on a busy provider |
| Longest cloud session | 3 hours (the server setting TESTVER_MOBILE_SESSION_MAX_MINUTES changes it) |
| Local iOS | macOS only |
| Test runs from the chat | Named tests only — never the whole suite |
Not available as live actions in Mobile mode: opening deep links, installing or removing other apps, sending the app to the background or closing it on command, reading device logs, setting the location, changing the network, biometrics, pinch and zoom, and the clipboard. Mobile mode also does not open websites in the phone’s browser — use Web mode for sites.
Troubleshooting & FAQ
Section titled “Troubleshooting & FAQ”“No desired mobile session set. Pick a device + app in the Mobile picker before starting.” The assistant tried to open the app before a session was started. Pick a provider, device and app in the Mobile session bar and click Start session, then ask again.
The provider says “no creds”. For a cloud provider, add your username and access key in Settings → Connectors → Cloud Testing Providers. For Local Devices (Appium), turn the connector on in Settings → Connectors.
“LambdaTest rejected the credentials (HTTP 401)”. The device picker shows this when LambdaTest refuses the saved username or access key. Correct them in Settings → Connectors → Cloud Testing Providers.
”… is an iOS simulator build — simulator builds run only on a local iOS simulator”. A zipped simulator .app can’t run on a cloud device. Pick a simulator in Local Devices (macOS), or upload an .ipa for a cloud iPhone or iPad.
“ANDROID_HOME (or ANDROID_SDK_ROOT) is not set.” Install the Android SDK (Android Studio is easiest), set ANDROID_HOME to it, then restart Testver and the terminal running Appium. The Local Devices checklist shows what is still missing.
The device is greyed out: “Tap ‘Allow’ on the phone’s USB debugging prompt”. Unlock the phone and allow USB debugging for this computer. Offline — unplug and reconnect it. No USB permission (Linux) — add the udev rule shown in Local Devices.
“An .ipa is a build for real iPhones and iPads — a simulator can’t install it.” Use a simulator build of the app for the simulator, or pick a real device for the .ipa.
The assistant says the session is locked by an active test run. A test is driving the device. Wait for it to finish — control comes back by itself.
It can’t find an element I can see. It may be off-screen (ask it to scroll to it), not loaded yet (ask it to wait for it), under a dialog, or inside a webview (Lesson 6). The failure message includes the screen it saw, so the next try uses the real ids.
No webview context shows up. On Android the app must turn on web-contents debugging and Appium needs a matching chromedriver (see Lesson 6).
The session closed by itself. A cloud session closes after 10 idle minutes or at its time limit, to save device minutes. Cloud sessions are also closed when Testver shuts down. Click Keep session open on the countdown banner to keep an idle one. Start a new session to continue.
Why did it ask for permission again? Manual mode asks before every action that uses the device — a tap, typing, a swipe, a key. Reading the screen and taking a screenshot don’t ask. Click Always allow for that action, or switch the chat to Auto.
“This .zip has no app inside.” A .zip must hold an app: the .app folder of an iOS Simulator build, zipped. Upload an .apk / .aab for Android and an .ipa for a real iPhone as they are.
Can I tap the device myself? In Mobile mode the mirror is for watching the assistant work: drag on it to scroll. To record a journey of your own taps, use the AI Record agent (Lesson 11) — there you tap the mirror or the phone itself, and get a test.
Does it cost anything? Local devices cost nothing. Cloud devices use minutes on your own provider account while the session is open — click End session when you are done.
Related
Section titled “Related”- AI Assistant — the chat, modes, permissions and the Mobile session bar
- AI Record — record a mobile test by hand, with assertions and notes
- Connectors — Local Devices (Appium) — set up emulators, phones, simulators and iPhones
- Runner — Mobile (Appium) commands — run mobile suites on local and cloud devices
- Cloud Grid Execution — BrowserStack, LambdaTest and Sauce Labs runs
- Framework scaffolding — build an Appium framework from scratch
- Analyze & Fix Failures — when a mobile test fails