

Skills
Introduction
Section titled “Introduction”Where Skills live
Section titled “Where Skills live”Skills are managed from the Skills tab of the Settings screen (/settings?tab=skills): create, edit, enable, and disable Agent Skills.
Talking to the assistant happens on the AI Assistant screen (/ai) under the Agents group. There is no longer a standalone Skills screen — the old /skills URL redirects to the AI Assistant.
What a skill is
Section titled “What a skill is”Skills let you teach the assistant specialised expertise — your conventions, your procedures, your house style.
- A skill is a reusable set of written instructions and best practices that gets injected into the AI’s system prompt. Think of it as a cheat-sheet the AI reads before answering. For example, a Playwright skill tells the AI exactly how your team writes Playwright tests, what page-object patterns to use, and what to avoid. Each skill carries a few tags, a token cost, and an enabled/disabled switch.
- A built-in skill can go further than style: it carries a whole procedure. Explore & Automate, below, walks your application, records what it finds, writes the tests and files the matching test cases.
Analogy: imagine hiring a brilliant new tester. A skill is the team handbook you hand them so they follow your conventions. The AI Assistant is the desk where you sit down and actually ask them to do the work, handing them the handbooks that piece of work needs.
Who this guide is for
Section titled “Who this guide is for”This guide is written for everyday Testver users, no coding required to follow along. You will get the most out of it if you are:
- A QA engineer or test author who wants the AI to follow your framework’s conventions when it analyses code, writes scripts, or builds reports.
- A test lead or manager who wants quick reports, charts, and summaries generated through the AI Assistant.
- Anyone curious about what the AI already knows. Administrators enable, disable, create and import skills; everyone else can browse them and use them in the AI Assistant. No prior knowledge is assumed — this guide walks through each screen step by step.
Key terms
Section titled “Key terms”| Term | What it means in Testver |
|---|---|
| Skill | A bundle of written instructions (a SKILL.md file: YAML front-matter plus a Markdown body) that is added to the AI’s prompt when enabled. Adds domain expertise. |
| Agent Skills | The collective name for all skills shown on the Settings → Skills tab. |
| Built-in skill | A skill that ships with Testver. Shown with a notepad icon and the Built-In source. Can be enabled/disabled and exported, but not deleted. |
| Custom skill | A skill you created or imported. Shown with a code icon and a purple custom badge. Can be edited, exported, and deleted. |
| Slug | The unique machine-readable id of a skill (e.g. playwright-best-practices). Shown in the skill’s detail view. |
| Token estimate | Roughly how much of the AI’s context budget a skill consumes when enabled (shown as ~N tok). More enabled skills means more tokens used. |
| Skill picker | The Add a skill list that opens when you type / at the start of the AI Assistant’s message box. It lists the enabled skills; the ones you pick go with your next message. |
How skills are used by the AI Assistant
Section titled “How skills are used by the AI Assistant”Skills are never used automatically. An enabled skill takes effect only when you pick it in the AI Assistant for a message:
- When a skill is enabled on the Settings → Skills tab, it appears in the AI Assistant’s skill picker (but is not selected for you).
- In the AI Assistant, type
/at the start of the message box and pick the skill. It shows as a chip above the box. - When you send, Testver adds the picked skills’ instructions to the AI’s prompt for that message, and your message in the conversation ends with a 📚 Skills used: line naming them.
- The picks then clear. To use a skill again on a later message, pick it again.
Getting Started
Section titled “Getting Started”Opening Skills
Section titled “Opening Skills”- In the left navigation, open Settings — under the Agents group, or under Admin if you are an administrator.
- Select the Skills tab to manage Agent Skills.
- Your active tab is remembered in the page address (the
tabparameter), so/settings?tab=skillsis safe to bookmark or share.
You can also get here from the AI Assistant: the skill picker (/) ends with Manage skills…, which opens this tab.
To use what you configure here, go to AI Assistant (/ai) under the Agents group.
Where each job happens
Section titled “Where each job happens”| Job | Where |
|---|---|
| Browse, search, enable/disable, create, import, edit, export, delete skills | Settings → Skills tab |
Talk to the AI, pick the skills a message uses (/), attach files and Sources, review saved conversations | AI Assistant screen |
At a glance
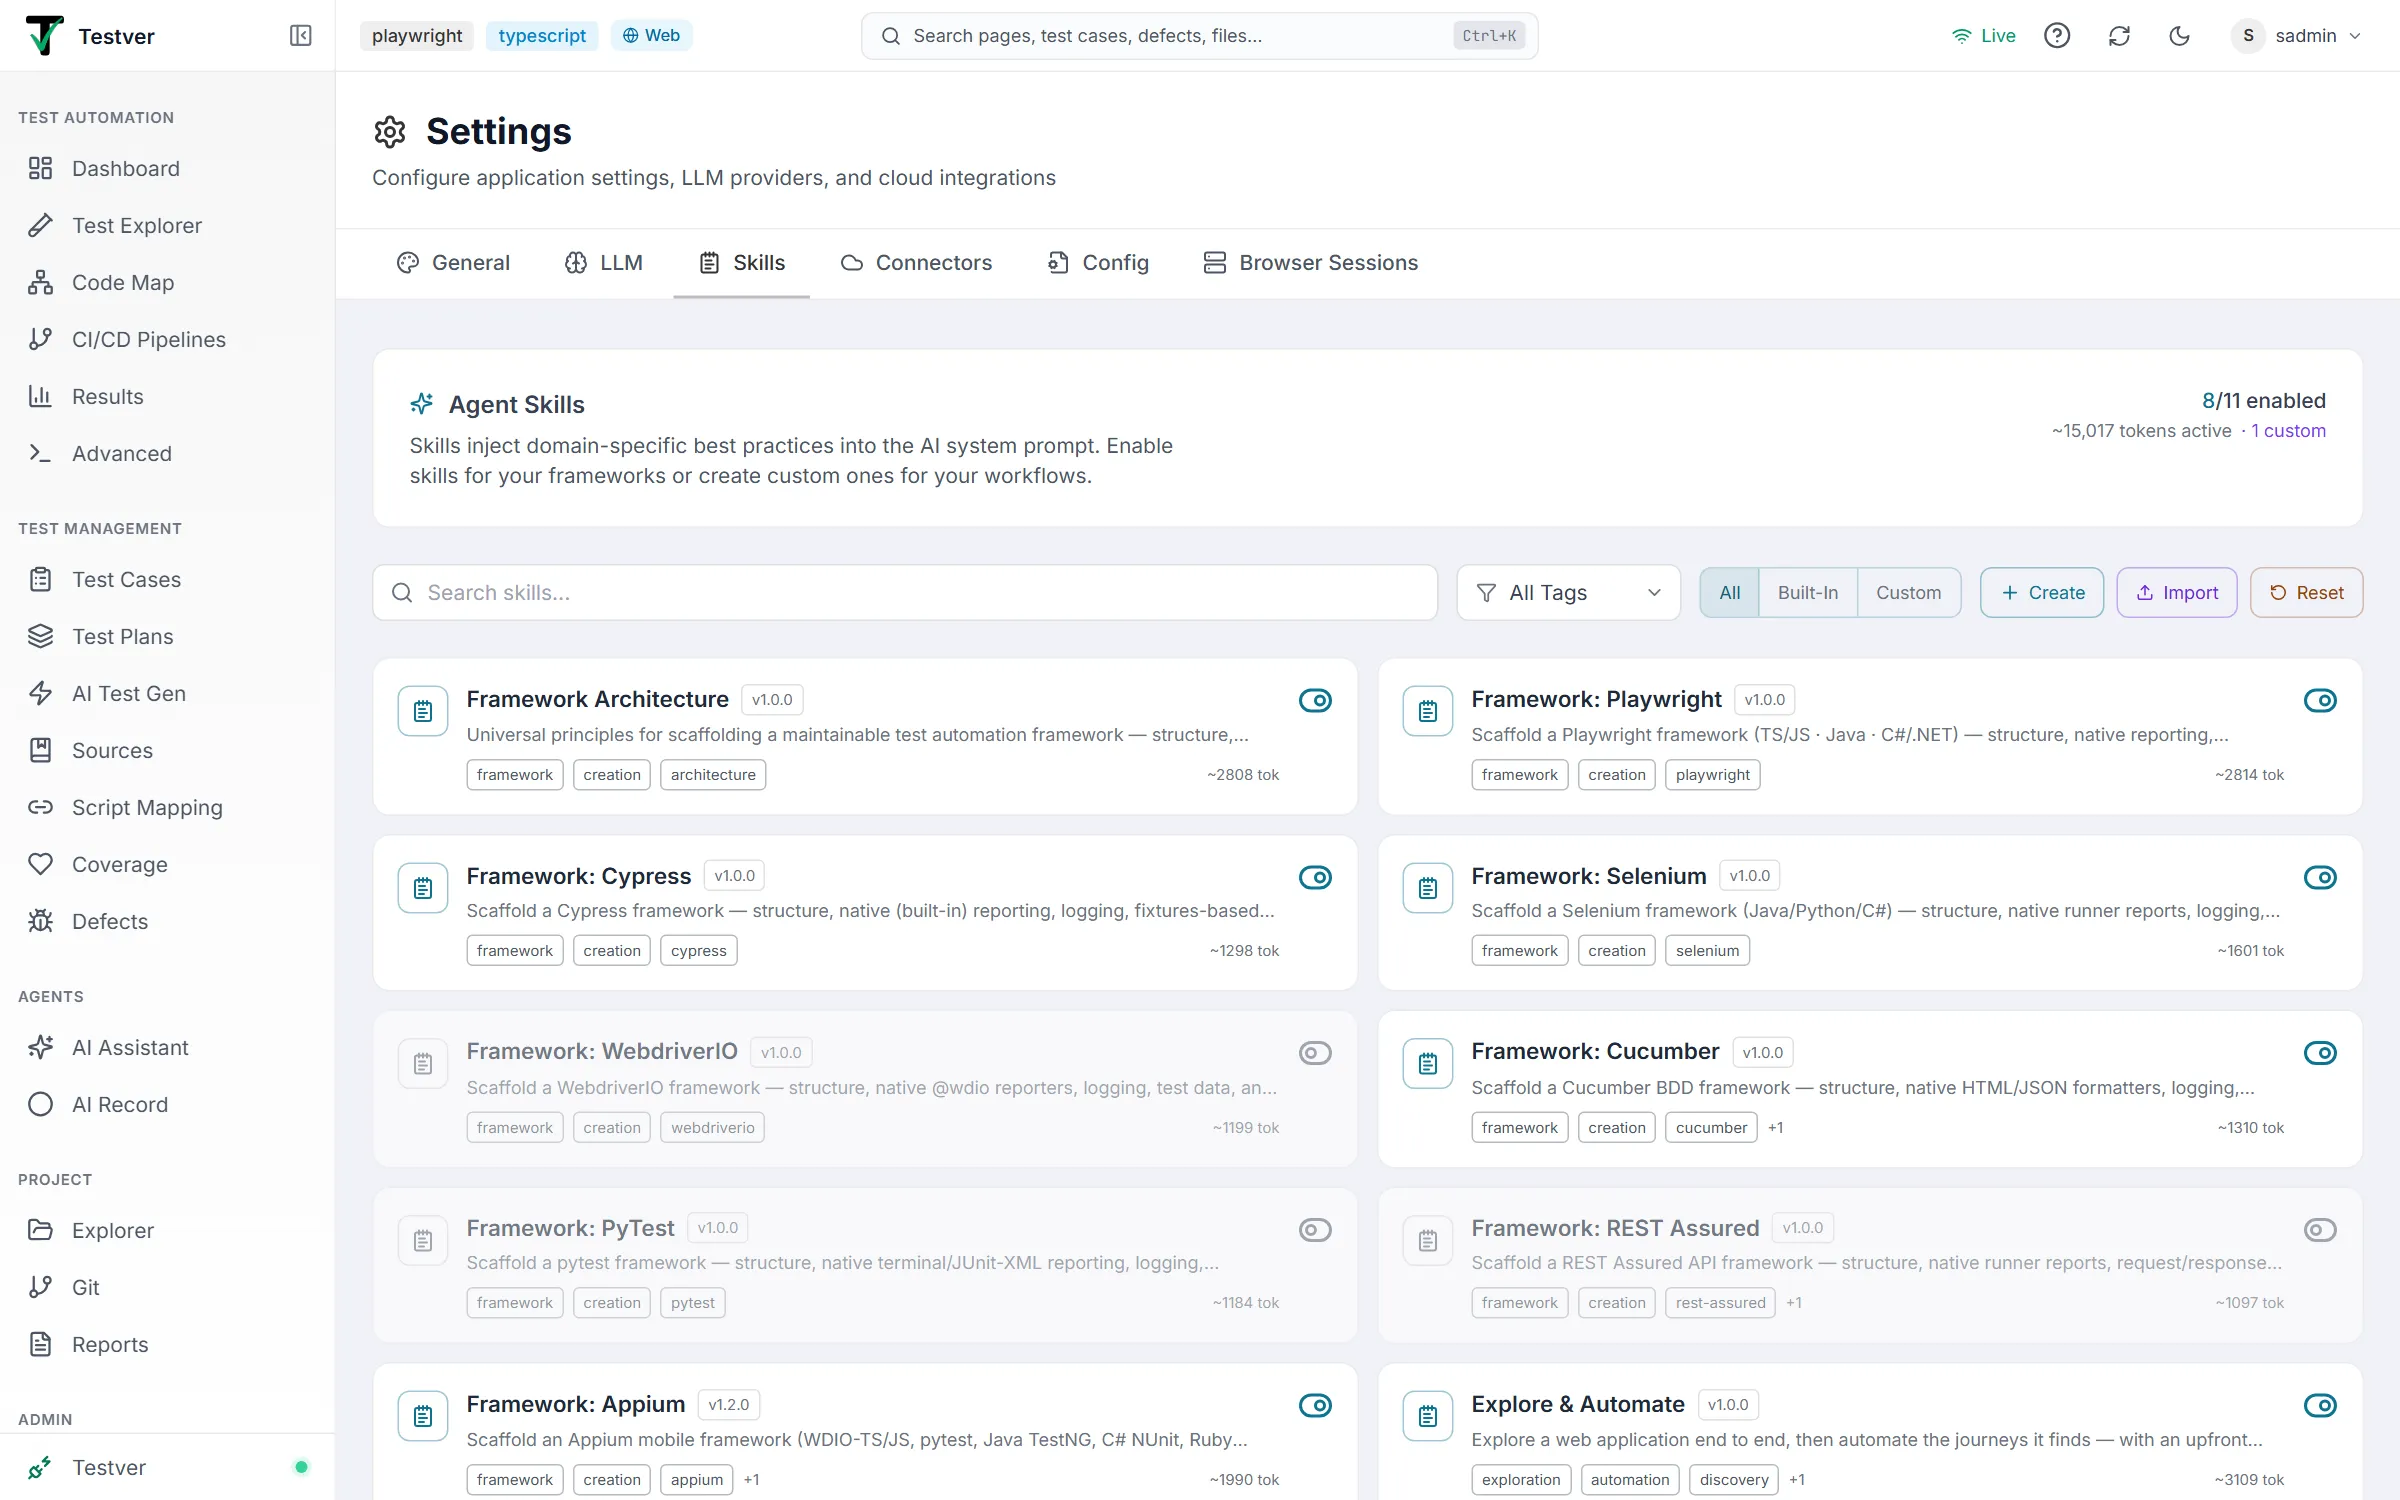
Section titled “At a glance”The Skills tab shows a summary header so you always know where you stand: an N/M enabled counter, an estimate of total tokens active, and how many custom skills you have.

The Skills List (Settings → Skills)
Section titled “The Skills List (Settings → Skills)”Overview
Section titled “Overview”On the Skills tab, under the Agent Skills header, every skill appears as a card in a grid. The header explains the purpose: skills inject domain-specific best practices into the AI system prompt. A skill that is enabled is shown brightly with a cyan toggle; a disabled skill is dimmed.
Each card carries an icon indicating its source, a notepad icon for Built-in skills and a code icon for custom ones, plus the skill name, an optional version tag, the purple custom badge (custom skills only), a one-line description, up to three coloured tag chips, and the token estimate.

Anatomy of a skill card
Section titled “Anatomy of a skill card”| Element | Where | What it does |
|---|---|---|
| Search box | Top bar | Filters cards by name, slug, description, tag, or framework as you type. A clear (x) button appears when text is present. |
| All Tags dropdown | Top bar | Narrows the list to skills carrying a chosen tag. |
| Source filter (All / Built-in / Custom) | Top bar | Shows all skills, only built-in skills, or only your custom skills. |
| Create button | Top bar | Opens the editor to write a brand-new custom skill from scratch. |
| Import button | Top bar | Opens the Import dialog to bring in a skill from a file, pasted text, or a GitHub URL. |
| Reset button | Top bar | Resets all skills to their default state — every skill off — and deletes every custom skill (a Reset Skills confirmation comes first). |
| Enable/disable toggle | Each card (right) | Turns the skill on or off. Shows a spinner while saving. |
| Card body (click) | Each card | Opens the skill detail view (preview). |
| Export icon | Card hover | Downloads the skill as a .md file. |
| Edit icon | Card hover (custom only) | Opens the editor pre-filled with the skill’s content. |
| Delete icon | Card hover (custom only) | Permanently deletes the custom skill (confirmation required). |
| Token chip | Each card | Shows the skill’s approximate token cost (~N tok). |

Finding a skill
Section titled “Finding a skill”- Find the skill you want using search, the tag dropdown, or the source filter.
- Click its toggle on the right of the card. A right-pointing cyan toggle means enabled; a left-pointing grey toggle means disabled.
- The card brightens when enabled and dims when disabled, and the header’s enabled counter and tokens active total update immediately. There is no bulk enable or disable control on the tab. Reset returns everything to the defaults, in which every skill is off. Which enabled skills are actually used is decided per message, in the AI Assistant.
Viewing skill details
Section titled “Viewing skill details”Click anywhere on a skill card (other than the toggle or hover icons) to open its detail view. This shows everything Testver knows about the skill:
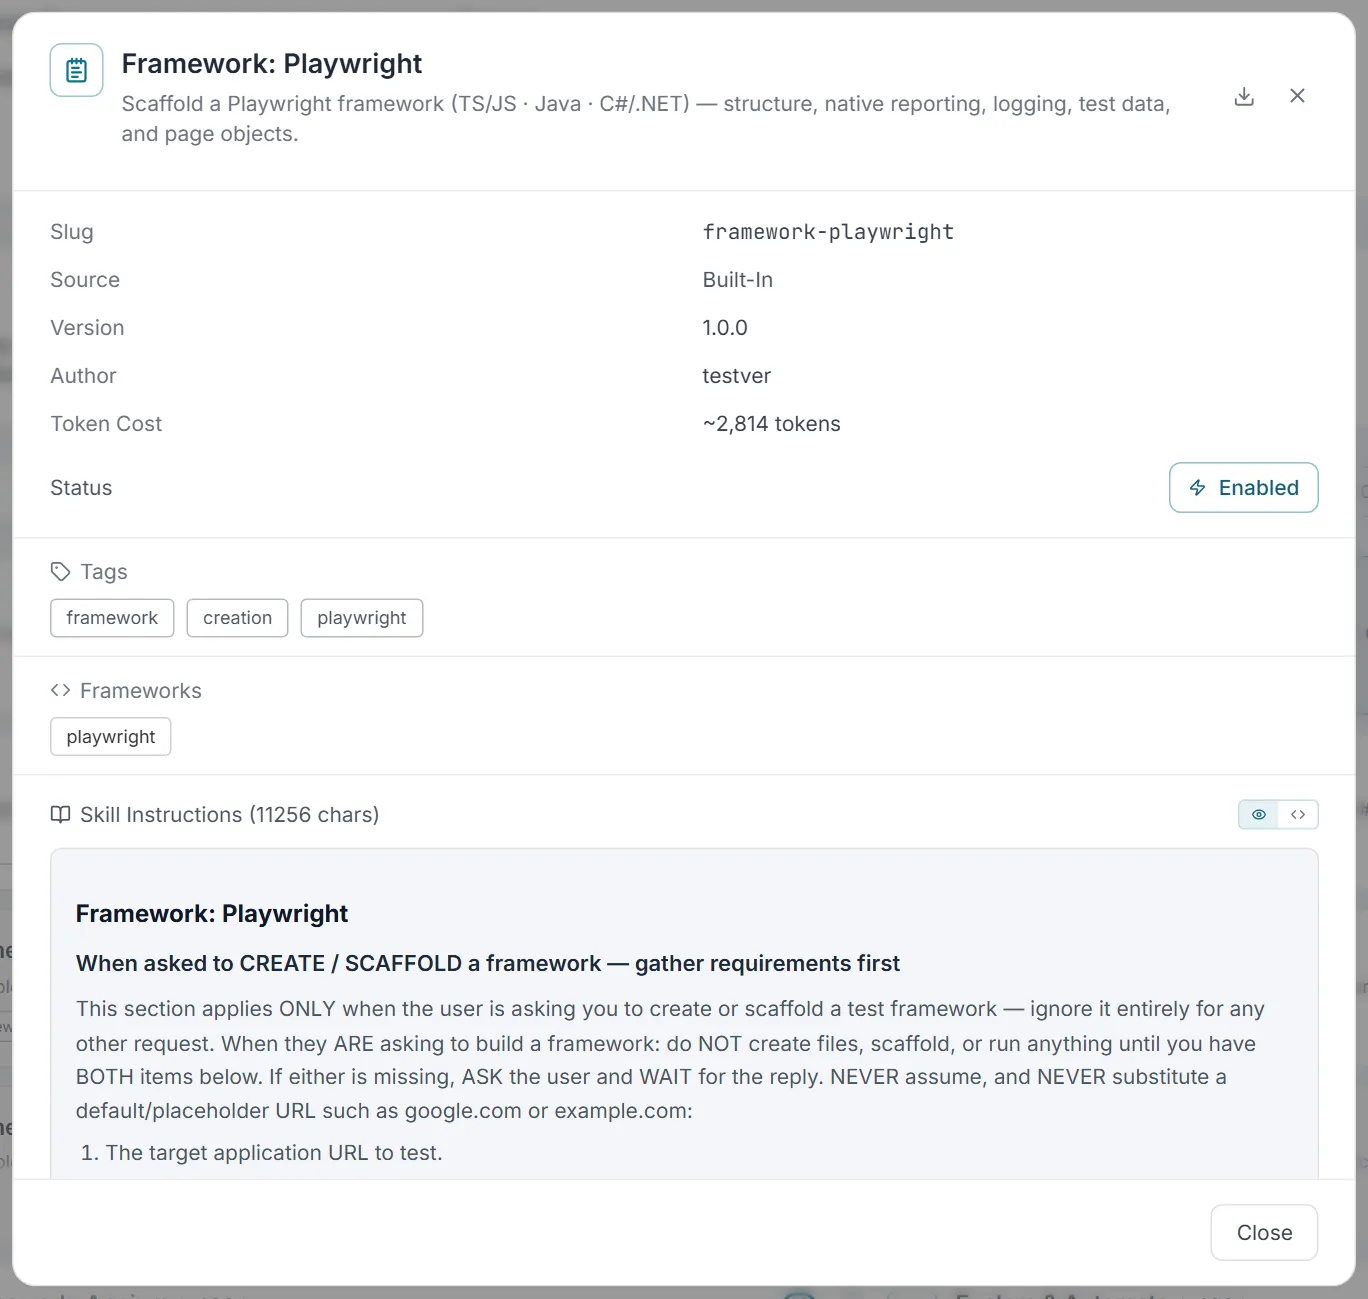
- Name, description, and source (Built-in or Custom).
- Slug, optional Version and Author, and the Token Cost estimate.
- A Status button (Enabled / Disabled) to switch the skill on or off right from the preview — a plain status badge for non-admins.
- Tags and Frameworks chips, when present.
- The full Skill Instructions body, with a toggle between Rendered markdown and Raw source view, plus a character count.
- Action icons in the header to Export (all skills), and Edit / Delete (custom skills only).
Creating a skill
Section titled “Creating a skill”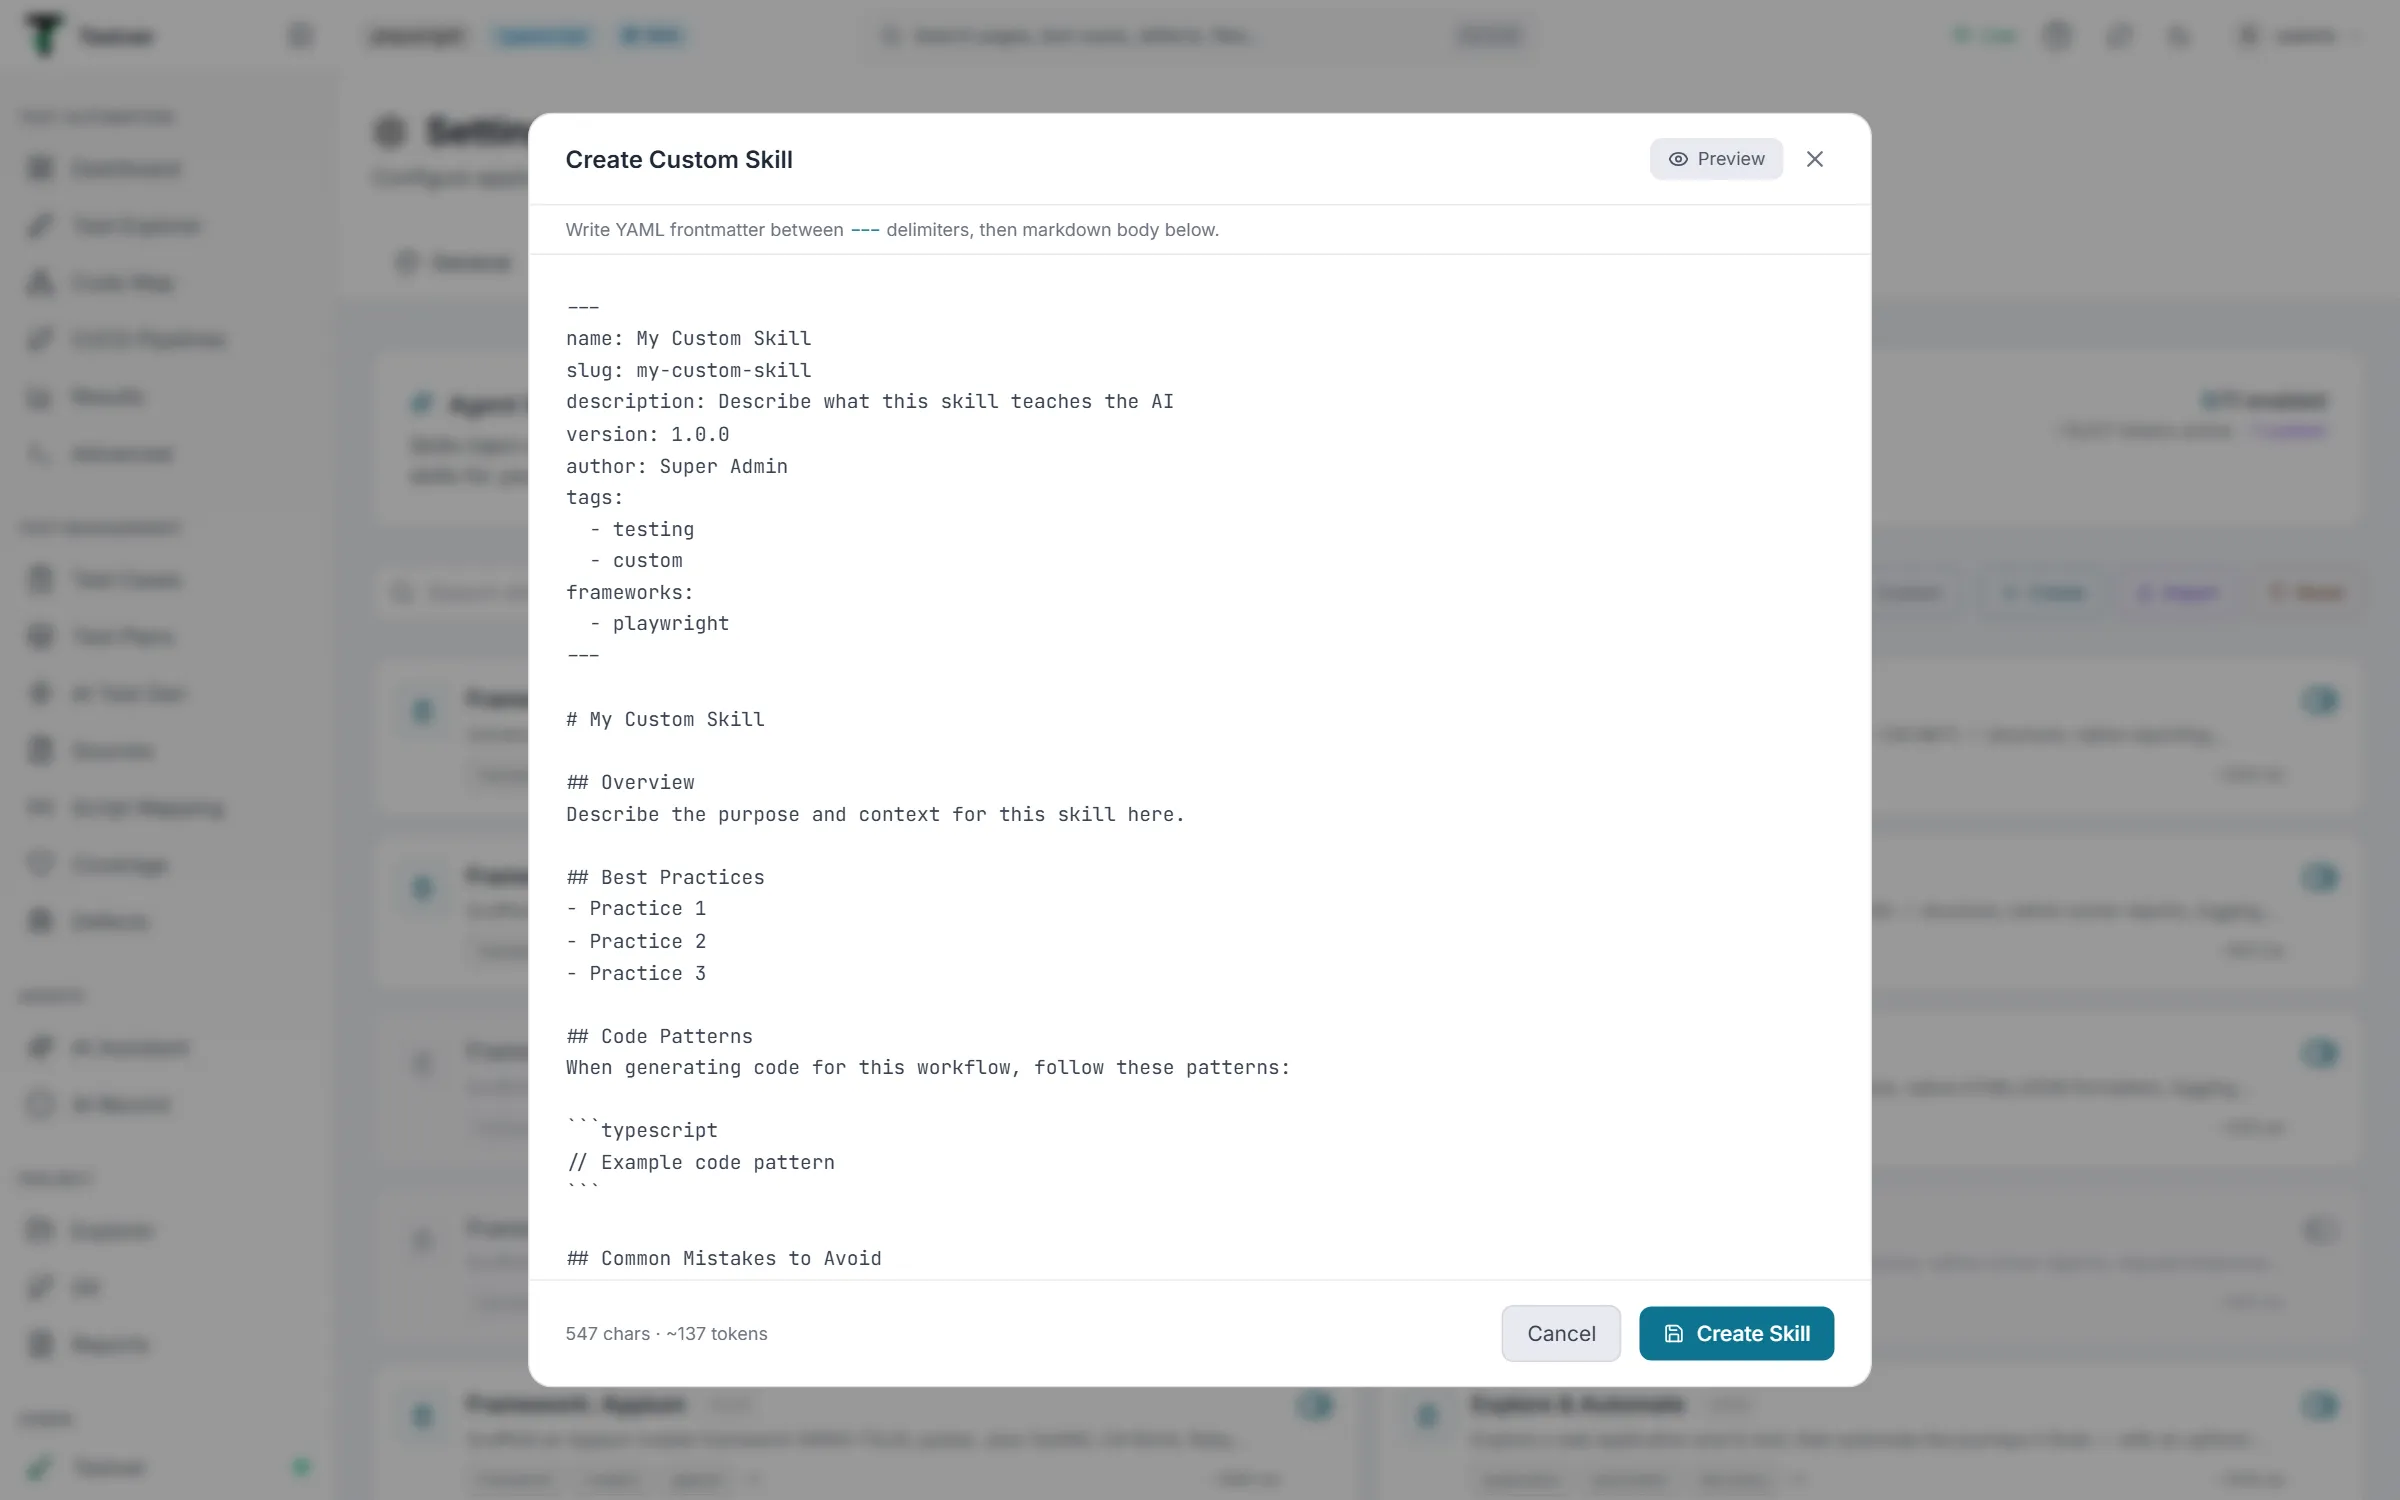
- Click Create in the top bar to open the skill editor.
- Write your skill in
SKILL.mdformat: a YAML front-matter block (name, slug, description, and optionally version, author, tags, frameworks, tools) followed by a Markdown body of instructions. - Use Preview to see the rendered result; the footer shows the character count and an estimated token count.
- Click Create Skill. The new skill appears in the grid with a purple custom badge and can be enabled like any other. (Editing a custom skill opens the same editor with Update Skill; its slug cannot be changed.)
- Newly created skills are marked as your own, so you can edit or delete them later.
Importing a skill
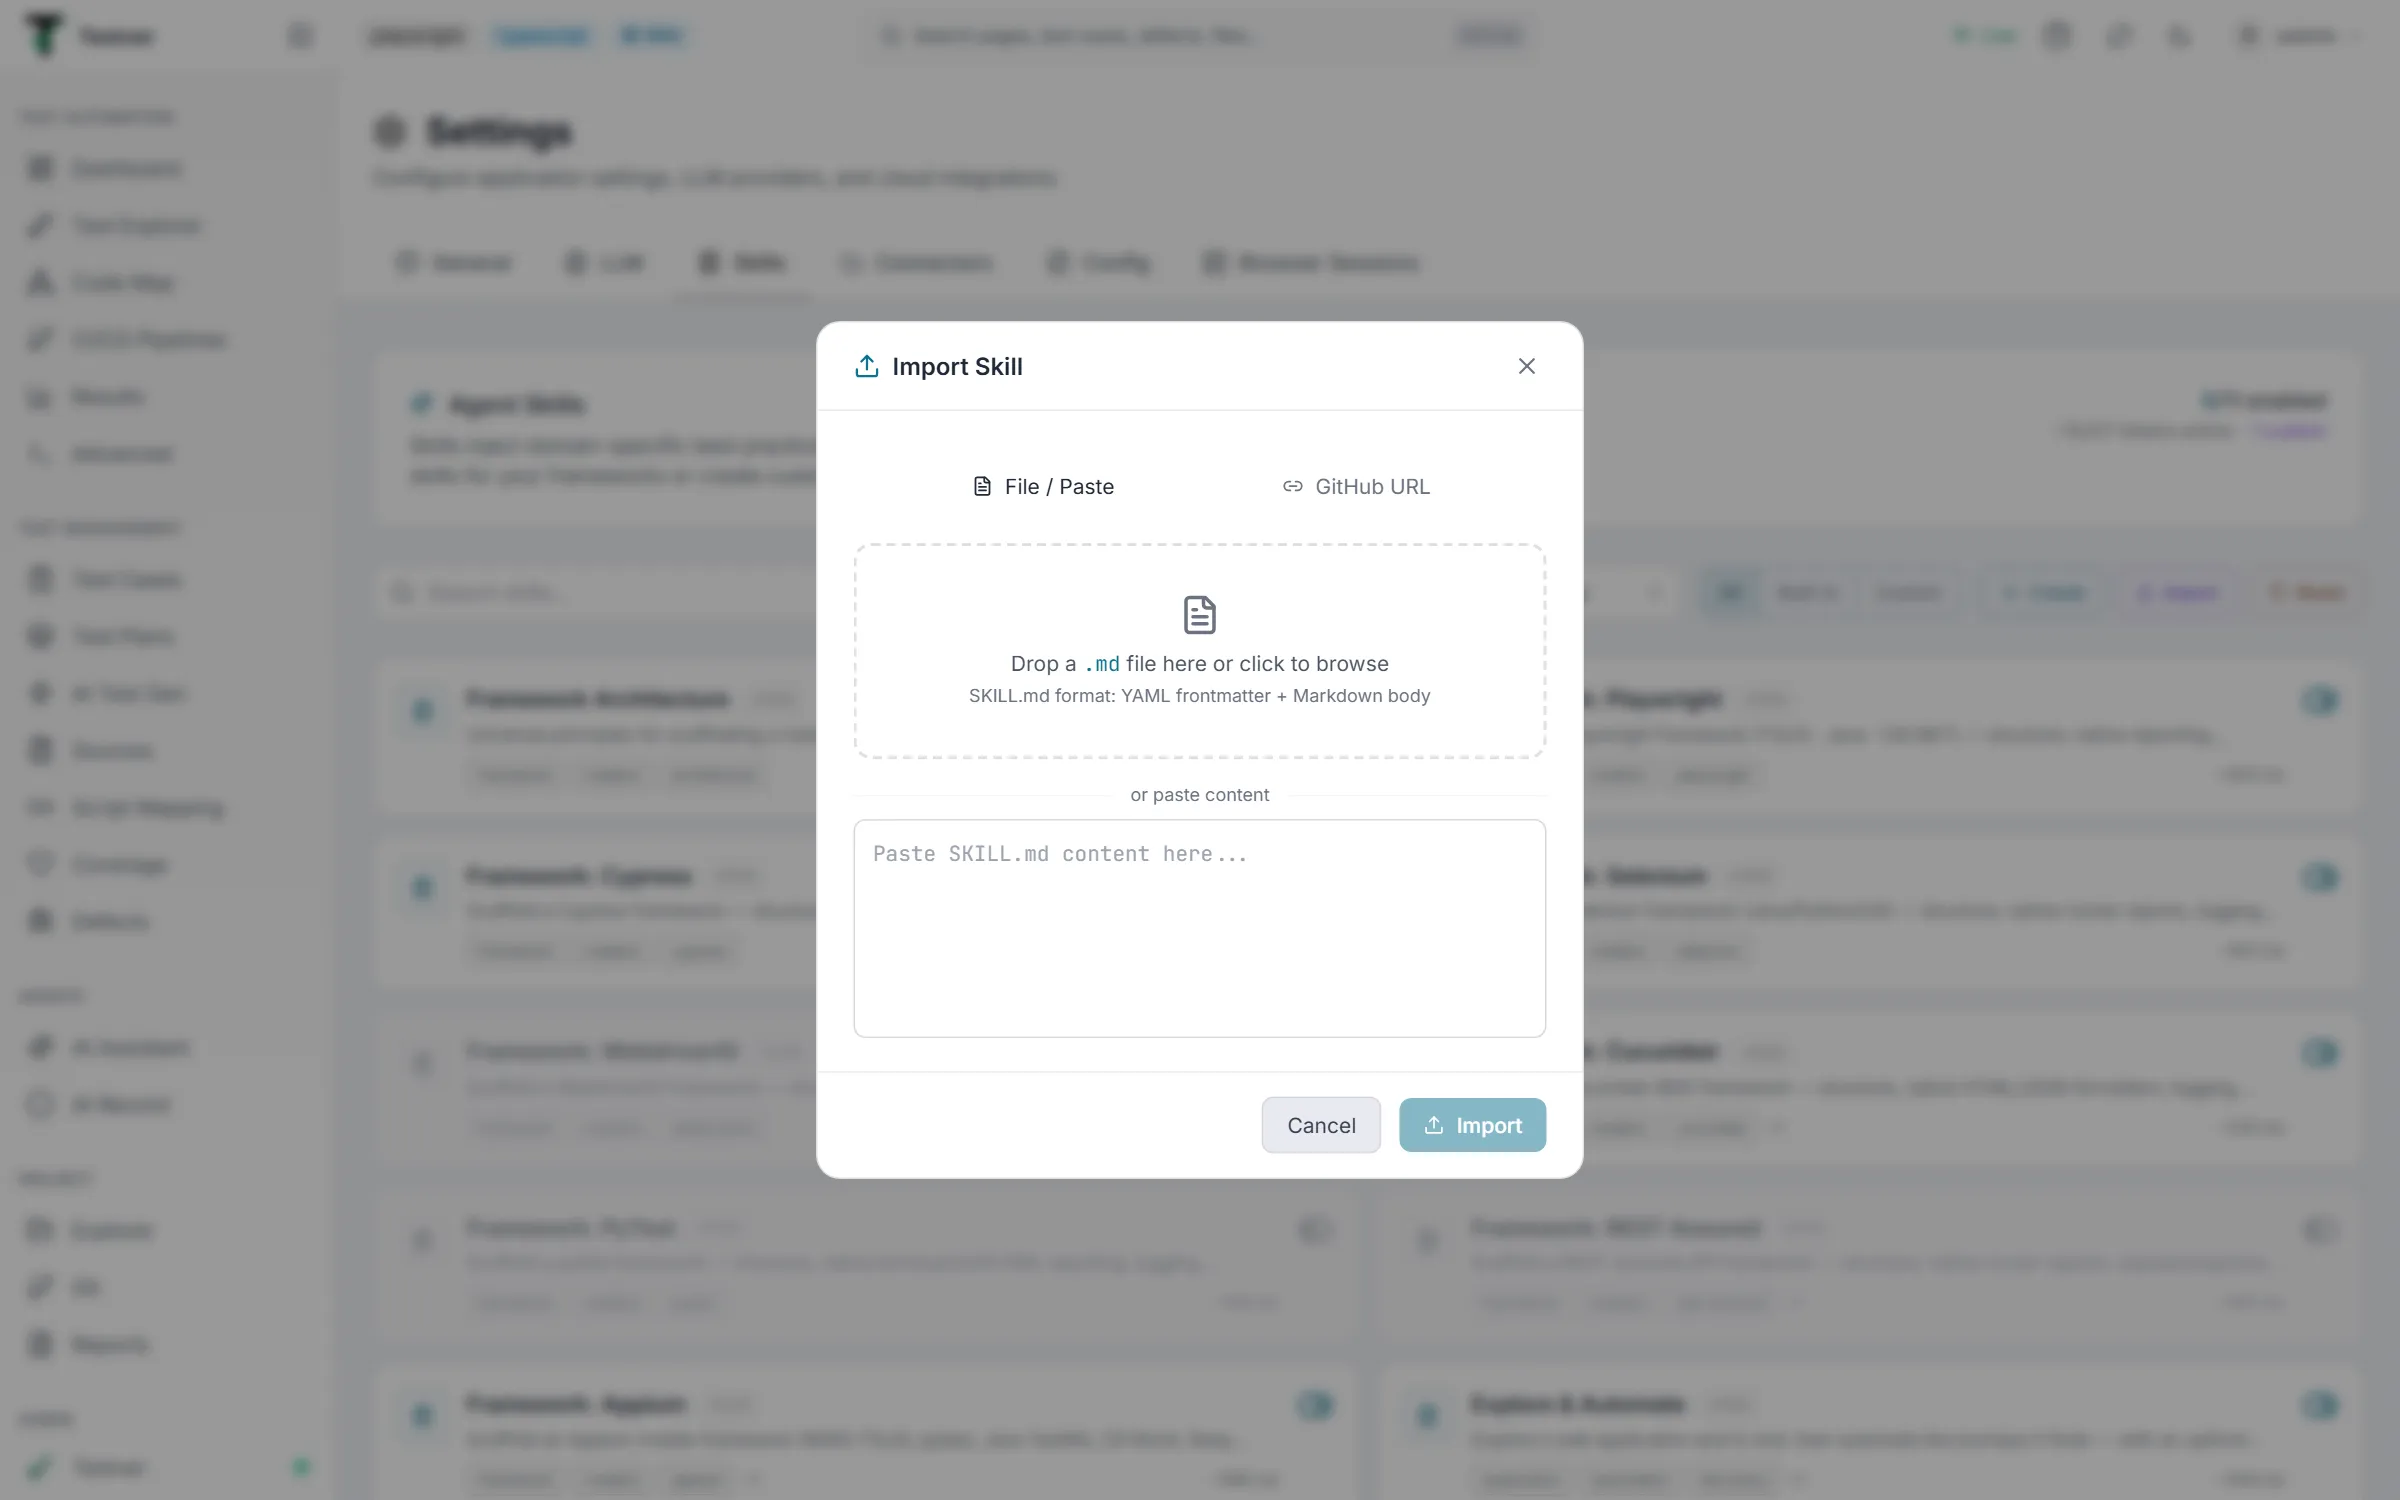
Section titled “Importing a skill”Click Import to open the Import Skill dialog, which offers two modes via a toggle at the top:
| Mode | How it works |
|---|---|
| File / Paste | Drag a .md file onto the drop zone, click to browse for one, or paste SKILL.md content directly into the text area. Only .md files are accepted; the dialog shows a green confirmation and character count once content is loaded. |
| GitHub URL | Paste a link to a skill file on GitHub. Supported forms include github.com/user/repo/blob/branch/path.md, raw.githubusercontent.com/…, and gist.github.com/… |
- Click Import to open the dialog.
- Choose File / Paste or GitHub URL at the top.
- Provide the content (drop/browse/paste a file, or enter a URL).
- Click Import (or Import from URL). On success the dialog closes and the skill appears in your list; any error is shown in red at the bottom of the dialog.
Exporting a skill
Section titled “Exporting a skill”- Export: hover a card and click the download icon (or use the Export icon in the detail view) to save the skill as a
.mdfile you can share or back up. Available for every skill. - Delete: hover a custom card and click the trash icon (or use Delete in the detail view). A confirmation dialog warns that the action is permanent. Built-in skills cannot be deleted, only disabled.
Using a skill
Section titled “Using a skill”Skills are not ‘run’ on this tab, they are made available. To actually put a skill to work, switch to the AI Assistant, type / at the start of the message box, pick the enabled skill, and send your message. The AI then follows that skill’s instructions while answering that message. See Picking skills in the AI Assistant below.
Built-in skills
Section titled “Built-in skills”Explore & Automate
Section titled “Explore & Automate”Most skills teach the assistant how you write things. Explore & Automate is different: it carries a whole procedure. Point it at a running application and it walks the app itself, records what it finds, writes the automated tests, runs them, and files the matching test cases in Test Management — all in one conversation.
Pick it the way you pick any skill: open the AI Assistant, choose Explore & Automate from the skill picker (/), and send your first message.
What it asks you first
Section titled “What it asks you first”The skill will not start guessing. Before it explores, it checks that it has what it needs and asks for anything missing:
| It needs | What to give it | If you leave it out |
|---|---|---|
| URL to explore | The address of the running application. | It asks. This is the one thing it cannot proceed without. |
| Restrictions and pre-conditions | Anything it must not touch, and anything it must do first. For example “stay inside /admin”, “do not delete anything”, “the demo tenant only”. | It explores with no restrictions beyond its own safety rules. |
| Roles and credentials | The roles you want covered — admin, manager, viewer — and how to sign in as each. | Optional. It explores as a guest, and says so in the report. |
Signing in without handing over passwords
Section titled “Signing in without handing over passwords”You never type a password into the chat. When the skill reaches a login page it stops and asks you to sign in yourself in the live browser panel:
- The browser opens on the login page and the exploration pauses.
- You sign in in that panel exactly as you normally would — including any two-factor step.
- A Continue prompt appears in the conversation. Click it once you are through.
- The skill saves that signed-in session and carries on exploring as that role.
Saved sessions are encrypted on disk, tied to the site they were captured on, and expire after seven days. A session captured for one site is never replayed against another. When you later ask the assistant to automate what it explored, it will ask you to put the credentials in your project’s environment or config file so the generated test reads them from there — they never end up in the test file.
What it produces
Section titled “What it produces”| Output | Where it lands |
|---|---|
| Automated tests | Written into your project, run until they pass, exactly as in Web mode. |
| Test cases | One case in Test Management per automated scenario, linked back to its script so the traceability is already in place. |
| Findings | Console errors, uncaught page errors and failed network requests noticed while exploring — real defects it tripped over, not guesses. |
| An access matrix | When you gave it more than one role: which pages each role could reach, and which it was blocked from. |
| A run report | A written summary of the run, with the automated scenarios in a table showing automation status, execution status and the test case ID created for each. |
Multi-role exploration
Section titled “Multi-role exploration”Give it two or more roles and it explores the application once per role, then compares. The access matrix shows every page against every role, and it calls out privilege inversions — a page a lower-privileged role can reach that a higher-privileged one cannot. That comparison is arithmetic over what it actually observed, not an opinion.
What it changes about the tests you get
Section titled “What it changes about the tests you get”Everything it observes is also available to AI Test Generation, which uses it for navigation and control names. That is the difference between a generated step that says “navigate to the Notification Settings page” and one that says “open the avatar menu, choose Settings, toggle the digest row, click Save preferences” — the second one is a step a machine can actually run.
Picking skills in the AI Assistant
Section titled “Picking skills in the AI Assistant”The skill picker (/)
Section titled “The skill picker (/)”Type / as the first character in the AI Assistant’s message box. An Add a skill list opens above the box with every enabled skill — its name, its description, and whether it is Built-in or Custom.
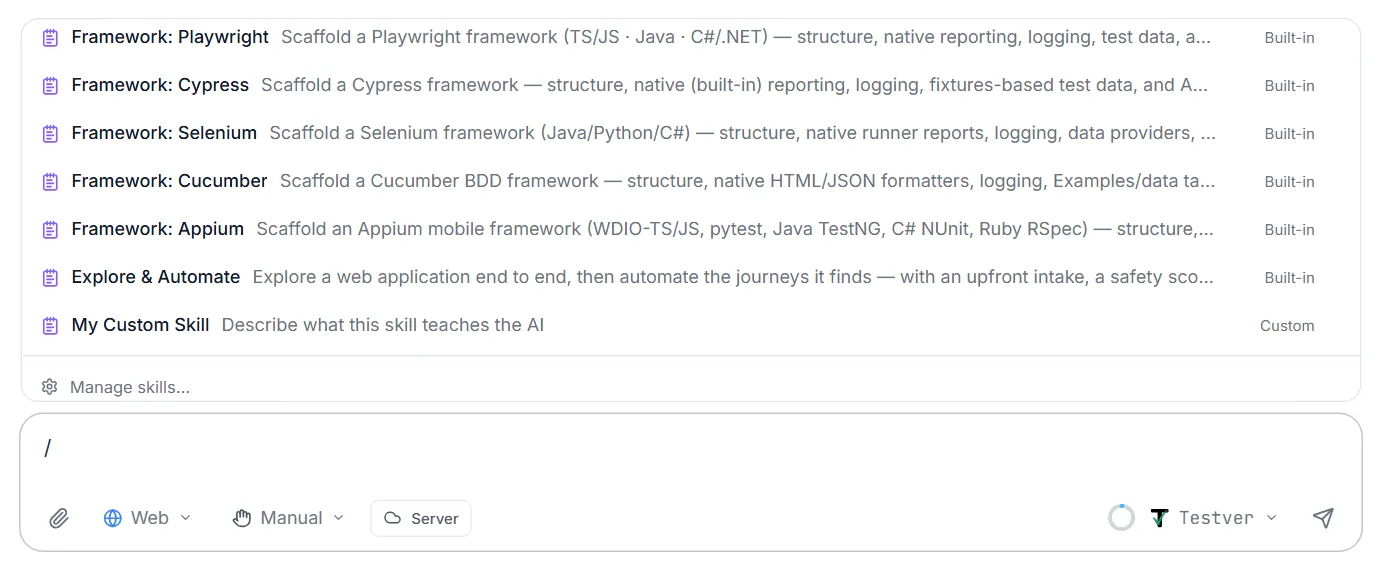
- Keep typing to narrow the list by name, slug or tag (for example
/framework). - Pick a skill with a click, or with ↑ ↓ and Enter or Tab. Esc closes the list.
- The list only opens at the very start of the message, so a
/inside a sentence or a file path types through untouched. - Manage skills… at the bottom of the list opens Settings → Skills.
- With no skills enabled, the list says so and points you to Settings → Skills.
The picker works in Web, Mobile, API and Reporting mode. Ask mode takes no skills, so / does nothing there.
Picked skills
Section titled “Picked skills”Each picked skill shows as a violet chip above the message box, with an x to remove it. Picking a skill that is already picked removes it again (a tick in the list marks the ones already picked). You can pick several — for example Framework Architecture plus Framework: Playwright.

When you send:
- The picked skills’ instructions go to the AI with that message only.
- Your message in the conversation ends with a 📚 Skills used: line naming them, so the transcript shows which skills were in play.
- The chips clear. Skills are never carried over to the next message, to another chat or after a restart — pick them again when you need them.
Common Tasks (How Do I…?)
Section titled “Common Tasks (How Do I…?)”| I want to… | Do this |
|---|---|
| Turn a skill on or off | Settings → Skills tab → click the skill’s toggle. |
| See exactly what a skill tells the AI | Settings → Skills tab → click the card → read the Skill Instructions (Rendered or Raw). |
| Add my own skill | Settings → Skills tab → Create, write SKILL.md, save. |
| Bring in a skill from GitHub | Settings → Skills tab → Import → GitHub URL → paste link → Import from URL. |
| Back up a skill | Hover the card → download icon (Export as .md). |
| Remove a custom skill | Hover the card → trash icon → confirm. |
| Explore an application and automate it end to end | AI Assistant → type / → pick Explore & Automate → give it a URL → answer its questions. |
| Use a skill for one request | AI Assistant → type / at the start of the message box → pick the skill → type your request → Enter. |
| Use several skills together | Type / and pick each one; every pick shows as a chip above the box. |
| Get from the AI Assistant to the Skills tab | Type / → Manage skills… at the bottom of the list. |
Tips & Best Practices
Section titled “Tips & Best Practices”- Enable only the skills you actually use, the header’s tokens active total reminds you that every enabled skill adds to the AI’s context budget.
- Equip per job: enable the skills your team uses, but pick with
/just the few that fit the task in hand. - Pick the skill again on a follow-up message if it still applies — picks clear after every send.
- Export custom skills you care about before using Reset, which deletes them permanently.
Troubleshooting & FAQ
Section titled “Troubleshooting & FAQ”| Question / Problem | Answer |
|---|---|
A skill I enabled doesn’t appear in the / list. | Confirm it is still enabled on Settings → Skills — only enabled skills are listed. |
Typing / does nothing. | The list opens only when / is the first character in the message box, and never in Ask mode. |
| I can’t turn a skill on or off. | Only administrators can change skills; for everyone else the Skills tab is view only. |
| I can’t delete a built-in skill. | Built-in skills can only be disabled, not deleted. Only custom skills have a delete option. |
| Import failed. | For files, ensure it is a .md in SKILL.md format (YAML front-matter + Markdown). For URLs, use a supported GitHub/raw/gist link. The error reason is shown at the bottom of the dialog. |
| My follow-up message ignored the skill. | Picked skills go with one message only. Pick the skill again with / for the follow-up. |
| Will enabling lots of skills slow things down? | No — enabling only makes a skill available. Only the skills you pick with / are sent, each adding its token cost (shown on its card) to that message. |
Related
Section titled “Related”- AI Assistant — where a selected skill takes effect.
- Create a Framework with AI — tutorial for the framework skills, with prompts for every framework.
- AI Test Gen — uses the navigation that Explore & Automate recorded.
- Settings → LLM — configure providers skills run on.